


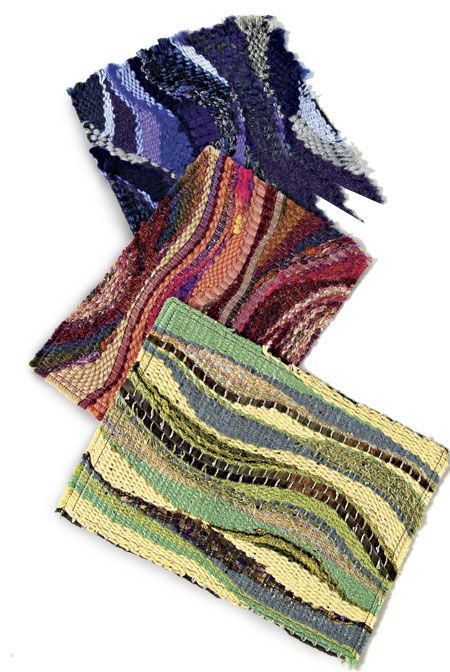
Create intricate fabric with pin weaving.
by Shirley Adams
excerpted from Threads #147, p. 72
Pin weaving doesn’t require much equipment; you only need a padded board for a base that will act as your “loom.” The pin-woven fabric is formed over a piece of fusible interfacing. Once you are happy with your design, iron it to the fusible interfacing to hold everything together. The result is a soft, pliable and beautifully textured fabric.
You can use this technique to weave a rectangle as I demonstrate here, or you can trace a garment pattern piece onto your board to weave a unique design specifically made for your garment, such as a collar or cuff. It’s the perfect way to add texture and color to any of your sewing projects. It’s also portable so you can work on your lap while watching TV or pack it in a tote to take on vacation. Pin weaving is the perfect on-the-go craft for sewers looking to use up scraps from their stashes.
Build a loom
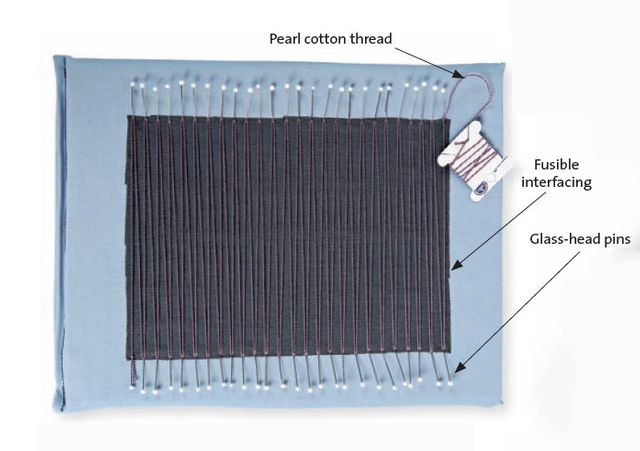
To make the loom, you need fusible interfacing in the size and shape of your desired weaving and glass-head straight pins (glass-head pins are a must because you will iron the piece later). You can use recycled cardboard for the base. Be sure to use a durable fabric to cover it and pearl cotton thread for the warp loom strings.
1. Cut the cardboard. Cut two, 11-inch by 14-inch rectangles from corrugated cardboard with the corrugation running in a opposite directions on each piece — vertical on one, horizontal on the other — to make the loom sturdier. Make the rectangles larger or smaller, depending on the size you want your weaving to be.
2. Cover the board. Cut a 24-inch by 16-inch rectangle from a durable fabric such as denim. With right sides together, fold the rectangle in half, aligning the 16-inch edges. Sew a narrow seam on the raw edges, and leave a 12-inch end open. Turn it right-side out, and insert the cardboard layers. Turn the open end inside, and sew it closed.
3. Position the interfacing and pins. Lay a piece of lightweight, fusible interfacing (the shape and size of the intended weaving plus seam allowance) on the board, fusible side up. Insert straight pins 1⁄3 inch apart to hold the interfacing edges in place. They should lay flat in a row along the longer edges.
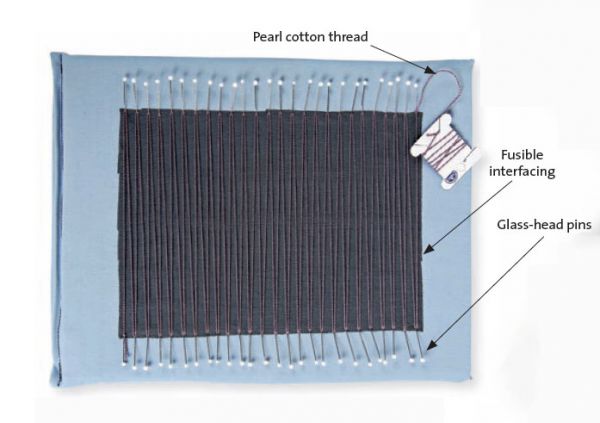
4. Weave the thread. Tie a pearl cotton knot to the first pin. Next, lace the thread back and forth between the pins, as shown above. Then tie another knot on the last pin. Now, your “loom” is ready.
Weave a unique design
To weave the design, you need 20 to 30 pieces of yarn (1 to 2 yards each) and a no. 16 tapestry needle. Choose a collection of yarns, ribbons, and fabric strips with contrasting textures—thick, thin, fuzzy, smooth, matte, glitz—and a harmony of colors, including light and dark choices. If you find creating the perfect color combination difficult, start with a print fabric or magazine ad that features colors you love, and duplicate them in the yarns you choose.
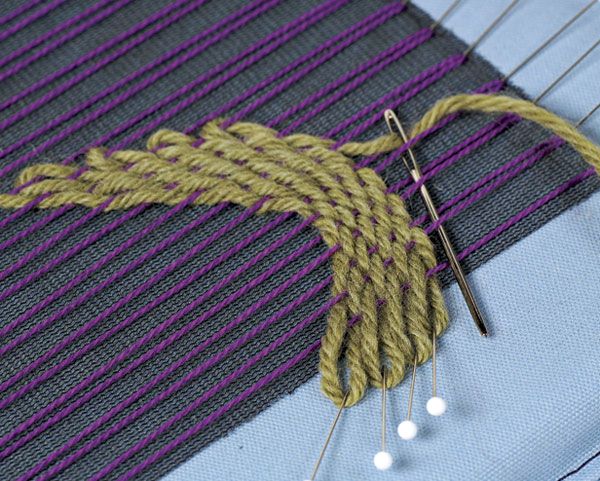
1. Start the weave. To begin, choose a yarn which blends with the rest of your selected yarns. Thread it through a tapestry needle, and start a simple over-under weaving process to form a curve across the loom.
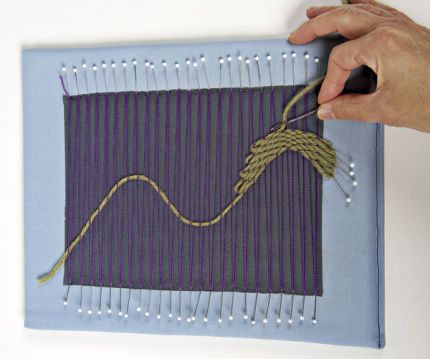
Weave the yarn to form a curve.

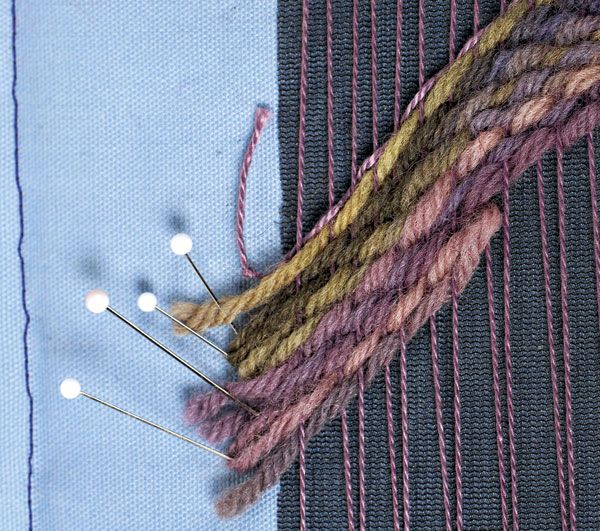
2. Always begin and end on the outside. When weaving your yarns, don’t start or stop in the loom’s center because it throws off the over-under sequence. Leave the yarns dangling on the sides. Use glass-head pins to secure yarns; avoid pulling the motif’s sides. If a yarn is thick or you’ve included a strip of fabric or ribbon, weave it across in one pass, not going back and forth. As the design builds, push new rows close to the previous ones to tighten the weave.

Pin the yarn ends to secure them.
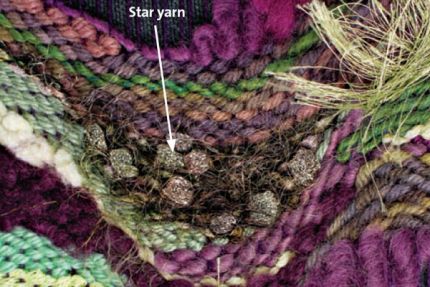
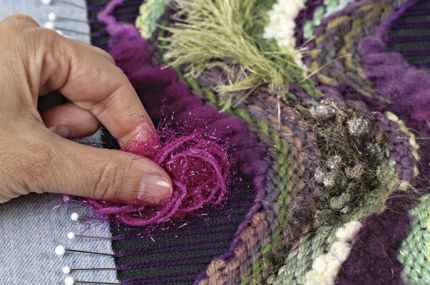
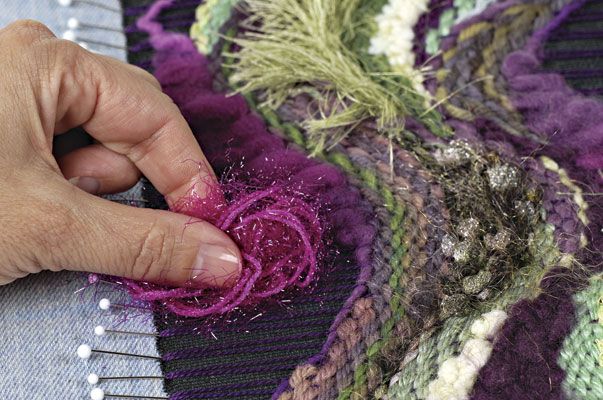
3. Highlight your favorite yarn. Choose a “star” yarn (one that stands out), and weave it to fill in a space along the curve you made in step 1. Weave this yarn back and forth, and with each pass, extend one warp yarn nearer or farther to smoothly blend it into the space; it has more impact if used in a concentrated area.
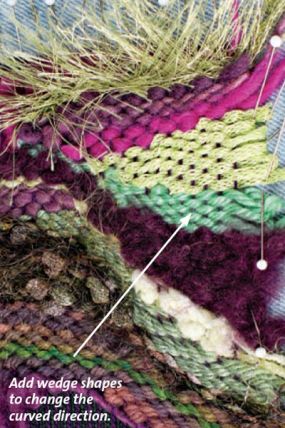
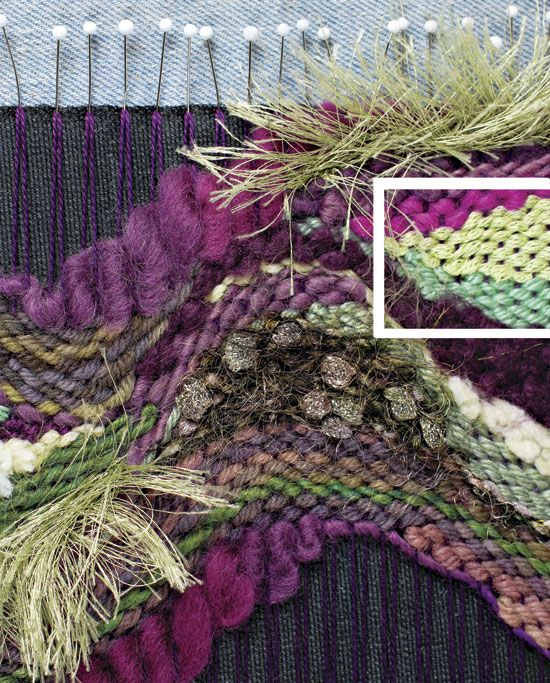
4. Change the curve direction. To avoid monotony, change the curve direction at the sides by weaving wedge shapes from the edge to fill in a void.
5. Check your design. Turn your board periodically so you fill in areas equally. When choosing the texture or color yarn to use next, “try it on” by placing a ball of the new yarn on top of different areas to see where it will best complement the piece before you weave it.
Place balls of yarn on the weave to test your next color choice.
6. Remove unwanted yarns. These abstract weaves often grow on their own—sometimes in surprising and delightful ways. If, however, you regret that bit you just added, remove it, and substitute something more to your liking. You can also push sections around as they freely slide on the warp threads if you want to change a curve direction.
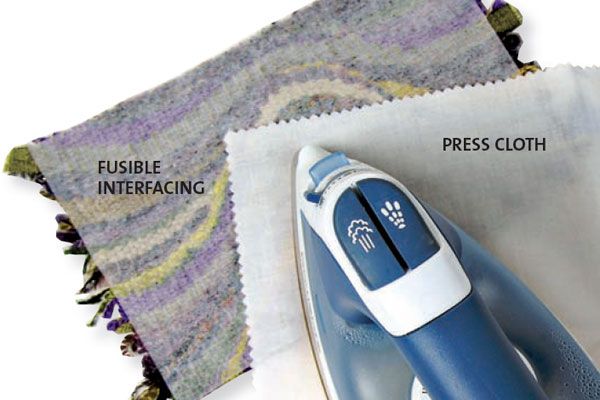
7. Press to finish the piece. When you’ve finished weaving your design, pull out the straight pins holding the yarn tails on each side, leaving the top and bottom pin rows in place. Cover it with a press cloth, and steam-press to secure it to the fusible interfacing. The press cloth is necessary because direct contact with the iron could melt some of the yarn fibers. Remove all the pins. Press again on both sides, and your woven piece is ready to be used as you please.


I tried this, but instead of using a homemade cardboard base, I used a "Cushioned Quilter's Square 'n' Blocker" from June Tailor that I had lying around anyway. (This is just a big padded rectangle covered with canvas that is ruled in various ways to help line up quilt blocks and such.) I just lay the interfacing right on it and then set up the pins and pearl cotton as described. The give in the padding was really handy for the edges, where my weaving got a little snug. In fact, it was indispensable. A fun project that can take as much or as little time as you want, and the results are pretty cool.
I LOVE this idea! I can't wait to try it!
I love this project and I can't wait to try it. I did something similar many years ago. My friend and I used to watch Shirley Adams on the t.v she had a great sewing show !
Thanks threads:)
woolbrain.wordpress.com
This is gorgeous. The textural possibilities it offers are great. I am intrigued at the prospect of using up fabric scraps by just cutting them on the bias and using them instead of yarns. I have such a hard time throwing away scraps of beautiful fabrics and this really may give me a good way to use them up.
A great backboard I've used is foam core board that is available at office and art supply stores in 1/4 and 1/2 inch thicknesses. Two pieces of 1/4 inch can be glued together for a lightweight, non bending stable base that the pins will slip into easily.
This is very interesting...a project that I will try for sure.
I did something very similar to this in Sisters, Oregon. At one of the Stitchin Posts annual outdoor quilt shows. The week before the show they do what they call the Quilters Affair. Since I have run into friends from around the world, I'm sure many of you have heard of it even if you haven't had the pleasure of being there.
We used foam core board, pearl cotton thread and bias strips of fabric. We made vests from our "fabric". It was really fun, but I like the different media used in this idea. I'll have to try it sometime.
I seem to recall Threads doing a feature on this MANY years ago. I think it was a cover story with a vest and it may have been with ribbons. It was beautiful. I have recently begun knitting and can't wait to try this method using all of those left over pieces of yarn. I now realize the necessity of creating "leftovers" on purpose!! Can't wait to try this!
Thanks.
I have been making woven necklaces using the same techniques. I also use various beads and charms to decorate the necklaces and they make one of a kind gifts. The necklaces can be made to match outfits or to add a punch to your wardrobe. I have also experiented with using felting and making these into woven cuff bracelets.
As always I am a great fan of Threads and will use this idea in my one of kind jackets.
Swell, another "must do" project.
I lost my job about 3 months ago, and have been VERY busy knitting, crocheting, sewing, macraming,etc. I'm loving every minute of it. There just don't seem to be enough hours in the day to do all the projects I have lined up. I mean, I have to get to my tatting, quilling, beadwork, etc.
I just don't have time to get a job. Unfortunately, since I support myself and my two sons . . . I will have to . . . eventually. 8-)
Very nice. Any chance you can tell us the purse pattern information?
This is fabulous! Each time I come into this site I spend ages looking at all the fabulous ideas, it is so exciting!
Currently working out a design based on Winnie The Pooh (only the E H Shepard illustrations - not the Disney versions which I really dislike)for my first crib quilt.
I did this yesterday. It looks cool and was lots of fun, however, I did have one issue and wondered if anyone could help. After I steamed using a press cloth all of the texture was lost. It still looks cool, but I'd rather keep the various textures. Any suggestions?
@CarolfromJnO: I read that pressing on top of a folded terrycloth towel helps prevent a textured fabric from being squashed (the towel goes between the ironing board and the right side of the fabric). I've never tried it myself, but perhaps it would work in this case?
To preserve the texture, you could use a thin cotton fabric instead of iron-on interfacing as the backing if you tacked the warp threads to it after you have pinned everything to the board. You'd probably need to put a strip of tape on the board under the backing fabric first so that you wouldn't catch the board cover in the tacking stitches.
After doing the weaving, unpin the piece, pick it up gently, and machine stitch around the outside to secure all the edges more firmly. If you wanted to cut the woven piece, you'd also have to machine stitch just inside the cutting line to prevent fraying.
Thanks to the Threads editors for the interesting inspiration!
I was so excited when I saw this article. I immediately shared it with our students at our new teaching facility, Artisans4Hope. We are working with African, Nepali, Bhutanese, etc. immigrants who are eager to learn new techniques so they can become self sufficient. You should have seen their eyes light up when they saw this idea! We will begin with our next class.
I had such a great time with this! Can't wait to try it with fabric strips! I had to go out and buy some yarn since I don't have the patience for knitting or crocheting and am just amazed with the results! Can't wait to make my first piece into a purse and my second into a cuff!
Fabulous! I've done this kind of weaving before but it never looked this good due to the lack of interesting yarns (due to the lack of a LYS) With the available yarns today this is going to be a fun adventure!
This made me dig out my woven vest fronts that never got put together. They are just as pleasing as when I first wove them--10 years ago. Will finish the vest and do some more weaving using strange and exotic findings!
I loved this idea - therefore, I tried the pin weaving. I also tried the June Tailor Board, which worked out perfectly.
I will using this technique on some pillars!
Love this idea! I used to weave (and spin and dye), so this is a wonderful way to renew that old "friendship" with yarns and weaving. Thanks for this!
lyk it!!!!
Thanks for this post. Noro has so many beautiful threads that will work well with a design like this. I can't wait to try this technique.
3. Highlight your favorite yarn. Choose a “star” yarn (one that stands out), and weave it to fill in a space along the curve you made in step 1. Weave this yarn back and forth, and with each pass, extend one warp yarn nearer or farther to smoothly blend it into the space; it has more impact if used in a concentrated area.
Can you explain this in a different way? I can't work out what this mean "extend one warp yarn nearer or farther"