


Charles Kleibacker
In honor of the late Charles Kleibacker, here is another article from the pages of Threads about this masterful designer.
by David Page Coffin
excerpted from Threads #99, p. 71
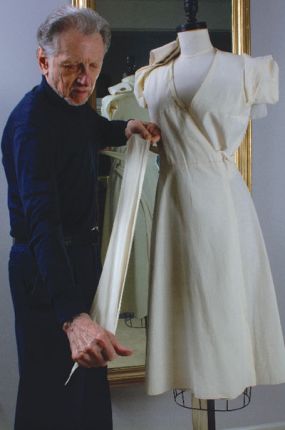
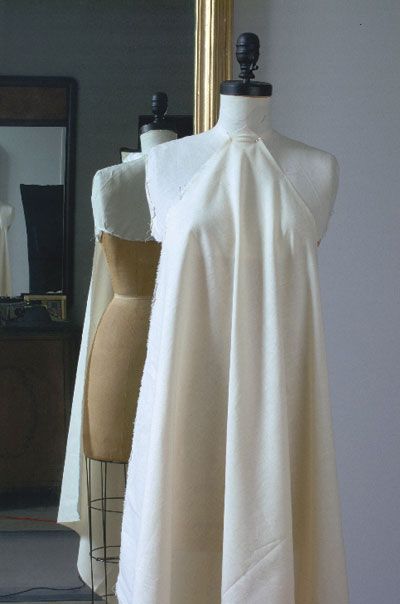
Last summer, I spent a fascinating weekend in Columbus, Ohio, visiting designer, educator, and costume collector Charles Kleibacker. On the second floor of his garment- and memorabilia-packed townhouse, we cleared a small work space, and I settled in behind the camera to record an extraordinary and all-too-fleeting demonstration: the distillation of more than 30 years of professional experience in the creation of couture-quality, bias-cut garments. Drawing from an apparently endless series of overstuffed garment racks, Charles led me through the discoveries and techniques that formed the cornerstones of his technical career, encompassing both the behavior of fabric cut on the bias and the core procedures that he and his workroom staff employed to control and exploit it to such expressive and practical ends. In the following collection of photos and commentary, I’ll share with you what I learned.
Lesson 1 – Fabric cut on the bias is not symmetrical.
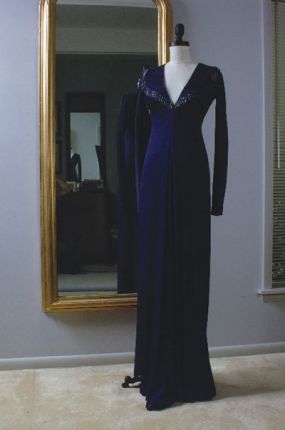
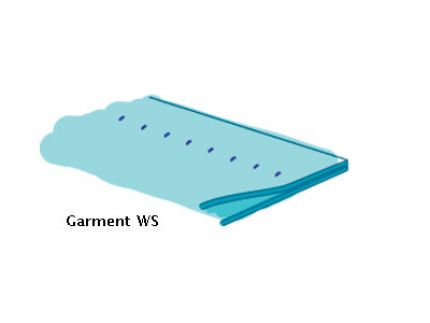
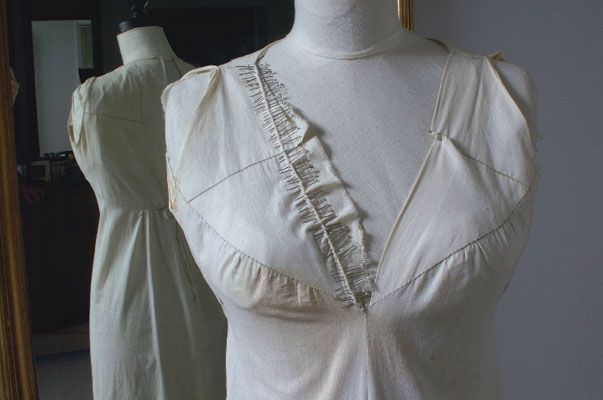
No matter how balanced or similar the vertical and horizontal threads look on any fabric, they always drape differently because they were each subjected to different tensions during the weaving process. To demonstrate the effect of this difference on bias draping, Charles pins a single piece of muslin on true bias (the 45-degree diagonal) to the center front of a dress form. As a result, one side hangs from the lengthwise grain, and the other hangs from the crosswise grain. You can see how the folds on each side of center front fall differently. For Kleibacker, if the object is symmetrical bias draping, a center-front seam is needed to create identical draped folds on both halves (he omits a center-front seam only if he wants to create an asymmetrical bias garment). The process starts with draping in muslin on one side of the form only, up to the central seam. This half-muslin is traced and duplicated to create a wearable muslin for fine-tuning on a live model before creating a pattern. The pattern is then laid out and marked on two layers of fashion fabric, pinned face to face, and thus mirrored for perfect symmetry.

A muslin square pinned to a dress form shows the drape of a true bias.
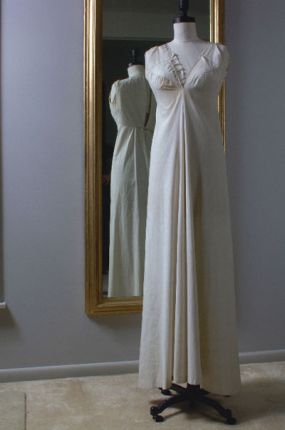
A center-front seam on bias-cut fabric allows identical drape.
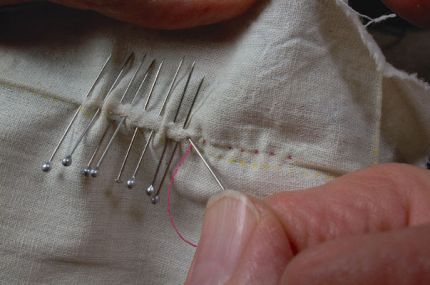
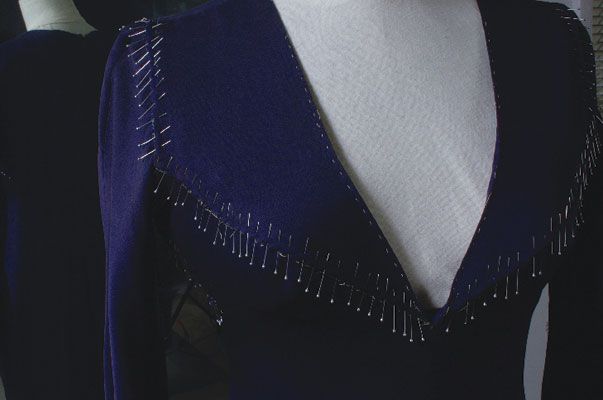
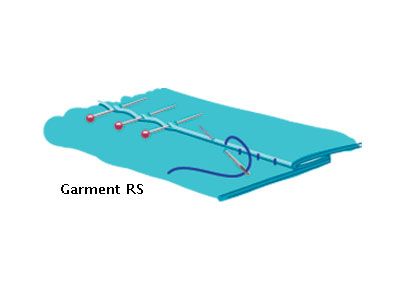
Lesson 2 – Pin and slip-baste from the garment’s right side.
Right-side pinning ensures absolute accuracy, as all seams are prepared and can hang just as they will when worn. Careful pinning distributes ease and allows precise matching of design lines. Once pinned, Kleibacker slip-bastes seams by hand and then permanently machine-stitches them from the wrong side. Slip-bastings are removed before the seam is pressed.
Garments are pinned from the right side to ensure accuracy.
In the sleeveless muslin prototype for this garment, you can clearly see the painstakingly pinned easing typical of a draped, bias-cut Kleibacker garment beneath the bustline seam and the neckline, which has been simply pinched on the right-hand side to show the exact amount of excess length. The eased fabric is not steamed flat in the muslin but will be carefully steamed and pressed to lie perfectly smooth in the fashion fabric.
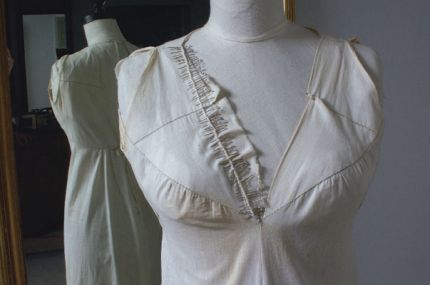
Typical easing on a Kleibacker neckline is painstakingly pinned.
Kleibacker is particularly fastidious about easing away any hint of gaping in a neckline. He recommends that this be done to improve patterns that don’t include it. Here, on his 1970s designer pattern for a wrapped dress, he has added both a seam and easing to the left-hand bodice to eliminate the gaping in the unaltered right-hand neckline.
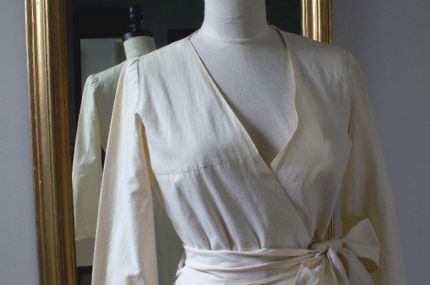
A seam and easing eliminates gaping on the left side of the dress.
Lesson 3 – Fabrics cut on the bias either have “drag” or “lift.”
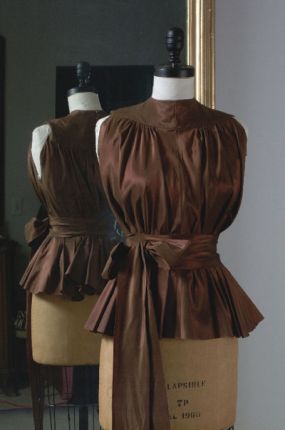
Fabrics such as crêpe, jersey, and charmeuse are among the fabrics that can be said to “drag” or “drip” on the bias. Fabrics such as taffeta, chiffon, broadcloth, and organza float or “lift” on the bias. Either type can be adapted to create a beautiful garment, but drag is better suited to revealing the form underneath, and lift is better suited to conceal it.
Soft fabrics (left) and crisp fabrics (right) drape quite differently.
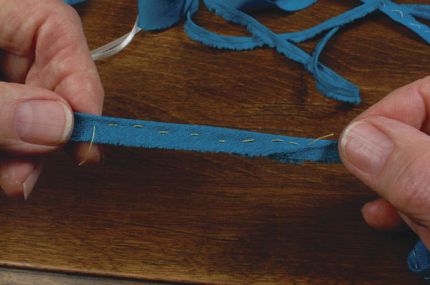
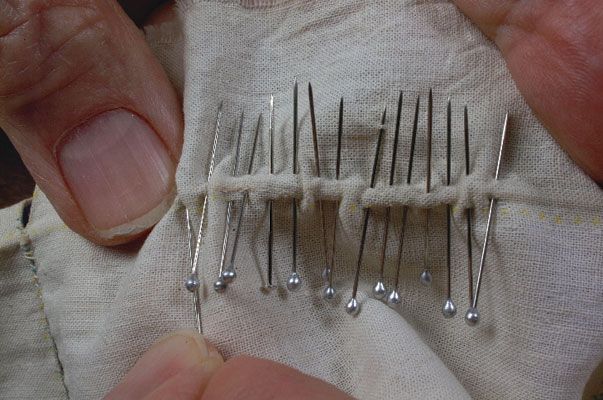
Lesson 4 – Ease a neckline by pinning it to a length of seam tape.
No matter how plunging the necklines on his dresses, Charles always wanted to be sure the wearer would be comfortable in the dress without the neckline gaping. The technique for easing away a gaping neckline is tedious but not especially challenging. It requires the seam allowance of the neckline to be used as a hand-overcast self-facing (so the neckline edge is a fold, not a seam) with the fabric eased into thin, stable rayon seam tape. To determine the length of the tape, pinch the excess fabric at the neckline into a small fold, measure the adjusted neckline, and then mask this measurement on the tape. Pin the tape at each end of the neckline, and ease the fabric to the tape with closely spaced pins.
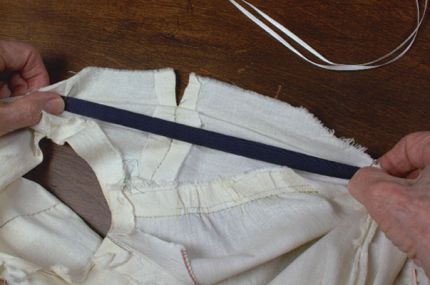
The neckline is eased into measured seam tape.
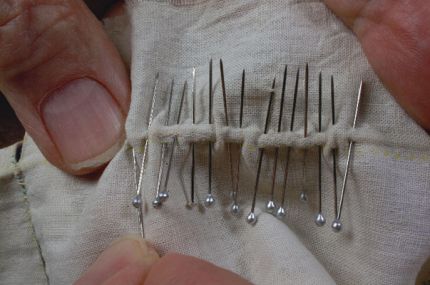
First, pin to ease the excess into the seam tape.
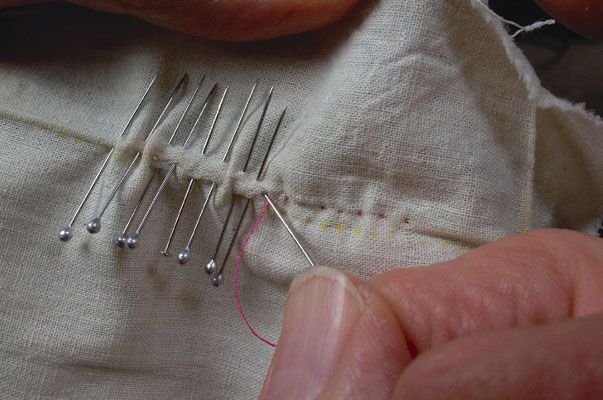
Next, make a row of tiny, permanent running stitches just to the inside of the neckline fold, using a very short needle and a single strand of size-A, matching silk thread.
Then, use a short needle to sew the excess to the seam tape.
Carefully press from the inside of the garment to render the easing invisible.
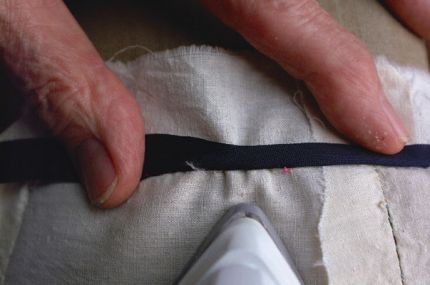
Press from the wrong side for a smooth surface.
Properly pressed ease is invisible.

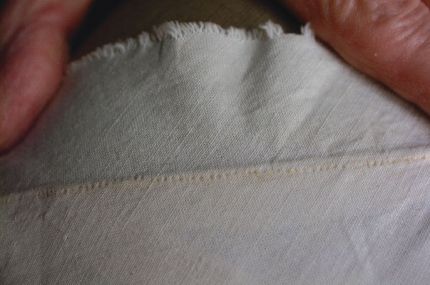
Seam tape also prevents stretching.
In the Kleibacker studio, all neckline (and top back edges to many designs) were eased with seam tape to reinforce them and prevent any possibility of stretching. For the muslin, the seamline at the bust was eased differently. Here, a tiny hand-sewn running stitch was made both at the seamline and just above it in the seam allowance. These two threads were pulled to the desired measurement. The fabric was carefully pressed on the wrong side and then pinned to the corresponding seamline for slip-basting.
To Slip-Baste A Right-Side Pinned Seam

After carefully pinning any seam from the RS to establish its position or to arrange an eased seam, slip-baste by working a short needle through the bottom layer, using a running stitch that comes up into the edge-fold of the top layer.
When ready to sew, turn garment inside out, and unfold the seam allowance. Then machine-stitch on top of the slip-basting. Slip-bastings must be removed before you press the seams.
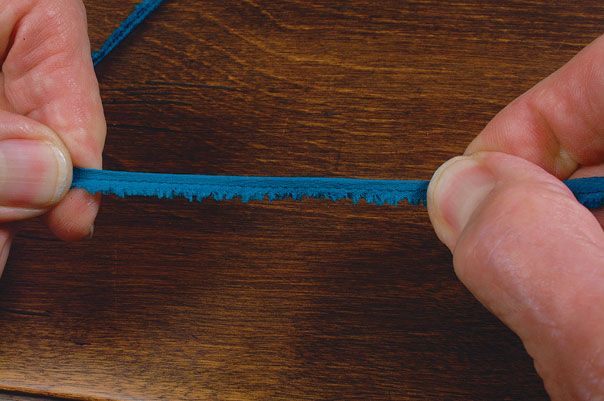
Lesson 5 – Baste some bias seams before cutting, and stretch them while machine-stitching.
After transferring the seamlines from the pattern to the layers of fabric positioned right sides together as described in lesson 1, the bias seams were always hand-basted while still flat on the cutting table and before the pieces were cut because bias edges tend to stretch once cut. Certain bias seams, typically center-front and center-back seams, edges of sashes and bands, and the narrow cording often called “spaghetti straps” were also stretched during the machine-stitching process, ensuring the seams would never break. (Bias seams joining asymmetrical pieces were usually not stretched.) To allow for this intense stretching, such seams must first be hand-basted with short, overlapping running stitches. To do this, start at the seam end with a knot, baste about 6 inches, and cut the thread. Then, without knotting the end, baste another 6 inches, overlapping the last few stitches of the preceding basting. Repeat about every 6 inches, tightly securing the basting at the very end. To make spaghetti straps, cut true bias strips 3/4 inch wide, fold them in half lengthwise, hand-baste with overlapping running stitches, and then stretch as strongly as possibly while machine-stitching along the center of the strip. Turn without trimming the seam allowances, allowing them to fill the turned tube. For maximum skinniness, stretch the straps on the ironing board, pinning the ends. Steam heavily by holding the iron closely above them, restretch, and let them dry.
Sew short overlapping lengths of basting stitches before stretching fabric, and stretch the strap while machine-stitching.

Stretch the strap while machine-stitching.
Charles Kleibacker stretches a bias band after it has been machine-stitched to make sure it shows no signs of broken thread.


This article is very helpful, but sometimes difficult to read. There are many typos and it was obviously not edited.
Thanks for letting us know about the error. I believe all of the edits have been made now.
This is a very fascinating article to read. I did also find some typos, but I honestly cant get enough of this kind of information. Thank YOU.
I loved this article. Thank you so much for posting it. What a knowledgeable and talented man . . . The posting of this article in his honor was a very nice gestsure to Mr. Kleibacker's memory.
Wow. What a privlege to be able to learn some of his secrets. I didn't notice any typos... I was enthralled with imagining how his fingers just "knew" what to do. I would love to have a whole book of what he knew!!
I agree that this is a lovely way to pay tribute to such an innovative and vital person in the fashion industry. I'm so happy to read (in part) how he achieved such wonderfully crafted garments. (Side note to Vicky: there are still a handful of typos in the article after editing, but I could still understand what was intended. If you need copy editing help, I'd love the job! Just let me know! Seriously! :o) )
Wow! I love it. I might be able to sew if I can do it by pin and baste-by-hand. I have never been able to do the machine part even though I can spin a fine thread and weave a fine cloth. I may just need "permission" to pin & baste my way through a garment.
"Bad Spellers of the World, Untie!" I don't recognize typos, so they never bother me. ;o)
Trabajar al sesgo requiere de sierta pericia y mucha paciencia, para obtener un trabajo de alta calidad. Los vestidos, blusas y faldas cortadas con esta técnica garantizan una figura esbelta y delicada. Este tutorial constituye un elemento fundamental en el aprendizaje de los diseñadores de moda, modistos y costureras. Muchas gracias por permitirnos tener al alcance estos conocimientos.
What a wonderful article!! I too would love to have a book on Mr. Kleibacker's work. I so enjoy these type of articles.
Sorry, ladies, but the typos drive me nuts... :) I was a proofreader for Harcourt Brace in my college days, and they literally jump off the page and assault me!
The article and photos are wonderful. These are the kinds of articles that make me wish I could sit at the sewer's feet and learn in person. Sometimes it's hard to understand exactly what's being done unless you actually see it done.
Thanks for sharing!
The typos re spelling may be corrected, but as a former Occupational Therapist the references to right side vs left side of bodice appear backwards. I'm looking for the right side of the bodice, not the right hand side of the picture. Loved this article when originally published, but it seems more precious now.
Whoops, I think I created a dangling something or other. I am the former Occupational Therapist, not the bodice or picture of it. Guess there should have been a "to me to be" between "appear" and "backwards". Oh wait, that's not correct, either. Now I'm nervous about the grammar police. Hope they're not "coming to take me away, ha ha!".
I had a class with Mr. Kleibacker in the late 1980's at Wayne State University in Detroit. We drape his famous bias skirt. He always encouraged you when you thought you couldn't get your running stitch any smaller. He will sorely be missed.
David, What a blessing it is that you share the experiences that you had with Mr. Kleibacker. Thank you!
The attention to detail in the construction process, figuring out what works and why and then taking the extra time to do it in the way that will produce the best results is one of the things that sets people like Charles Kleibacker apart.
it also shows us how the masters approach things ... they care! A LOT. They pay attention – close attention.
This is fantastically helpful information for all of us so that when we want to make something cut on the bias we can do a better job of it. And, if we apply those same high standards to everything we sew we'll aways get better results.
Vicki, thanks for putting this up and for the time you spend editing and re-editing ... paying attention to all those details for all of us picky peop ... er... detail oriented people. I bet ol' Charles K. would approve.
Fan-dan-tastic! Enjoyed reading about this intuitive, textual (no pun intended) man. You just "know" his fingers can do this automatically, without thinking. How gifted is that? Speaking of gifts, if we remember not to shoot the messenger, we can all appreciate some pretty great "message gifts". If we get bogged down in semantics and pickiyune stuff, we may discourage others from contributing for our benefit as this article does. Some of us are more into "the doing" of it than the writing of it, and, darn it, some of us, it seems can do it ALL! I guess there's room for all of us. If it shrieks at you, try to calm down and see what it's SAYING. When you write your own book or article, you can make it perfect and we'll all cheer for you! /j/
Thank you to the universe that there was a Charles Kliebacker, how fortunate are we that he would share his genius before his passing? I have a passion for cloth cut on the bias. Hope I can acomplish half his contribution. Thank You Threads.
What an amazing designer! I wish I had knew more about him while he was alive...his work is so beautiful and timeless. Simply elegant!
Very interesting. Anyway, there's something I don't clearly understand. What are those yellow dots on picture two on page 3? I suppose it's not the running stitch - it should be pink. Where is the running stitch then? Thank you for help!
Regarding #4 - where can you GET rayon seam tape? it seems to be no longer available. Is there a substitute??
thanks