

I’m a pack rat, and I collect a variety of things: old sewing tools and notions, patterns, fabrics, even sewing myths. Through the years, I’ve seen many recommendations and sewing misconceptions that don’t work or are bad advice, so I’ve selected a few to discuss here.
Here are some of my favorites:
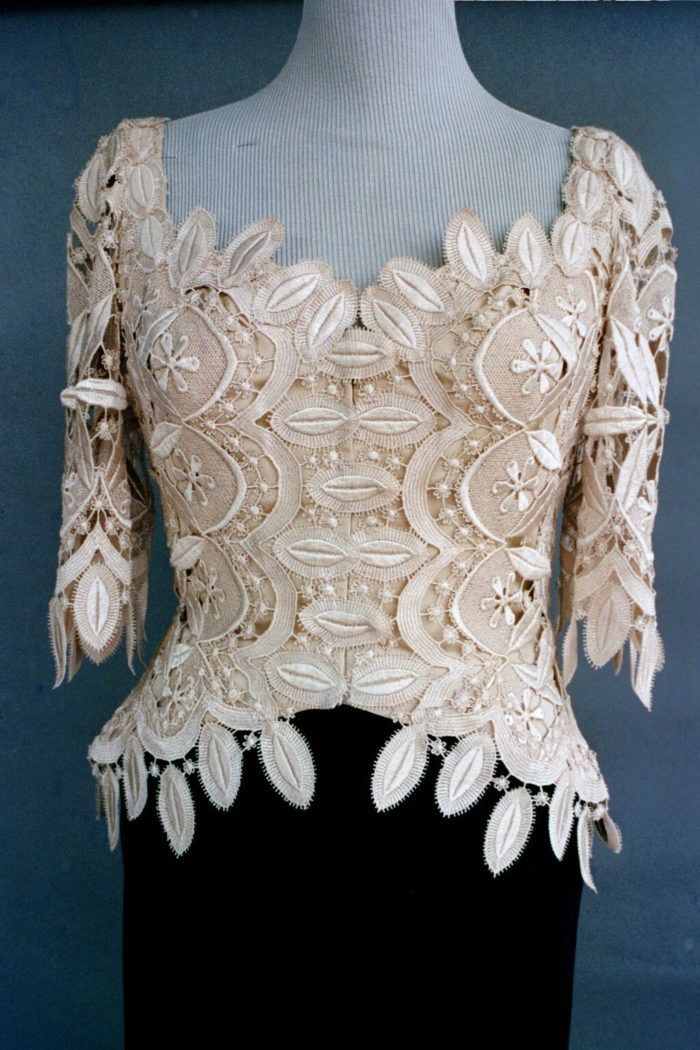
Myth 1: Lace doesn’t have a grain, so you can cut it in any direction.
Reality: This is true, but it requires careful planning to be successful since most laces have more stretch in one direction than the other. More importantly, many laces have a pattern with a directional design.
|
|

Myth 2: A Hong Kong binding is the best seam finish on couture designs.
Reality: Generally, the best finish is hand overcasting. It is flatter, less bulky, and drapes better; and it is less likely to show on the right side of the garment. The Hong Kong finish is more attractive on unlined jackets, but very few of these are couture.

Myth 3: When quilting a garment, it is OK to quilt some rows up and some down.
Reality: Your quilted garment will be more attractive when all rows are quilted in the same direction.
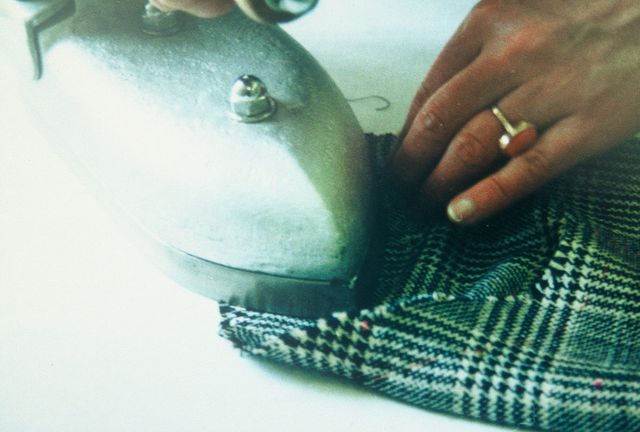
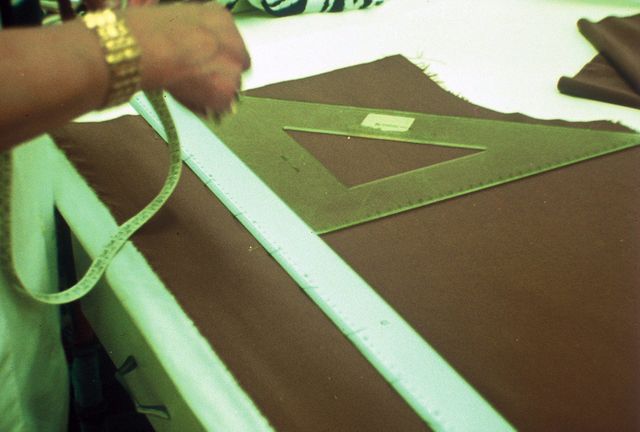
Myth 4: When cutting bias, fold a corner so the warp or lengthwise yarns are parallel to the weft or crosswise yarns.
Reality: To cut the bias more accurately, use a triangle with a right angle. Spread the fabric and straighten it on the table. Align one short edge of the triangle with the warp, and mark the bias along the long edge.

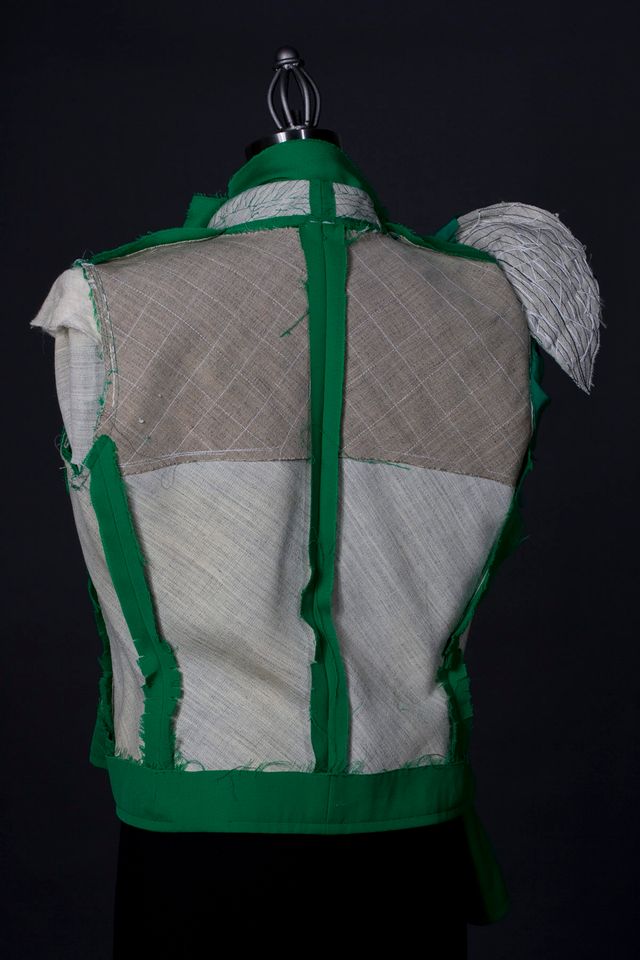
Myth 5: The underlining or backing should be smaller than the fashion fabric.
Reality: This depends on the fabric and underlining material. When the underlining is a crisp interfacing, such as hair canvas, it should be slightly smaller so it won’t buckle under the fashion fabric but will restrict the give or stretch of the garment. To mitigate this, Yves Saint Laurent frequently underlined wool jackets with hair canvas cut on the bias so it would move with the body and not restrict the give.

Myth 6: When underlining a garment, trace the stitching lines on the underlining material. Then use the underlining as a pattern for cutting the fashion fabric.
Reality: This works only if the underlining and fashion fabric have the same amount of give or stretch. For example, this technique works well when you are underlining a firmly woven fabric (such as dupioni), which has no give, with silk organza. When underlining wool fabrics, such as wool crepe, silk organza doesn’t have enough give and your wool design will fit like a silk garment. For wool crepe, consider easing an underlining with no give to the fashion fabric, cutting the underlining on the bias, or a backing material with spandex.
Myth 7: Always cut off the selvage.
Reality: Charles Frederick Worth, the father of haute couture, always left the selvages on so the customer could see the quality of the fabric. In fact, on many Worth gowns, the selvage is used as a trim on the face side of the garment. To avoid a problem, if the selvage will shrink, clip the edges so they will lie flat.
Myth 8: When setting sleeves, shrink out the ease only on the seam allowance.
Reality: In Valentino’s couture workrooms in Rome, I was surprised to see the staff shrink past the seamline about 1 inch onto the cap itself. Try it. You’ll be pleased with the results.
Myth 9: When adjusting a pattern that is too small in the bust, divide the amount needed by 4 and add that amount to each front and back section. For example, if the blouse is 2 inches too small, add 1/2 inch to each front and 1/2 inch to each back.
Reality: The back doesn’t need an added amount for a large bust. Add 1 inch to each front section. The reverse also works when you are adjusting for a broad back.
Myth 10: Always place a button at the bustline to prevent gaping.
Reality: The button locations should be determined by the number of buttons and the locations of the top and bottom buttons. If the garment gaps at the bustline, the front is too small.

Myth 11: If a coat’s edges swing toward the side seams, add a triangle to each front edge so the edges will hang parallel at center front.
Reality: The edges swing to the sides for two reasons: The coat isn’t large enough at the hips, or the front edges were not stabilized and have been stretched. When the front edges are taped, they should hang parallel to each other, even when the coat is not fastened.
Myth 12: Shape the waistband on skirts and pants so the upper edge is shorter than the lower edge.
Reality: This is a good idea when the top of the band sits at the waist. When the bottom of the band sits at the waist, it should be shorter than the top.
Myth 13: Your waistline is at the top of your skirt or pants.
Reality: Your waistline is where your body is smallest, or about 1 inch above your navel.
Myth 14: Never press over basting threads.
Reality: Basting threads are often used to hold the layers in place for pressing. To avoid pressing imprints, use lightweight silk thread or basting cotton, which is soft and has no finish.
Myth 15: When stitching basted seamlines, stitch next to the basting threads so they’ll be easy to pull out.
Reality: This works well on simple, straight seams. However, when basting intricate seamlines, always stitch on the basted lines for accuracy. The threads are difficult to remove, but the results are worth it.
Myth 16: If the basting threads are difficult to remove, it’s OK to leave them in.
Reality: When the bastings are left in, you cannot press as crisply as when they are removed.
Myth 17: Always machine-staystitch necklines to prevent stretching.
Reality: If you thread-traced the seamlines by hand, the thread tracing will serve as staystitching.
Myth 18: When making a plaid jacket, match the plaids on the fronts and backs at the shoulders.
Reality: This can be done if the back shoulder has no ease, but the garment won’t fit well and the placement of the plaids on the jacket back may be unattractive. For most plaids, begin planning the placement at center back. If the jacket has a collar, match the center back to the collar.
Myth 19: When cutting a sleeve from a plaid pattern, align the center of the dominant plaid with the shoulder point.
Reality: Before cutting, consider the relationship of the vertical color bars on the front and the sleeve. Then cut the sleeve so you have a pleasing relationship as the eye moves from the front to the sleeve. This will help avoid positioning two of the same color bars next to each other.
Myth 20: When sewing a zipper by hand, use pickstitches (short, nearly invisible backstitches).
Reality: In haute couture and expensive ready-to-wear garments, running stitches are used because they move with the body and don’t restrict the fabric, making them less likely to show.
Myth 21: When stitching a princess seam on a plaid or fabric with horizontal stripes, you can distort the seam to match the fabric pattern above the bust. Don’t worry about the excess fabric on the side front at the end of the seam.
Reality: When you force the horizontal stripes to match, you remove the ease in the side front, and the garment won’t fit properly.
Have any of these sewing myths made the rounds in your sewing circle? What are some sewing myths that you’ve come across that were not listed?


Thanks Claire, all excellent points. AM making couture sewed car coat - will use many of your pointers.
I am so grateful for these tips but I do not understand # 8:
How does one "shrink past the seam line" - or, for that matter, shrink on the seam line.
I'm truing to learn.
What a wonderful piece! This goes into my "keep" file.
Thank you for your myth busters! These are great!
Some people think you don't have to preshrink all fabrics, just cotton and other natural fibers.
There are many ways to shrink fabric. I thought all I needed to do was to preshrink the fabric with the same temperature I planned to use once it was a dress or skirt, but...
Someone helped me with the wash and used a higher temperature AND put it in the dryer, when I was using cold and air dry. Well? It shrunk more. Being a knit, it shrank up and out. The sleeves still come to my wrist, but the shoulders are dropped now and the top doesn't tuck in and the skirt lost about eight inches...
I still recommend a finish that rolls the edges of brocade. It shreds. Although that hand sewn edge looks good for other things!
Thank you for your collection! I will find a way to save it.
Disagree with #10. if the button isn't placed between the largest part of the breasts, all one has to do is move a bit and the blouse will gap open. I have sewed little snaps there or safety pinned it there to keep a purchased blouses from gapping.
also: that sign "Now Available On Google Play for Android Devices! is blocking the copy.
I'll be breaking some of those old rules now! I have a questions about #17. What is thread-tracing on the seam line? I've always had the suspicion that stay-stitching by machine could have caused some stretching just by the extra handling, even though I have tried to be careful with the fabric.
I agree with JudyinMerida. I've done custom sewing and alterations for 20+ years. Large busted women who don't want to wear tent tops or dresses need buttons at the fullest part of the bust. I place a button at the top of the placket and at the fullest part of the bust then divide to have the buttons distributed in a pleasing fashion down the front of the top or dress. It's pleased my clients. I did like the other hints.
Thanks, Claire. My fave is number ten. It's amazing how many of these exist to accommodate ill fit.
I while back you asked for myths on facebook as you were working on this article. I was thinking of superstitions and gave you that instead.
A lot of the myths were just personal opinions of the teacher or for practical purposes. IE. Limitation of skill or tools. I will have to think back for I have gotten many in my schooling and tended to dismiss them quickly. I do remember one instructor said I could not mix linen and wool together in a garment. I made a lovely gathered full skirt in cream & pearl grey linen with a beige summer wt gabardine for the inverted pleats at CF & CB as well as for the pocketing.
Although the combo was not conventional, the skirt hung well and cleaned up nicely. It just wasn't perhaps a good idea for a mass produced garment. She later agreed that the results were nice.
The important point is there is a time and place for everything.
Am I the only one frustrated but the "Now available on Google play..." bar? I want to be able to see and read the article that I have linked to and this bar prevents it. Makes me not want to bother to access the articles and I will seriously reconsider when it comes time to join Threads Insider if I have to deal with this nonsense. And no I could not move it out of the way or deleat it.
skyemom: You should not be experiencing the issue you have reported. Our team is looking into resolving this problem. Thank you for your feedback!
Evamarie Gomez
Web Producer
Threads
I've never heard most of these myths. Good thing I guess. I've been stitching my zips in with running stitches always!
I am not familiar with the term 'shrink out' with the sleeve seams. Could you explain or link me to a video? Thanks.
Hello! Great tips (although my English is pretty rusty regarding technical sewing jargon :) ) I have a small question if anyone may help : I'm making a *guipure straight cut top, for a customer. The sleeves are straight, 3/4 length, the sleeve head is puffed (about 1,75"). Because the guipure (lace) is transparent, and I want it to stay nicely frilled and up, what material could I use to stiffened it? I thought using a curved strip (2" wide) of silk organza, fold in 2 to avoid edge, sewn in the same time than the lace. Or may I saw an off-white silk crepe bias around the seam of the sleeve (also around the garment armhole for a neat finish)? A long off-white silk crepe skirt comes with the lace top. I will take any suggestions. The wedding is end of March, and i'm starting to stress :))) Thanks and keep up the good work!!
*(Net lace with add-on of some kind of piping on themotifs, which enriches it, and make it more stiff and heavy)