
Understanding Thread Tension on Your Sewing Machine
Learn how to use the tension devices on your sewing machine and understand proper thread tension.

Learn how to use the tension devices on your sewing machine and how to thread for proper tension.
Don’t stress over finding the correct thread tension on your sewing machine. Here’s what you need to know about setting and adjusting thread tension dials.
Many sewers avoid the tension dials on their sewing machines like the plague, certain they’ll only make matters worse if they make adjustments. In fact, there’s nothing mysterious about setting and adjusting thread tensions on your sewing machine, whatever its make and model. What’s potentially more confusing is that many apparently tension-related problems are caused by factors other than misadjusted tension dials.
Let’s look closely at how to identify and correct “tension” problems, with and without touching the tension settings.
Tension devices and proper threading
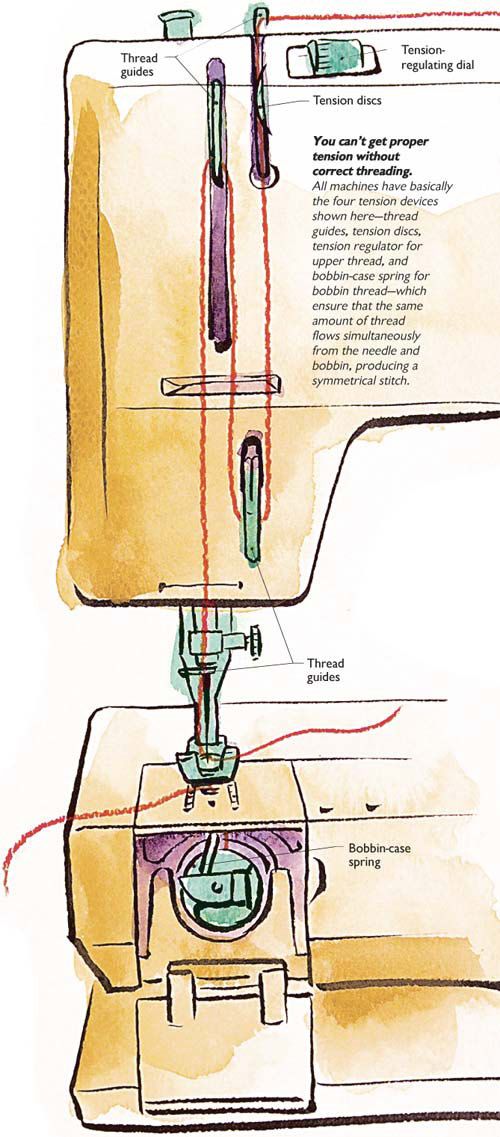
You can’t get proper tension without correct threading.
All machines have basically the four tension devices shown: thread guides, tension discs, tension regulator for upper thread, and bobbin-case spring for bobbin thread. These ensure that the same amount of thread flows simultaneously from the needle and the bobbin, producing a symmetrical stitch.
Meet your tension tools
In order to form a row of stitches that looks the same on both sides of the fabric, the same amount of thread needs to flow from the spool and the bobbin simultaneously. This is accomplished by running the threads through various tension devices, including the thread guides, tension discs, and tension regulator on the machine head for the upper thread(s), and the bobbin-case spring for the bobbin thread. Some machines include a small hole in the bobbin-case finger, through which to feed the bobbin thread to increase the tension for improved stitch definition when topstitching, satin-stitching, and embroidering, without touching your tension settings.
The tension discs and tension regulator together are called the tension assembly. The tension discs squeeze the thread as it passes between them, while the tension regulator controls the amount of pressure on the discs. On older machines, there are only two tension discs, controlled by a screw or knob. On newer models there are three discs controlled by a dial or key pad on the front of the machine, which can regulate two threads at once.
In either case, the tension regulator is elementary: When adjusted to a higher number (turned clockwise), the discs move closer together, increasing the amount of pressure. Turned to a lower number (counterclockwise), the discs move apart, decreasing the pressure. Using a thicker thread without resetting the dial will increase the pressure and cause the upper thread flow to decrease, unless you’ve got a newer machine that makes automatic upper-tension adjustments. Since the bobbin tension is not self-adjusting, the lower tension may need to be adjusted manually to match.
In addition to guiding the thread along its path, each thread guide exerts a small amount of resistance on the thread, adding to the tension from the discs to achieve balanced tension. Bottom line: Always make sure all guides are threaded before stitching.
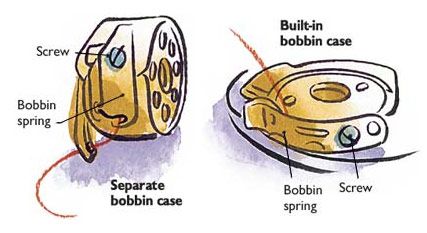
The flat bobbin-case spring exerts pressure on the thread as it comes out of the bobbin case. The amount of pressure is regulated by a small screw at the rear of the spring. Both the spring and screw are easy to locate when the machine has a separate bobbin case. When the machine has a drop-in bobbin with a built-in bobbin case, locating the tension screw can be more challenging. Both types are shown in the drawings below. In either case, to increase the resistance, use a small screwdriver to turn the screw clockwise (to a higher number) or counterclockwise (to a lower number). Turn the screw in small increments and never more than a quarter-turn between tests. This helps you keep track of how much you’re changing your settings and reduces the risk of losing this tiny screw.

As with the tension dials, the amount of pressure will be increased when thicker threads are run under the bobbin spring. To eliminate the need to fiddle with the bobbin-case screw, many sewers (myself included) have two bobbin cases: one set for general sewing and the other for adjusting to less frequently used threads.
Recognizing balanced tensions
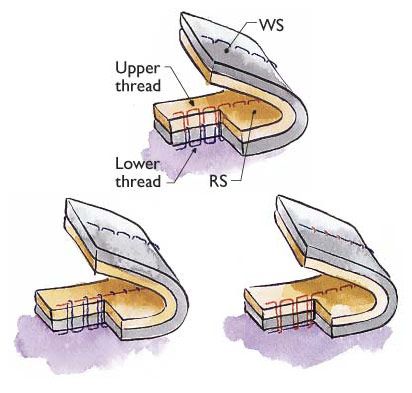
When the tensions are balanced, the stitched line looks good on both sides of the fabric, as shown at the top of the illustration below, and the seam is at its strongest and most elastic. The easiest way to spot unbalanced tension is to look for visible knots or loops at the end of each stitch. When the bobbin thread shows on the right side, the needle tension is too tight or the bobbin thread, too loose, as shown at left in the illustration below. When the needle thread shows on the wrong side, the needle tension is too loose or the bobbin thread, too tight, as shown at right in the illustration below. Of course, if you’re sewing on thin or lightweight fabrics, both threads may show on both sides when the tension is balanced, simply because the fabric is so thin.

Tensions can still need adjustment even if they’re balanced. If both tensions are too tight, the seam may pucker, or break easily when stretched (test this on the more stretchy crossgrain, with at least a 6-inch seam). If both are too loose, the seam will gap when pressed open, exposing the threads between the sections.
How to adjust tension
There are two types of tension adjustments, a basic adjustment for everyday sewing (this is what your repair person does when adjusting tension, but you can do it, too) and a temporary adjustment, necessary when you change thread types or sizes, fabrics, and stitching operations.
To make a basic adjustment, select contrasting colors of a thread in the brand, size, and fiber you use most frequently. Use one color to fill the bobbin, with the machine set on medium speed to reduce the risk of stretching the thread. Insert a new needle in the size you use most frequently and thread the machine, using all the thread guides on the machine head, but skip threading the eye on the bobbin-case finger if you have that feature.
Set the stitch length for 2 mm (12 stitches per inch) or for the length you expect to use most frequently. Set the upper-tension regulator at the middle of its range (on most machines, this is 4 or 5), and stitch a test seam on two layers of lightweight muslin, then examine the stitches. If necessary, use a magnifier to see the stitches clearly. If the tension isn’t perfect, fix it by adjusting the bobbin spring; tighter if the bobbin thread shows on the upper layer, and looser if the needle thread shows on the underlayer. Make another test seam, and examine the stitches, repeating until the stitch is balanced.
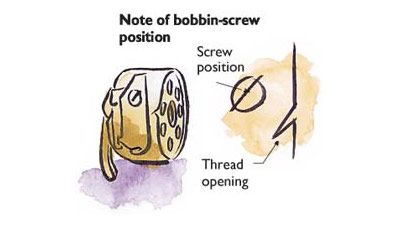
Once your stitching is balanced, start a tension log in your sewing-machine manual, indicating the thread brand, size, and type, as well as the number on the upper-tension regulator that produced a balanced stitch. Then draw a picture showing the position of the bobbin screw, like the example below, to use as a reference if you need to record a change in bobbin settings for special threads.

![]()
To make a temporary tension adjustment, select the threads for the needle and bobbin, then fill the bobbin and thread the machine. Make a test seam on the fabric that you plan to sew, examine the stitches, then see if you can find a balance using the upper-tension assembly alone.
Whenever you switch from your standard sewing thread to another thread, first thread your sewing machine and test your setup to see if you can get away with a tension-dial-only, temporary adjustment. If that doesn’t work, get out your second bobbin case, and start moving the screw in quarter-turns to loosen or tighten it, as your sample dictates. Typically, when you use a lighter-than-normal thread for both needle and bobbin, the tensions will stay balanced, even though they’re both lighter. This is often just what you need to avoid puckering lightweight fabrics, so no adjustment may be necessary. A heavier thread in top and bottom will increase both tensions, and you’ll probably need to set a lighter tension to accommodate heavier fabrics.
Don’t touch that dial
So many things can affect the tension that it’s worthwhile to run through the following checklist in the order given before you reach for the tension regulator:
• Incorrectly threaded machine: Incorrect threading is responsible for more “tension” problems than any other factor. Did you use all thread guides? Did you thread with the presser foot down, thus keeping the thread from slipping fully between tension discs? Is thread unwinding freely from the spool, or catching on the spool’s slash? Are you using a bobbin as a spool (which can interfere with the thread flow)? Is the bobbin inserted correctly?
• Incorrectly filled bobbin: Remove any thread on the bobbin be-fore you wind on new thread. Wind the bobbin following the machine instructions, so it’s evenly wound at the proper tension. Remove any thread from the outside of the bobbin. Wind at a consistent, slow or medium speed, especially with polyester and nylon threads, to keep them from stretching; they relax in your seam, causing puckers.
• Dirty machine: Lint and thread ends lodged between the tension discs, under the throat plate, or around the bobbin case and bobbin, increase the resistance and restrict the thread flow. “Floss” between the tension discs with a lightweight, lint-free cloth, and check in the bobbin area for thread ends and lint.
• Damaged machine parts: Bent needles and bobbins, and rough or damaged surfaces on the needle eyes, thread guides, tension discs, take-up lever, throat plate, presser foot, bobbin case, and in the bobbin area can all cause problems. If you drop a metal bobbin on a hard floor, throw it away, even if it looks fine; the smallest damage can distort tension. Avoid damage to the bobbin-tension spring by cutting the thread close to the case before removing the bobbin. Raise the presser foot before removing thread from the upper tension.
• Needles, threads, and fabrics: Different thread sizes and types on top and in the bobbin can throw off basic tension settings. A needle that’s too large or small for the thread can also unbalance your stitches, because the size of the hole adds to or reduces the total top tension. If you find that you’re getting puckers on organza, chiffon, jersey, lace, or blouse-weight silks or polyesters, try changing to a straight-stitch foot and needle plate, and shorten the stitch length to 1.75 mm (15 sts/in.), before you reach for those tension dials.
This article was written by Claire Shaeffer and excerpted from Threads #78.
Claire Shaeffer, author of Couture Sewing Techniques (The Taunton Press, 1993), writes about all levels of sewing from Palm Springs, California.
Enjoy more sewing machine tutorials by purchasing a print subscription to Threads, or become a Threads Insider member for exclusive access to expert and advanced sewing technique videos, articles, and more.

Get more machine articles:
• How a Stitch is Made Video
• Sewing-Machine Needles: An Overview
• YOUR Sewing Machine Buying Advice


hi i have singer 8280 machine. my problem is when i stitching the cloth in backside the thread is loose then i use tension they will correct in 8 number but in manual book say 4 or 5 is correct for stitch wat can i do plzs help me
I am so glad I came on this site. With your information on bobbin tension I have been able to fix my sewing problems!
thanx for nice detail and clear info...i required it for my begginer usage of the machine...had funy things goin on with wound up thread appearing on the wrong side of da fabric...am now gonna check list the possible problem using the exact list u gave above...wud be very interesting to try it out.thanx for guidance on dis ...will get back by Gods grace.bless ya'll
I don't know if my problem is tension-related or not: when I start to sew, the stop motion knob spins free and when I lift the presser foot & remove the fabric, I find several threads @ 3 inches long looped on the bottom of the fabric instead of just a single bobbin thread. The troubleshooting list at the back of my sewing machine book does not address this problem. Could you at least identify the problem for me? If possible, I would also appreciate an explanation of how to solve the problem.
The upper thread keeps on breaking. I have cleaned and oiled the machine and I have changed the needles and the thread. I have a strong feeling that it has something to do with the tension disc and the tension dial. Though I have it on the lowest and loosest setting, it still seems like there's a lot of tension on the thread. I'm thinking this is why the upper thread is breaking. Is that possible? If so, what should I do? thanks.
Hi there kaylaesq. I was having the same problems, and my instruction book didn't mention this problem, either. I thought maybe it was the thread I was using. I had a coated thread on both the upper thread and the bobbin. I think all the coating affected how the threads gripped one another. Changing the type of thread on at least one of them fixed this for me.
This article is very well written and I want to thank you for it. I will print this and post it by my machine.
I have a Baby Lock Quilter's Choice Professional on a New Joy Gold Standard frame. I have always experienced alot of thread breakage and I get so frustrated with it and will walk away from it for days. I have 6 shirt quilts to quilt and Im not looking forward to it. I was experiencing my top thread showing on back, but I finally got that balances out. Now my bobbin thread is showing on top. Ugh! I will work on balance that tonight. back to the thread breaking. I have tried different thread, different needles. I have threaded, unthreaded and rethreaded to no avail. I keep having the same issue. Im almost convinced now, it may be the way the thread is on the spindle. I noticed that when I have the presser foot up and I pull the thread thru, that it is smooth until more thread comes off the spool, then it almost jerk and releases smooth again. Any thoughts?? If you can help solve my ongoing problem, you will have a friend for life!! THANKS SO MUCH!!
For the other Sue...
It sounds like your machine's timing is off - I had that problem with one of my antique Singers, it didn't matter what I did, it broke thread or knotted severely.
Not willing to throw my 1924 model 66 in the trash, or send it to Goodwill where I rescued it from, I looked around until I found a shop that would work on it. it turns out... one of the lower arms bearings were loose, which made the bobbin case run just slightly out of time.
Now, your babylock (I hope!!!) isn't as abused or old as this machine, but if you can't get the tension to tense right (after following the instructions on this page) it might be worth spending a few $$$ to have someone go thru it, and make sure it's timed right.
If you're lucky, you'll find a repair guy who will let you watch what he does. Not likely your machine breaks again, but if it does, yo'll know what he did to fix it. IF you're handy with tools (and can find the repair book for the machine) you'll remember what he did, and better, keep your machine running like the techs!!! ;)
I have a 1662 singer sewing machine and i can not get the bobbin thread to thread to top thread. I have cleaned machine. reread manual to make sure bobbin is thread correct and also that machine is threaded correctly. All are correct I loaded the bobbin it will not catch when i rotate the needle. It always did before now it just does nothing what i notice is the case doesn't rotate any more. It is a plastic case.
Please help
This article was perfect and exactly what I needed. I saved this as one of my favorites for future reference. Thanks.
Thank you so much for this post on tightening the bobbin case screw. You made my day. I have been trying to fix my sewing machine for awhile. I kept reading the same info over and over, until I read this. Yay I'm so excited...it's fixed!
How timely! Tomorrow, I will be teaching a homeschool sewing class of 12 and 13 year olds the parts of a sewing machine and how to use them. Thanks so much. I found this on Pinterest this evening and will use it during my class.
Interesting read about a little discussed topic on web blogs. I was not familiar with "thread tension" and so just learned some valuable information, thanks.
Thank you!! Excellent information!
If both tensions are to loose and the stitch looks perfect how is the seam compromised?
Thank you so much! My machine has been driving me crazy and finally I have fixed the tension. Thank you for the tips on the bobbin tension.
My problem doesn't really seem to be thread tension. My foot sits too firmly on the fabric, I think! I have a skirt with one side shorter than the other because of the foot's movement or lack thereof on the slick fabric--any suggestions on how to deal with that?
I learned about using the right size needles for specific fabric, right type of thread for specific fabric such as polyester for polyester fabric & cotton for cotton fabric, not to use old or cheap thread not just color, even how to hold the fabric as it goes thru the machine matters but I could never get the tension right. I even learned about maintaining it regularly, using a new needle for every project but this is the first time I have learned this much about tension! I don't understand what you mean about how to "floss" between the tension discs. I'm not even sure where they are exactly and how to get to them. Can you give me for information on that please?
Attention to all,
I am need of some assistance. Some many years ago I purchased for my wife a Riccar 800 sewing machine. she has been trying to use it lately and the bobbin will not thread. The needle thread will catch the tip of the shuttle hook and the tip of the shuttle race holder. HELP! Can someone out there please assist me?
I had a problem with top threads breaking.
Solution: My machine held the spool horizontally (not vertically) and when I used a larger spool, the end cap that held the spool in place was too small. It allowed the thread to catch in the little slash on the rim of the spool and everything stopped.
When I used the larger end cap (supplied with the machine)the problem was solved.
I remember how I use to "play" with my mother's sewing machine settings and then she would get annoyed when she would notice her thread tension went haywire. Now I totally understand why! Thank you for sharing!
Brilliant job of explaining how tension works. Thank you.
There's a good video explaining this...
Thanks for this great information.
I also recently bought a document, it was very good on this issue : http://thetopworld.com/fyos
Your writing is great, I learnt a lot from your article and I definitely use your reference for my
article Sewing Machine Parts
Excellent content, I really appreciate it. I will learn a lot of from this article and definitely make a reference in my content in Textile Learner