
A Minimalist Finish for No-Fray Fabrics

Wool fleece and boiled wool are perfect fabrics for unstructured one-layer garments.
When I work with fabric, my Gemini traits take over. At times I want to pleat, tuck, fold, ruche, quilt, twist, and manipulate the dickens out of it to create great detail and surface design. At other times, I just want to leave it alone as much as possible. And when it’s a great fabric, that’s all you have to do.
A few years ago, on separate occasions, I bought a piece of wool fleece and a piece of boiled wool. The colors were so great – my favorites – and they each felt like cozy blankets to snuggle up in. I wasn’t sure what I was going to do with either of them, but I knew it would come to me. I also realized that whatever I made, I could overdo it if I added facings and interfacings and linings. So I used the minimalist approach and I couldn’t be happier. They’re perfect garments for the climate I live in. The tailored silhouettes satisfy the traditionalist in me, while the lack of added structure gives them a modern edge and comfortable wearability.
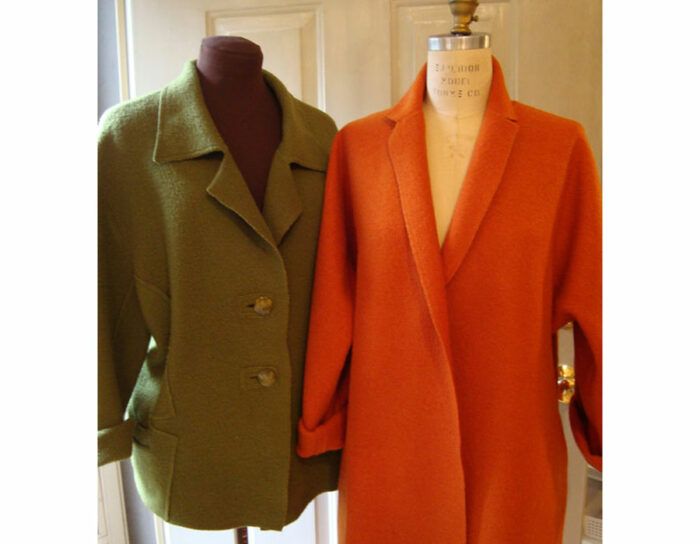
The fabric doesn’t fray at all, so it’s really not necessary to finish the edges. But a little topstitching and edgestitching gives them a bit of legitimacy. The patterns, of course, are on the out-of-print list. But, in case you’re interested and want to do some searching – the green fleece jacket is an Issey Miyake design, Vogue 1481 and the pumpkin coat is by Calvin Klein, Vogue 2236. There are other fabrics that might lend themselves to this same type of treatment – like wool melton and synthetic leather and suede. Follow your instincts – and listen to the fabric, too.

Stitching along the edges adds a finishing touch to single-layer garments.

Topstitching is done…
Start your 14-day FREE trial to access this story.
Start your FREE trial today and get instant access to this article plus access to all Threads Insider content.
Start Your Free TrialAlready an Insider? Log in


Beautiful and very inspiring ... I am going to try the buttonhole support, next opportunity. Thank you!
Gorgeous! Being a Gemini too, I understand what you're saying - I tend to love simple and these are just...gorgeous!
Beautiful work - love the colors
Where do you find the fabric?
Beautiful!.I wonder how is the collar attached to the garment?
In college, Dr.Bornemeier, at EMU, introduced us to Davidow suits.Probably a brand from the 50's and 60's which featured this technique. These suits were sold in the fine fashion areas of department stores. Also, in the 70's, one of the pattern companies featured "Make it Tonight" garments using polyester double knits and used very similar techniques.
I am absolutely thrilled to see this article, will print it and try it very soon! Thank you for detailing this technique
for me!!
Question for Mary Ray.....what do the backs of the jackets look like? Would like to see a picture of those too!
Thanks
Thanks for all your comments. Let me try to answer some of your questions. First, I purchased both of these fabrics a few years ago from Habermans in Michigan (www.habermanfabrics.com). The green wool fleece is soft and seems to just get better with wearing. The boiled wool has great body for an unlined coat.
Both patterns include a collar stand so there's that extra piece to consider, but I basically attached the stand and the collar by overlapping the seams or sewing the right side of collar to wrong of jacket and topstitching the seam allowance down much like a flat felled seam with a raw edge.
And you can see most of the backs of each garment in the photos. The Miyake jacket has a center back seam with side back panels that have the cut-out edges. The coat also has a center back seam. And -- I'm running out of space so I'll continue in another comment!
To continue where I left off below -- yes, this is similar to Davidow's technique. You can learn more about it and see some great photos of Davidow suits in a past issue of Threads, #60. David Coffin, former senior editor of Threads, wrote a wonderful article about the designer's process -- another reason to get that DVD with all the past issues.
And, if you want to learn more from me, I'll be teaching it at the American Sewing Guild conference in Atlanta in August in a class I call, "The Softly Tailored One-Layer Jacket."
Beautiful coats!And the colors are great too!Thanks for
sharing these tips--valuable for an advanced beginner sewer like me.I was giggling with your Gemini description--I'm a
Gemini too,forever split!
Thank you MaryRay :)
I saw a ton of wool jersey at Nature's Fabrics, all kinds of colors too.
Great topic
Wonderful article - now I have to go back to my favourite store here in Toronto, Fabricland. They are having their Boxing week sale and guess what's on sale for half price!! Of course -- boiled wool. Oh no -- more fabric for the stash -- need another week off to sew, sew sew
Can you check on the orange pattern Vogue 2236, I can't find that number is it another number?
That buttonhole is simple yet looks elegant. I love your work! The fabrics are so gorgeous and I must say, you have inspired me!
Love the stitching. How do you prevent the collars from curling?
Please reassure me that unlined boiled wool won't bag out in the seat for a knee-length coat? I have enough fabric to extend my favorite uber-simple jacket pattern, am hesitating. It is good quality, red/heathered gray, pretty firm weave.TY!