Design your own pleated skirt
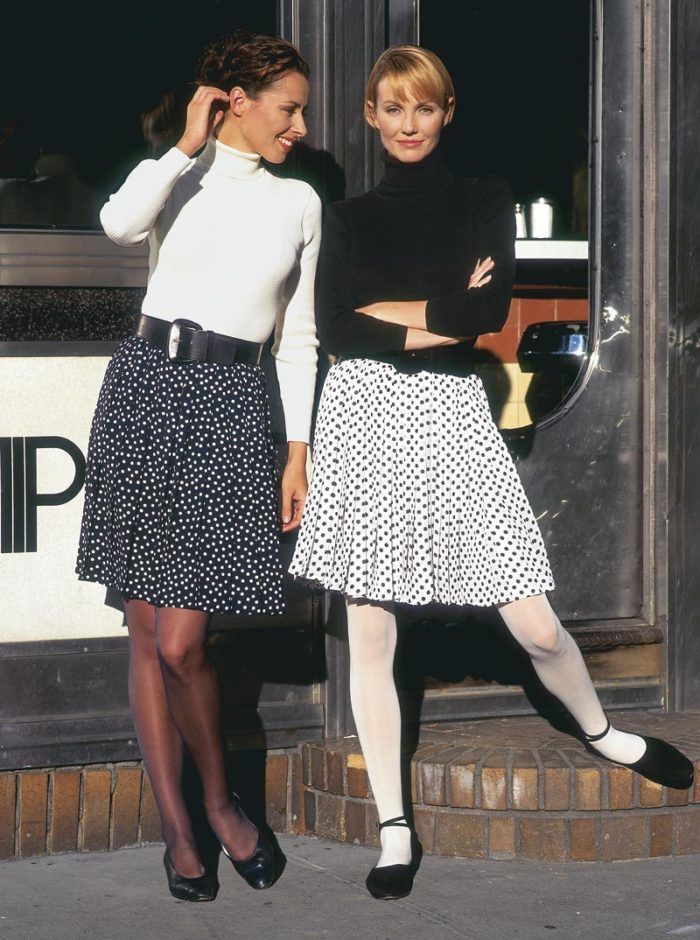
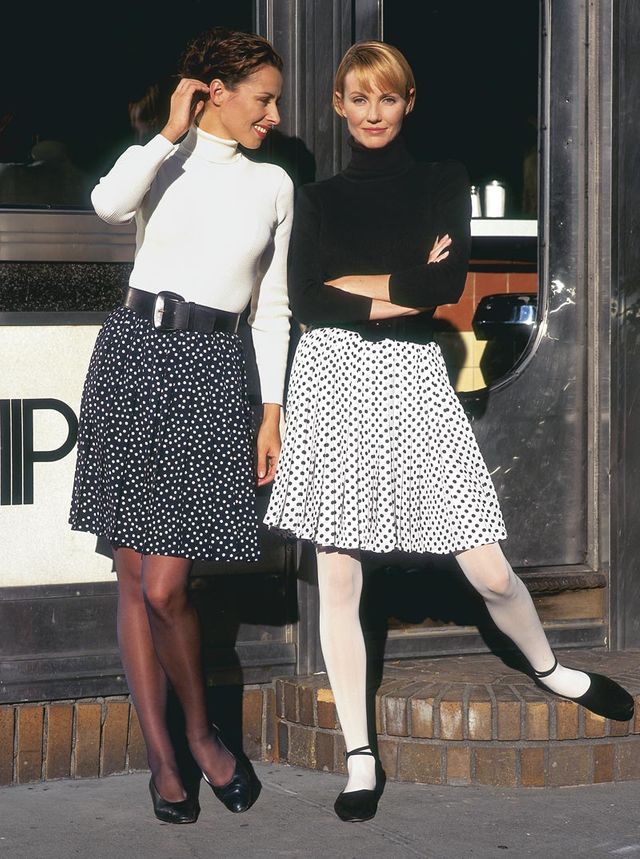
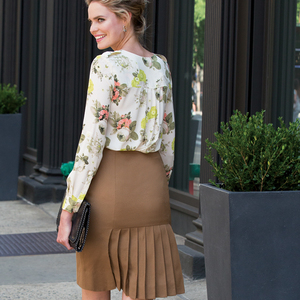
A stylish and well-fitted pleated skirt, like those shown below, is a staple in the wardrobes of most women.
From playful to demure, the mood of the skirt is determined by the length and fullness you choose for it. And with the arrival of microfibers and other contemporary polyester fabrics that are almost indistinguishable from silk, the perfect pleated skirt is surprisingly easy to make and even easier to maintain. Since heat will actually change the shape of polyester fibers, you can set permanent, wash-proof pleats using just an iron and a press cloth.
 Get more on pleating:
• Re-create Couture Pleated Silk Organza Panels
• Video: How to Fold Knife and Box Pleats
• How to Sew a Basic Kick Pleat
Don’t miss other helpful skirt techniques like this by ordering a subscription of Threads magazine. Print subscriptions come with FREE access to our tablet editions.

![]() Washers and dryers can’t harm these pleats. They’re permanently heat-set with an ordinary iron.
Washers and dryers can’t harm these pleats. They’re permanently heat-set with an ordinary iron.
When you add a clever pressing aid called the Perfect Pleater, the pleating is as quick to set up as it is easy to press in place. In fact, the entire skirt-making process should take less than an afternoon. If you don’t use the pleater, you can still make pleats by pinning and folding on a padded surface; however, the process will be less accurate and more time-consuming.
No pattern needed
It’s isn’t necessary to use a pattern to make a pleated skirt, since all its pieces are perfect rectangles. All you’ll need to do is measure your waist and hips and choose a skirt length. Three to four skirt lengths of 45-in.-wide material is usually sufficient. Any all-polyester fabric will work, from the cheapest stuff to the most extravagant. You’ll also need fusible interfacing for the waistband (I prefer lightweight knit fusibles for polyester), buttons for the side closure, and a piece of thin, cotton fabric about 1 ft. wide and a little longer than your skirt length for a press cloth.
You’ll need to cut a waistband the length of your waist plus overlap (2 x 1-1/4 in. = 2-1/2 in.) and seam allowances (2 x 5/8 in. = 1-1/4 in.), and twice the width of the finished band plus seam allowances. Interface the band so that the skirt can be pinned to it after pleating. You can usually save yardage by cutting the waistband on the crossgrain, depending on the fabric.
Pleat individual panels, not the whole skirt
Here, in a nutshell, are the steps for making a pleated skirt: Pleat individual rectangles of skirt-length fabric and join them to make up the desired circumference. Attach a waistband, join the ends into a tube, and add a button closure.
How long is each panel?-Once you settle on a skirt length, add 1-3/8 in. (which equals the waistline seam allowance plus a 3/4-in. hem). To make sure that your fabric panels are perfectly on grain, tear the fabric across the grain instead of cutting it (snip the selvage at the measured length and tear across).
How many panels?-Using the skirt-length Perfect Pleater from Clotilde, you can choose pleat widths in increments of 3/4 in. (3/4 in., 1-1/2 in., 2-1/4 in., and so on), all with 1-1/4-in. returns (the depth of the folded-under part of the pleat). I typically choose 3/4-in. pleats, which will reduce a 45-in.-wide fabric to about 17 in., including seam allowances at each end so that the panels can be joined invisibly. I want a total of 38 in. of pleated width at the hips (including 2 in. of ease), so two full panels and one partial panel give me the required width.
The number of whole or partial panels you’ll need depends on your figure and the pleat width you’ve selected. To test, pleat a paper strip that’s cut the width of your fabric.
Forming the pleats
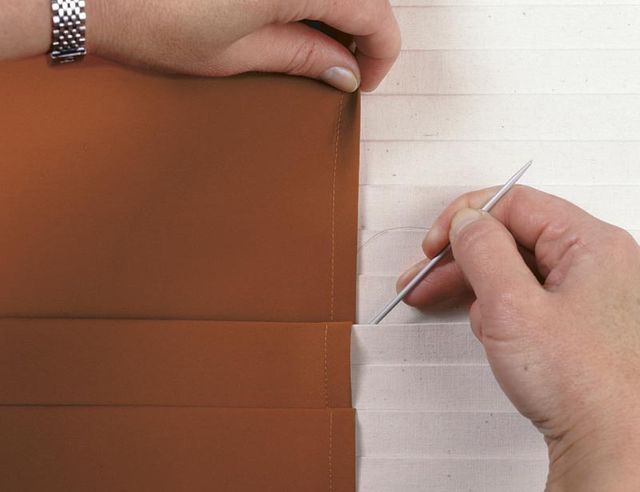
Before pleating each panel, add a machine hem by making a double 3/8-in. fold on one raw edge and topstitching along the top foldline. Pin one selvage right side up 5/8 in. from the bottom of the pleater, as shown in the photo below left. Stuff the fabric carefully into the folds of the pleater, working toward the opposite selvage.
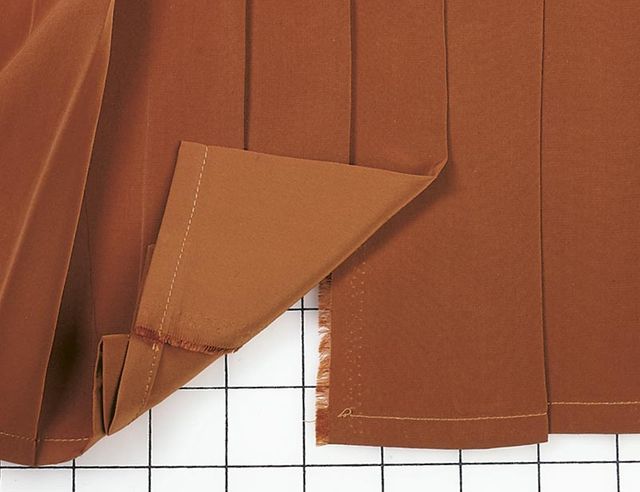
The manufacturer of the Perfect Pleater suggests using a credit card to insert the fabric smoothly. I’ve had better results with the tip of a paper knife or thin knitting needle, which I can easily run along the inside of each pleater fold. Keep the hemmed edge in a straight line as you make a pleat. Leave enough unpleated fabric at the other end to allow for another pleat fold (which you’ll form by hand to match), plus a return and a seam allowance, for joining to the next panel, as shown in the photo below right.


Offset the edge of the fabric to be pleated 5/8 in. from the edge of the Perfect Pleater (left). This will create the seam allowance needed to invisibly join the fabric to other pleated sections (right).
Set pleats with a hot iron
When your pleats are in place and arranged exactly as you want them, soak and wring out your press cloth and turn your iron up to its highest setting. Place the damp press cloth over the pleated fabric while it’s still in the pleater and press with moderate pressure until the press cloth is nearly dry. Let the pleated fabric dry completely.
Before shifting the pleated panel from the pleater, hand-baste across the unhemmed edge to hold the folds together. Remove the pleated fabric from the pleater, rearrange it as pleated right side up on a pad- ded ironing board, and iron it again to sharpen the crease at each fold.
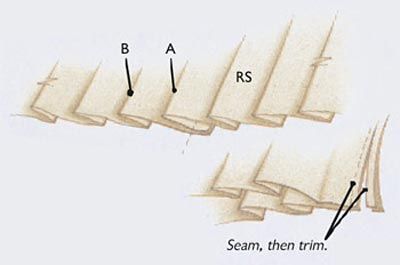
When all the panels have been pleated, basted, and ironed, join them together end to end. Make sure the seams are hidden inside a pleat and the folds arranged so that the joins are invisible, as shown in the drawings below.
TO CONSTRUCT THE SKIRT
Conceal a seam within a pleat 1. Hand-form last pleat at end of panel (pleat A) so it matches other pleats.
2. Position pleat A next to first pleat of next panel (pleat B) so distance matches other pleats.
3. Pin, then sew seam allowances together at return distance from pleat A, trimming away excess.
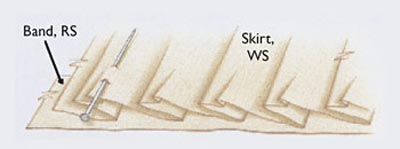
Gather skirt to band To reduce pleated circumference to fit waist, pinch out and pin tiny pleats to inner layer of face-down skirt pleats.
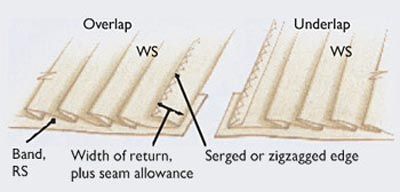
Create a closure within a pleat Arrange over- and underlap sides of skirt ends to join below opening with concealed seam, described in top drawing.
Fitting the pleats to the waistband
Up to this point, we’ve been concerned only with creating enough pleated fabric to circle the body at the hips and allow a little ease. To make the skirt fit the waist without spreading the pleats at the hip, it’s necessary to further reduce the length of the pleated fabric along the top edge.
The middle drawing at left shows how I add small pleats to the inside layer of all or most of the original pleats, allowing the new pleats to taper to nothing within a few inches of the skirt’s waistline seam. Depending on the amount of difference between waist and hips, this reduction will require more or less effort on your part.
To find out how much more to reduce each pleat, you could divide the difference between your waist and hips by the total number of pleats. In practice, I find it much easier to make the adjustments by eye, which means that a certain amount of trial and error is necessary to get the edges of the skirt to meet the ends of the band.
I try to distribute the reduction evenly across the entire skirt, but if you’re careful and patient, you can arrange it unevenly to accommodate areas of your figure (such as the sides or rear) where the difference may be greater. At bottom left, you’ll find directions for arranging the edges of the skirt at each end to create a well-spaced overlap.
When the reduction is pinned to the waistband to your satisfaction (skirt face down, band and skirt right sides together and pinned as near to the waistline as possible), turn the skirt right side up onto your padded ironing surface, fold the band out of the way, and press the pleats. This will taper the new pleats permanently and invisibly beneath the old ones. Stitch the band to the adjusted skirt along the waistline seam.
Wrapping it up
All that remains now is to fold in the ends of the band to cover the skirt edges, fold over the band, press it, and topstitch all around. Then join the skirt edges to create an invisible pleat, closing the seam to about 9 or 10 in. from the finished band. Add buttonholes and buttons to the opening, serge or zigzag the raw edges of the inside seams, and you’re done!
Kicki S. Wehlóu is a pediatrician in Forest Hills, New York; her sewing room is right next to her office. She was co-author of “When Armani Makes Pants” in Threads #57, pp. 38-43.
from Threads #64, pp. 40-42
Model photo by Barry Yee; hair and makeup by Maria Cullati; location: Empire Diner, New York City; process photos: David Page Coffin; illustration: Michael Gellatly









Log in or create an account to post a comment.
Sign up Log in