

Princess Seams and Other Treacherous Curves
Sewing an inside seam to an outside seam without puckering
There seems to be some confusion about sewing an inside seam to an outside seam, without puckering one side or the other. I’m posting this, to help all of those people I’ve talked to, who have this question.
I’m sure this subject matter has been treated elsewhere, but my students say they have never seen it. So they all suggested I post it as a blog.
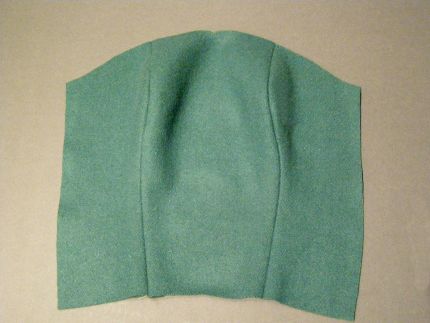
I’m using the front section of a bustier as my example here, because this was the class where the question of sewing princess seams came up.
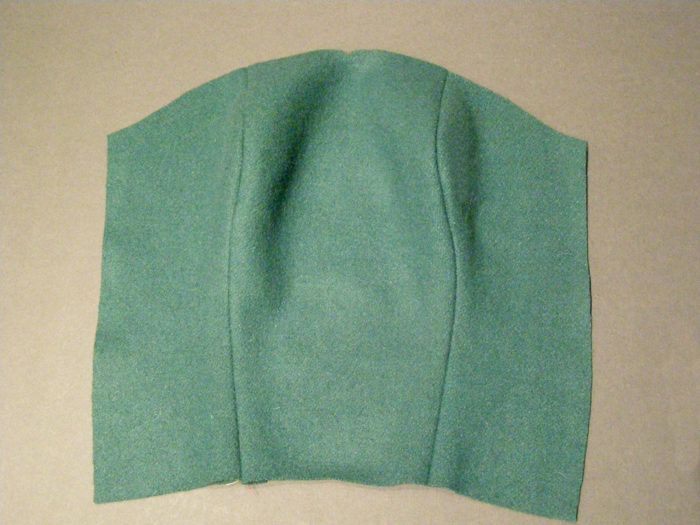
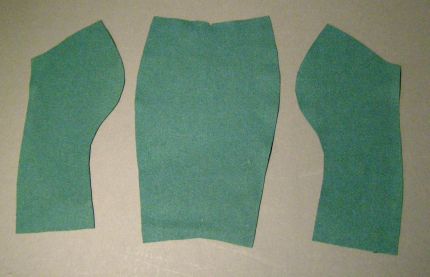
First, some explanation about the phrases “inside curve” and “outside curve”: In the photo shown, there is the center panel of the princess bodice, and the two side panels. Look at the bust area of the side panels, and compare them to the bust area of the center panel. In this case, the curve at the bust area on the side panels would be considered the “outside curve”–the curve projects out more. The curve at the bust area on the center panel would be regarded as the “inside curve”, because it doesn’t project out quite as far in comparison to the side panel curve–it’s flatter, almost straight.
 Get more fitting articles:
• To Get the Right Armhole, Fit the Bodice
• The Merits of a Basic Fitting Pattern
• On Fitting Sleeves
When looking at the two curves, if you measured the cut edge of the seam allowance on the inside curve, it would be shorter than the cut edge of the outside curve, seam lengths being equal. It is this situation we will compensate for in this demonstration, so the two seams will sew together, and press smoothly.
In our example, we will use a standard 5/8″ wide seam allowance.…
Start your 14-day FREE trial to access this story.
Start your FREE trial today and get instant access to this article plus access to all Threads Insider content.
Start Your Free TrialAlready an Insider? Log in


Nice and clear instructions. Sometimes i used to get perfect princess seam and sometimes nearly puckery and ugly, now i know how to get it right everytime. Thanks a ton.
Princess seams, you will no longer intimidate me, I will be the one that concurs! Thank you, Kenneth!
Great instructions!!!! THANK YOU!!!!
This information is priceless! I've given my sweat blood and tears over a jacket I wanted to make for my daughter, but it ended up in the garbage as I just couldn't get it right. Merci, merci merci!
FANTASTIC Tutorial! So clear and concise! Thank you!
Thanks so much for posting this write-up with photos, Kenneth. Your written answer in the bustier class was terrific but these photos and pressing instructions take it to a whole new level. This is a great tutorial for sewing a smooth-fitting curvy seam!
Absolutely Wonderful tutorial! Thanks for the close-ups - that really makes everything clear.
Couldn't believe that sewers actually have problems with inside/outside curve construction. This was basic instruction in my high school sewing class and has worked for me ever since. In talking to fellow classmates, they, too, have never had problems with inside/outside curve construction. Guess an old fashioned sewing class needs to be started in secondary education institutions. I hate to take away your job, Mr. King. You have excellent visual and written instructions.
Great tutorial! I have always been lucky and have never had problems sewing princess seams, but then again I mostly sew wool fabrics, and wool is so forgiving, it can be shaped without all the clipping, of course if the curves are very deep (as in the examples above), the clipping and notching works wonders. I also never sew such seams with just pins, I also ways baste; much more control this way and no worry of about pins getting in the way. Just my two cents :).
I never took high school sewing, I wanted to take drafting and they wouldn't let me, so I took latin to spite them.
I appreciate the clear concise text and diagrams.
I don't know that I have ever had a problem with this kind of seam, but I have a much clearer understanding of the process and I appreciate that.
Kenneth King....you are a marvel. What a good teacher showing how simple it is to do what sometimes seems to be difficult sewing. Thanks!
Princess seams/curves are so flattering and I especially
like the idea of the other opption, using the basting feature to get that professional look. The pinning trick is cool too, thanks !
This is a wonderful tutorial. Kenneth it is just like you to have instructions written and displayed in a kind manner. You are a wonderful teacher. Have you thought about having your own on-line teaching/tutorial site? I think you are the right person for it. Your teachings are clear and consice. You are great.
I have just started sewing princess seam blouses and this article is great as always, Mr. King always puts his instructions in a way that is so easy to follow, Thanks for sharing
Hi Kenneth,
Thanks so much for sharing this, I'm going to go try it out tonight! I've been sewing for 40 years and no one ever explained it like this to me, what great instructions!
Thank you Kenneth for the princess seam directions, as always your instructions are a snap to follow.
I've always loved your designs and wish you had a pattern company, hope you think of it for the future. I've turned gray with you and would like someone to design for my age, I don't wear slips in public and have seen only about two dresses in two years that didn't look like they put on the slip only to forgot the dress. I have what I think is your first video with Miss America. I might have been wrong, but I felt sorry for what you seemed to have to put up with making it with her. In the future could you do the bias cut from one piece of fabric. It was done so fast on the video I've been afraid to try it.
Again sewing and lifetime thanks for the great instruction.
As another poster mentioned about having sewn for many years, I second that ! Never before has it been so clear. Just why do magazine articles etc never give you the full story. This article by Kenneth is the full story and its what we need, crave, to do procedures properly. Thankyou so much Kenneth !
I love this article but I have made princess seams previously but have trouble fitting as I have a low bust line. Are there any ways of overcoming this problem.
How do you determine how to cut and shape the outside curve to fit someones bustline?
Mr King,
Fabulous tutorial, as always!
I want to thank you all for the kind comments!
TO answer questions: To Jackie50, the pattern determines the curves, and that, you get from fitting on the person. If you match the seam lines, the outer clipped edges of the seam allowances will spread exactly the amount they need to, without you having to do anything. One thing to remember--make sure you mark all your matching notches from your pattern to the fabric. Then everything will work smoothly.
To Twilight Dancer, regarding the show "Sewing Today": Nancy Fleming, who was the host, was really wonderful to me, and I can't say anything bad about her. She took a lot of time to make me feel comfortable in front of a camera (she did lots of TV in her career), and was generally a lovely woman. Just what you'd expect from a Miss America. If anything came across in the videos, it was because I was the nervous one, and didn't reflect on her. A truly lovely gal.
To Wanda J,and establishing my own sewing-content site: I teach on Patternreview, and feel fortunate to be associated with that site, and it's inventor Deepika Prakash. She's worked really hard to provide a community where people who love sewing can connect, all over the world. I couldn't even begin to compete with that (nor do I want to, as it's a boatload of work), because she "wrote the book" on doing it well. I highly encourage you all to check them out if you haven't. Also, she has a book coming out in the fall, which I am a contributor to.
To Mynick: I'm with you onthis. I assumed for a long time that people were taught this, but it seems, not. I saw this in my students at FIT, as well as seasoned sew-ers, so that's why I posted this.
I absolutely LOVE this technique. I used it on a Burda World of Fashion pattern in which the collar and collar stand were joined by a curved seam. It worked perfectly! Thank you so much, Kenneth, for posting this technique.
I have just found this site and I think it's great! I have been sewing for a long time and it's amazing all the things that I don't know! The Princess seams article was very clear and simple to follow. The photographs have helped me a lot, so thank you to Kenneth!! I have a question for anyone....which is the best way to bind a v neckine? I always have trouble at the V part, it never looks professional!
Thanks again, I will be logging on every day I think!
Dear Mr Kenneth.. you are an angel.
Kenneth . . .
Thank you for this posting . . . and so beautifully done! I appreciate that you offer the explanations of WHY things work as well as HOW to do it, that makes it so much easier to remember! Well done!
I noticed that someone mentioned something about a technique for cutting bias from one piece of fabric. I saw this done many years ago, and for the life of me I can't remember how it was done! Does this sound familiar to you . . . I would LOVE to be taught this again!!!
Thank you for the very clear instructions. No matter how long I've been sewing, there's always a little tweak here and there that make things easier.
So a question - when the seam is not right in front but to the side a little bit (may be called something other than a princess seam) but still has an inside and outside side - how do you know where the seam should go - closer to the center of the breast or further back 3-4" towards the center side?
To French Tart:
The description you mention, is still indeed a princess seam, whether it hits right across the bust or not--princess seams by definition being vertical seams up and down a garment (excluding side seams).
As far as where the placement of where the princess seam should go, the general rule I use is that it shouldn't cross the bust point, but should be 1/4"-1/2" outside--this looks better on the figure. It narrows in at the waist, to reinforce the "wider at the bust, narrower at the waist" line.
As for anything else, you use your eye to determine the placement, and this is all judged on a case by case basis. You can get narrow black tape at the art supply store or a photographic supplier--tape that on your garment, to determine where the seam looks best.
So glad I found your excellent instructions. I just made a fitted dress for a class, but now I wonder -- how do you finish the princess seam from the inside? The only thing I can think of is to add a lining and cover it all up. Are there other ways that are acceptable on a curved and slashed seam? Maybe just pinking?
Kenneth - awesome demo. Thanks so much for sharing this!! Question about seam allowance clipping: why do you clip perpendicular to the seam? I recently read it's best to clip on the bias (or at an angle, I suppose, depending on what grain your seam is on) to reduce ravelling. Doesn't matter if you've got a fabric that doesn't ravel much, but thought it was just a good habit. Your thoughts would be appreciated!
To CutterDraper: I was taught to clip perpendicular, as others were taught to clip at an angle. I like my way because I catch the seam allowances down, and having that little angled end of the clipped seam allowance flapping away isn't to my taste.
It's one of those preference things, both ways being applicable...
Do you have any suggestions for fitting princess seams. I basted mine instead of pinning and had no trouble at all sewing the basting stitches. But, when I went back to adjust the seam after fitting it the fabric kept bunching and I couldnt get it to lie flat enough to sew it. I did clip the seam allowances but now that I basted they don't seem to help. Could the basting stitches be preventing the fabric from spreading out. I'm realizing that perhaps I should just use pins. Also, is it better to sew the seams with the center panel or the side panel up or does it make a difference?
Any help you can provide is so appreciated. I really want to sew a nice sheath dress.
Hi, this was really great, but one small question. If you clip the seam allowance on a seam that is going to be visible e.g. an unlined jacket, can you still finish the seam with an overlocker?
Thanks for the tips, I've been sewing for a long time, ever since I saw my Grandmother make aprons from calico printed feed sacks. You can always learn a better way. Thanks again.
I discovered this tutorial after I sewed my first princess seamed blouse. I'm now making a second top from the same pattern and followed these instructions. The difference in the two garment fronts is just amazing! Thank you so much for making this available to all of us.
Is there a good way to finish princess seams on unlined blouses or dresses?
I'm a long time sewer but always seem to have problems with princess seams. The tutorial helped, but my question is: should both seams always be stitched from one direction (I've heard, bottom to top, which would require the center piece to be on the bottom at one point).
Whenever I stitch princess seams, I get distortion on one side and it may be because of stitching in the opposite direction.
So, what are your thoughts: a) stitch both sides in the same direction which would mean the center piece is on the bottom at one point or b) always stitch with the center piece on the bottom, therefore, stitching one side top to bottom and one side bottom to top?
No matter how many times I do princess seams, one side comes out great, but then I always get distortion in the lower third of the other seam...it doesn't appear to be a stitching problem, nor a "body fitting" problem. I think it has to do with the direction but I can't put my finger on exactly what it is because the seams on both sides area always very smooth. Just that the distorted side pulls in toward under the bust every time.
Can anyone help?
Fantastic! Been struggling for puckers for a couple of muslins now but this tutorial sorted it. Thanks, Kenneth
A question for anyone who may still be using this tutorial as a reference- should you always start joining the seam from the bottom? I did it but it meant my work was on the right hand side of me ie on the sewing machine bed.
Thanks
Thank you for the fantastic clear photos in this explanation. Your teaching is priceless.