


This post is a little bit of show-and-tell. I came into a large piece of Fortuny printed cotton recently. For those not familiar with Fortuny, Mariano Fortuny was active in the early years of the 20th Century, and gained his fame from, among other things, his stenciled cottons. This piece of fabric is just that. His cottons are still manufactured in Italy from his methods, and therefore are extremely costly. So that I got my hands on a 7-yard piece of this opulent fabric–well, I cannot tell you how excited I was! Here, I’ll show you the fabric and the resulting shirt, and then share my technique for finishing the armhole on this somewhat stiff fabric.
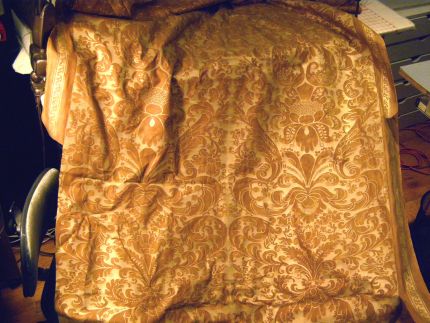
This photo shows the piece, partially unfolded. It’s a metallic gold on a ground of curry-gold twill, with an extremely long repeat, gigantic at 36 inches, to be exact. 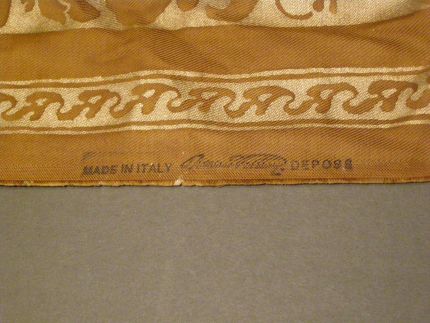
Along both of the selvedges is a printed border, and you can see here the stamp of authenticity right next to this border. 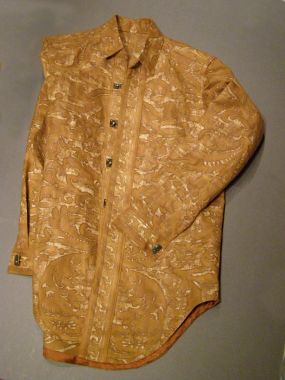
I decided to make a shirt from some of this exceptional fabric, but liked the back side better than the front–it looks like a metallic batik. Here’s a photo of the finished shirt. (For the record, with the remainder of the fabric, I’ve made a pair of jeans, and a jacket with the gold on the outside–rock-star pieces that I absolutely CANNOT wear together. Unless it’s Halloween.)
EDITOR’S UPDATE: Here’s a picture of Kenneth in the Fortuny Jacket.
And here’s a detail shot, to show how I used the border, for the cuffs and front placket. You can see better, the way the fabric looks like a batik from the back. And inside, is the gold–it looks so opulent, even flat on the…
Start your 14-day FREE trial to access this story.
Start your FREE trial today and get instant access to this article plus access to all Threads Insider content.
Start Your Free TrialAlready an Insider? Log in


great shirt, kenneth! thanks for showing us the armhole seam tip.
Thanks, Kenneth, now I'm not afraid to try the upholstery fabric in my stash for a jacket.
I love you, Kenneth! Truly! I applied this same technique to a Sandra Betzina jacket pattern. It was styled as a denim jacket and I used a gorgeous oriental brocade fabric. It was too thick to flat fell, so I used Bias tape to cover all the inside seams, including the armhole. I learned the hard way just how important basting is, especially around the tighter curves of the armhole.
Gorgeous shirt!
Genevieve
What a fine shirt, and I love the illustration of the very pretty binding technique.
I'm afraid we're gonna have to see those pants (please)....no really, please?
Wow, I love it! Thanks for sharing this. And now, I also desperately want to see the jeans and jacket you made, too...
Please oh please; may we see the rest of the ensemble?
Thank You--I love this finish--I have used it on a jacket, but had trouble top stitching from the right side of the armhole and just catching the tape edge. Your basting first would have helped and will help me next time.
Love this shirt and the technique for the very beautiful armhole. And like the others I ask, please post pants and jacket pics for us!
Wonderful ideas and construction. I too would like to see the other pieces. I would also and I'm sure everyone joins me in this, wish so much I could borrow you for a couple of weeks to make me some clothes and show me how to sew better! I do love all your how-tos that I have seen here. They always make so much sense.
I love the shirt! I'd like to see all the pieces and I especially like the sleeve finish. I have some material that will be great with that finish!
Thanks
What a beautiful finish! Kenneth, you have taught me so much over the years...you really make things easy to learn, you show incredible detail, explain in clear, understandable terms, and do impeccable work! You have inspired me for 40+ years, and have given me the courage to attempt (and complete) some of the most complicated garments! Even when I was a teen-ager, I didn't hesitate to cut pattern pieces apart to make a totally different item than shown on the pattern envelope.
Thank you for teaching sewers how to do things right! Beautiful fabric, and beautiful job. You have an audience awaiting the other pieces you made from this beautiful textile!
I don't know which impresses me most -- the technical expertise, or the kindness in demonstrating it to the rest of us. Thank you, Kenneth!
Like you, Kenneth, I found two coordinating remnants of Fortuny fabric 20 years ago. Since they coordinated so well with my oriental carpet in the oval tabled dining room, I fashioned a table covering and 12 napkins out of it. What a joy! The fabric has gotten softer and softer with each machine washing and I have never had to iron it if I grab it warm from the dryer. I have used it every day for all those years and still marvel at its beauty and practical stain resistance and durablilty. I never serve dinner or lunch without compliments on it. I only wish the fabric finishing plant where I purchased it was still viable here in SC.
Absolutely gorgeous sewing. I love it. Please send in pictures of the jeans you created from the same fabric. Just love the shirt!
I noted the pinking on your graded sleeve cap seam. I'm glad to see that I have been doing that right. With the pinking shears clipping the seam is a snap. Beautiful fabric and congratulations on the being able to obtain the additional piece.
Hi Kenth,
You are wonderful, good man,-a very good heart! great Art. Fashion, thank you to you show us your talent, helping in all your work, I love your talent Art. Always waiting, see you again, as shown, the technique, a simple course-by-step year, thank you sincerely, my dear you're a man, I wish you much health, thank you,
warm greetings.
Hi Kenneth,
You are wonderful, good man,-a very good heart! great Article. Fashion, thank you to you show us your talent, helping in all your work, I love your talent Article. Always waiting, see you again, as shown, the technique, a simple course-by-step year, thank you sincerely, my dear you're a man, I wish you much health, thank you,
warm greetings.
Kenneth, thank you so much for this lesson. I have wanted to know the "right" way of doing this for some time. Thank you so much for your generosity as well. You are a gift! My dream is to attend a class with you one day, maybe soon!...Bunny
Wonderful! Thanks--
Wonderful.. one could use that on unlined jackets also..i love your lessons. and have purchaed your cd's also.l
I so hope that you are keeping all these tips in a notebook somewhere so that someday you can pull them out to write a fabulous 'how-to' book that we'd all love to own. Your furry friend, Linda S in MD.
...and the inside is gorgeous with the placement of the fabrics design. ....and the buttons. love the choice. As all that have commented before me, what a wonderful pictorial tutorial. You make us want to rush home from work and try this. I love the photo of you in the jacket! too cool! thanks for sharing, Laurie
Hi Kenneth, and All Readers and Posters,
Kenneth,not once have I read any of your material, whether on-line, or printed in one of your books, Threads Magazine, etc., did I not learn something. You are a fantastic instructor of the fabric arts, and your work is wonderful.
This time I learned how to handle a bias covered sleeve;however, I would like to know if the sewing, trimming, application of binding, etc. is the same for seams that are not flat-felled? I like to finish the inside of my garments and have often wondered how to reduce the bulk in this area and not have imprints on the right side of the face fabric after pressing, along with how to maintain the ease of movement in the sleeve seam area.
Your input on this issue is greatly appreciated.
By the way, prior to reading this article I started reading your "Designer Bead Embroidery (150 patterns and commplete techniques)" in preparation for making an off-white embellished suit for winter, along with a red boucle Channel-like suit for winter.
Thanks for all the help you provide to sewist.
When and are you coming to OH for classes? I make that plural as one-day with you under your tutelage, I am sure is not enough to fill me up!
Kind regards,
WandaJ
King talks about the shorter edge of the bias. The bias tape makers make equal edges. Nowhere does he discuss how he arrives at a "shorter edge." When pressing the tape you would have to press it with one edge narrower than the other. This is much like a binding you would apply to a quilt. I am assuming that he feels everyone should know about that technique already.
What a wonderful shirt, Kenneth! Thank you for sharing this technique. And, if anyone can rock a Fortuny jean or jacket, it's you!
Great fabric, it is beautiful. Have used this technique before, great finish. Would love to see the jeans.
Kenneth, I had the good fortune of meeting you at Alexandra Palace in UK a few years back when you spoke about sewing jackets without facings. I was facinated by you and your techniques ever since. I have all your books - always a pleasure to read and sometimes just look at the pictures. You are truly inspiring. Your shirt here, and especially the jacket (you look fabulous!) are both fantastic. Makes me want to get strait to the sewing machine. Love, LOVE your work!
The fabric and garment are both fabulous, but I'm also interested in the fastenings. Are those square snaps? I've never seen those before.
redandredder wrote:
"King talks about the shorter edge of the bias. The bias tape makers make equal edges. Nowhere does he discuss how he arrives at a "shorter edge." When pressing the tape you would have to press it with one edge narrower than the other."
He DOES tell us how he arrives at the "shorter edge" -- he says:
"Pin the fold of the shorter edge of the curved bias tape (the inside of the "C"-shape)"
He's not saying one fold is NARROWER than the other, but rather after pressing, one edge of the bias tape is SHORTER than the other edge because it's been pressed to be the inside of the curve.
This was really helpful to me. i love getting my online threads newsletter. I want to become a better sewer and this information helps a lot. Thanks
What a fabulous work of art! The detail and workmanship are superb and the fabric is beautiful! I was looking through my stash of fabrics this morning and can easily make use of your biased binding technique. What a great idea. . . .Maybe I should just go shopping and see if I can come across some (more) beautiful fabrics!
There is a question as to where I got the snaps: There's a place called "Pacific Trimmings", on 38th street between 7th and 8th Avenues in New York. They have a wide assortment of really cool snaps, quite a variety of designs and finishes. I believe they have a web site, which is: http://www.pacifictrimming.com
I wonder what to do with the 27 yards of Fortuny DeMedici fabric I inherited......pewter on brick.....BEAUTIFUL!!!!
Does anyone buy such a large amount of fabric ?
To Fortuny Fanatic:
Would you like to work a trade, some of mine for some of yours?