


Here is a snapshot of the finished garment, as requested!
I went off to camp after the holidays, and while the fashion bar is set really low there, I wanted some spiffy new clothes. I found this felted wool jersey fabric at one of my suppliers, and thought it would make a good sweater.
The beauty of this fabric, is that the finish can be a pinked edge–I don’t have to sweat a good finish. My aim here, was to make something that looked a little rustic (as I was indeed going to the country), and this is what I came up with.

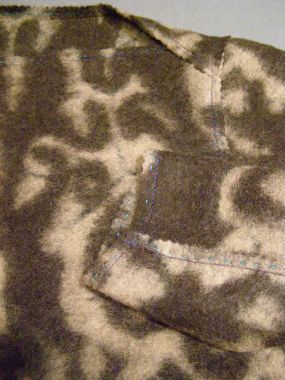
Here’s a detail of the neck and armhole area, so you can see the finish I went for. I went for a machine stitch finish and what is called a “saddle stitch” when used decoratively–its fancy name. (It’s called a running stitch if you’re using it just to join fabric together.) 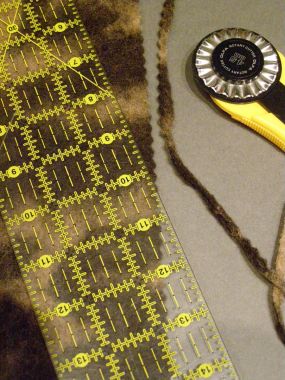
I’m showing the edge finish first, because I needed to finish the neck edges before adding the sleeves. Start out by pinking off about 1/8″ or so of the raw edge.
Machine stitch 3/8″ away from the pinked edge–I used the purple topstitching thread, so it would really show.
Next, with a double strand of the turquoise topstitching thread, I did a saddle stitch between the machine stitching and the pinked edge. As I wanted a rustic-looking garment, which was consistent with the rough fabric, I didn’t get out the micrometer to make the stitches even. Perfectionists out there, you can choose to make the stitches uneven, you know.
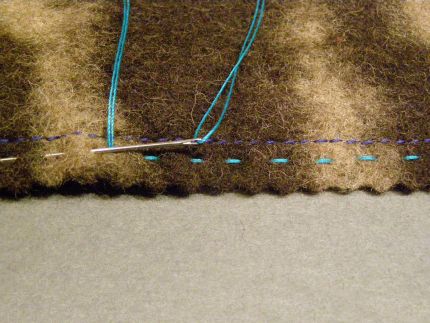
One tip about sewing with a double strand–after you’ve threaded your needle, before knotting, iron the thread. This makes it pass smoothly through the fabric without knotting up and fighting you.
To install the sleeves, I decided on…
Start your 14-day FREE trial to access this story.
Start your FREE trial today and get instant access to this article plus access to all Threads Insider content.
Start Your Free TrialAlready an Insider? Log in


Seeing the finished garment, on a human would have added an awful lot to this article. Detailed photography of the process is great but a pic of the final product can really make the viewers drool & dive in.
I love this and see it must have been fun to do....but one question...how did you sew the sleeve up? I'm having trouble visualizing this. So you must have been able to fit it under the pressure foot from underarm to wrist? Now I will have to try this at home. I liked this technique...everything about it.
I've been searching for a good source for wool jersey since it's not readily available at my local fabric store. Care to share where this came from? Thanks!
I love the tips, especially stretching the underarm seam allowance. Can't wait to try this out - and am so glad to see wool felted fabrics becoming popular. They are warm and relatively windproof. Thanks so much for this article.
Did you use a commercial pattern or just design it for you?? This is a really clever look. Thanks for your fabulous talents.
Ditto SilksWithAttitude! I know that Kenneth was teaching a Technique rather than a Pattern, but seeing this sweater in total would certainly affect how one would relish a new project!
How did the front collar and lapels lay?
Did it even have these features?
Were there closures along the front and how were they handled?
Were the side seams tapered for the body silhouette to eliminate bulk?
So many questions and all needing answers.... can there possibly be a Part 2?
Thanks for the tips on sewing with double thread, and using a ruler for pinning. I am a hit & miss sewer (it's either a hit or a miss) and each tip I pack away in my creative brain makes the next project all the more better.
I really wanted to see the sweater modeled. I was sorely dissappointed. So yes, part II please, and the source for felted wool.
I like the idea of using a machine stich and the saddle stich together in different colors.
Am I missing something? If you cut the bodice along the 5/8" stitching line and the overlap the seams and sew in another 3/8" you have now made the bodice too tight. You should cut the bodice edge only 2/8" and then sew in 3/8" from the pinker edge, no?
Would really like to see the finished product please.
I would love to see this garment modeled. The photographs of each stage are wonderful though.
Everyone is wondering where you can buy felted wool jersey. It is not readily available in any of my fabric stores. I have found you can felt your own by buying XL Mens wool (must have at least 50% wool) sweaters from the local Goodwill or Salvation army. Just machine wash the sweater with laundry soap in hot water and dry in the dryer. This will felt the sweater and it will shrink. It is difficult to have any control with the shrinkage but you can block it before it is dry for some control.
Kenneth, I've become such a huge fan of yours! What you do is inventive, practical, fun and your instructions and photos are absolutely the best. I always understand what you mean. You're a master teacher and wonderfully creative. Thank you!
See Threads #109 for an article on how to felt wool jersey which I think I am going to try. A basic barn jacket pattern would look great with these techniques. And I agree seeing the finished version or a part 2 of this article would be terrific!
The sweater looks great! I made a men's indian tunic out of a vintage army blanket with exposed seam allowances, but I likke your effect more. One question I have for anyoneis: How do you get the arm seam sew by machine?
Hello!
I'm glad you all are enjoying t his post--so, to address questions and comments.
To all of you who wanted to see me in the sweater: Sadly, I didn't have anyone around to photograph me in it. Everyone was away for the holidays, that's why I was sewing clothes for myself.
As for the design, it was my own pattern--I wanted to make a boat neck style sweater pattern for myself--it's just a basic pullover, no closures, a little taper at the waist. Nothing special, no collars or details. Very plain.
To Lauriediane and jothwade: Sewing the sleeve is a bit of a challenge--I sewed it from the right side, but turned the sleeve inside out before beginning. You have to go a little at a time, and the sleeve sort-of stacks up around the needle and presser foot before you're done. So, I thread basted it first before sewing. The saddle stitching came after.
To sassy crafter: I got the fabric from a place here in NYC called "Fabrics For Less" on 38th Street.
To cerogersmom: Not so--when you overlap the cut edge (which is a seam line) onto the chalk-marked stitching line on the sleeve, you have put the garment together "at the seamline". By sewing 3/8" in, though the machine stitching ON THE BODICE is 3/8" inside the stitching line, it is compensated for because the machine stitching on the sleeve is 3/8" out onto the seam allowance. So there's no net change in fit.
Imagine the joining of the cut edge on the bodice to the marked stitching line, as a proper seam--Sew the seam, press both seam allowances to the bodice, and then the 3/8" in would just be topstitching. Here we eliminate the first row of stitching-the topstitching is what's holding things together.
Very, very cool! For those of us who can't wear wool, do you think this could be made from a nice quality fleece?
wow! this a wonderful article. i have been trying to figure out a way to finish a felted wool jacket I'm making for my toddler made from thrift store wool finds that i felted in the washing machine. i thought about pinking the edges' but i LOVE the bright stitching and saddle stitch in turquoise. As always, i have enjoyed another garment you have presented to us. Keep up the great work! oh and great job on Martha Stewart!
what does the finished garment look like???
Part II please!
A few years ago I received a felted wool jacket as a hand-me-down. It quickly became my most treasured article of clothing. I went online to try to buy one in black and found they were 300.00. Yes, it is probably worth it, but it is outside my budget. With your tips I should be able to create my own.
Would have loved to see the finished garment and went to the end of article to see if it was there...........no, however the instruction pics are very good. You are truly talented when you can just pop a garment together like this using your own visions. Keep up with the creativity.
As always, fabulous article, thank you so much for the spot-on teaching and photos. You never waste time when teaching, you always seem to know what we don't know, and hone in on exactly how to complete the unique technique featured!I have some felted wool/cashmere--I was planning to used lapped seams, but hadn't thought about stretching rather than clipping--now I can branch out into more curves rather than the straighter angles I was thinking of using. Thank you Kenneth, and enjoy wearing this!
Kenneth has graciously taken a photo of the finished sweater for you all to see. We've added it to the top. Thank you, Kenneth!
Great techniques and timely, too. I used some of Kenneth's techniques for a jacket that I recently completed. The jacket already featured some non traditional sewing techniques (Marcy Tilton's Vogue 8676), so these were some more "out of the box" sewing tools to add to the mix. Thanks!
LOL - I'm almost sorry I clamored for Part 2 (a complete image) now!
Somehow the two don't quite match; it was better to keep wondering - - - - -
Now that we've been exposed to the inside working of many designers' minds through PR & The Ultimate Collection, there is something that's 'off' for me, and it's the dichotomy between the fine quality of the detailed finishing and the rough-and-tumble, hunters' camouflage print in a thick, casual, fuzzy fabric.
Either one would have been fine by itself: boxy-shaped pullover out for a stroll in the woods or the nicly detailed shoulder treatment on a casual bateau sweater a la 1950s—but to me it looks like a jumble that just tried to accomplish too much.
Or this is the practice (non-muslin)piece and I'm waiting to see it worked up in The Fashion Fabric!
Brilliant, as always!
To rk4cds1--
This is why I was reluctant to post an entire photo! As I said in an earlier post, it's just a dumb sweater. But it does read better, and work aesthetically, in person. And that's why I didn't initially post a photo. I do things for a reason.
It is precisely the contrast of the detail, and the texture of the fabric, that I was going for. And as for trying to accomplish too much--again, that's what I was going for.
So, perhaps, next time I don't post a photo, could we all agree to just enjoy the technique? It's less wounding to me than reading a post that sounds like someone talking smack about my taste, which is what this post felt like.
I have to say I enjoyed seeing your design which struck me as a fresh take on a 50s retro look. It may have presented better on an actual person. Seeing it on the dress form one of my first thoughts was that part of the fabric design would fall on a part of my anatomy that really doesn't need any additional emphasis. I think this would stunning on a man with a pair of casual corduroys and some scuffed up boots - the picture immediately visualized by seeing your garment. I appreciate your articles and hope you will continue to share. I am knitting more now than sewing, but this intrigued and inspired me.
Gosh where do I start? There is so much I like about this.
Thanks for the tips on ironing double thread and using a ruler to separate layers when pinning. Both great timesavers.
I love the boatneck and contrast saddle stitch. I plan to make one of these with narrow ribbon topstitched on in the same color as one of my button up shirts so I can wear them together.
One question? When you sewed in the sleeve, did you sew the bodice side seam first or after? Thanks again, this is a great idea!!
To Ordinary Princess:
I sewed the sleeve to the bodice, and then sewed the bodice side seam and underarm seam on the sleeve all in one shot--when installing a sleeve with one underam seam, that's the easiest way.
It's difficult to know what is real when viewing a much-edited episode of any tv show. When you spend hours in person with Kenneth in class you realize that he is very deliberate about everything he designs and knows his craft by heart!
Thinking that we've been exposed to the inside working of designers' minds by watching Project Runway or the Ultimate Collection is like thinking that we've been exposed to true journalism by watching cable TV news. It's all just entertainment. I was first exposed to Kenneth, his work and his approach to fashion in 1996 and have been delighted by the inside working of his mind ever since. Not only is he an artist but he is an architect and an engineer in everything he does. So many designers are simply stylists who can't sew a stitch. This camp sweater, with its rough texture and fine detail is a kick and provides the same kind of kick as putting flannel with trains and bears as the interlining on a $10,000 opera coat. Alexander McQueen did the same sort of thing when he worked on Saville Row and no one doubts his genius. Kenneth is no less a genius, perhaps a little more real world and a little less flamboyant. I look forward to each and every morsel of technique and knowledge and bit of inspiration he is willing to share. Bravo on the camp sweater! Now I MUST felt some yardage and give this a go.
Thank you for sharing the tip on the sleeve to the bodice "chain of command." Its much like knitting a sweater. You can sew a lot of seams or not, it makes a difference in time and construction. Does it seem to make it less, "moveable," tho'. Just curious? P.S. I love the photos.
to Quertygirl: The order of construction doesn't inhibit or affect mobility. As long as all of the seams on a garment are sewn to the pattern specifications, the garment will fit and wear the same--the order of construction makes no difference in fit or mobility. Setting a sleeve to the bodice flat, and then sewing the underarm seam of the sleeve along with the side seam of the bodice, just simplifies construction.
Kenneth,
You are absolutely right about the seam. I get it now. Thanks for taking the time to reply. I now have a new technique in my repertoire, thanks to you!
have you ever seen an outfit on a hanger that doesn't appeal to you but when you try it on looks gorgeous?
That's how this sweater looks on KDK. He looks good and the sweater looks great. The details of the saddle stitch, the pinking edge plus the fabric gives the garment a different look. Out of this world!!!