

For some women, it’s easy to find bras that fit in styles they like. But many others aren’t so lucky, spending endless time and money in search of that elusive perfect style and fit. And even if they do find it, chances are that the style will be discontinued the next time they shop. (In fact, it’s estimated that 85 percent of women who wear bras are wearing the wrong size.) And others of us are just tired of spending so much money on so little fabric.
Well, if any of this sounds familiar, you’ll be pleased to find out that making your own custom bra can be a quick and rewarding project. And rest assured, if you’re able to cut accurately and sew a precise 1/4-in. seam, you can make a bra.
For the first bra, plan to spend an evening or so. After this one is fitted and finished, you’ll find that additional bras take two hours or less. Best of all, once you perfect the fit, you can keep the pattern forever, secure in the knowledge that you’ve solved one of a woman’s trickiest wardrobe problems. Don’t miss other Threads techniques like this by purchasing a print subscription which comes with FREE access to our tablet editions.
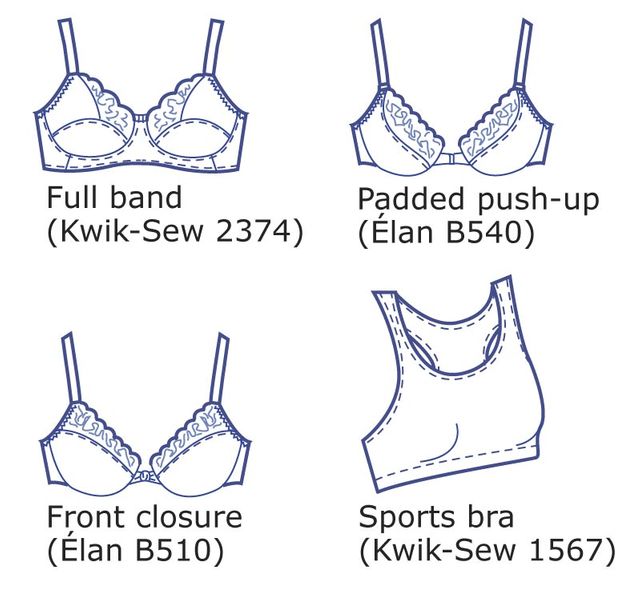
Bra-styling options
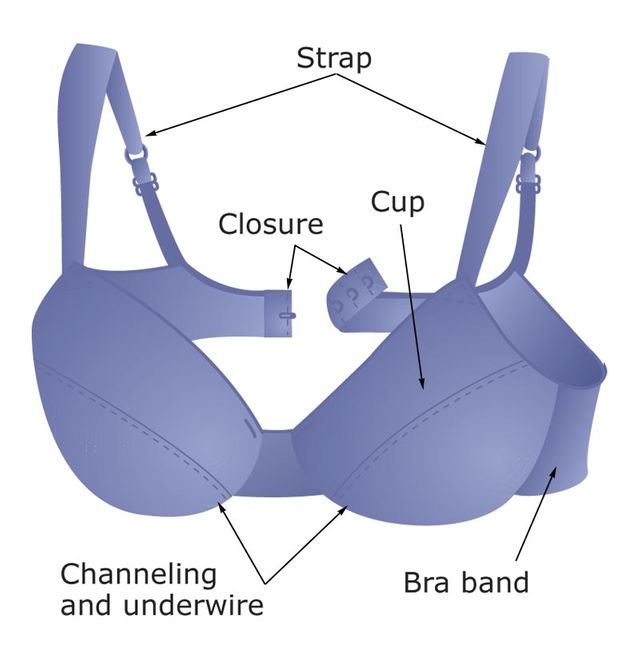
The four elements of a basic bra include a bra band, cups, straps, and a closure (see below). Variations in these key elements determine the bra style. A full-band style, for example, offers the most support; it has a continuous band that extends around the body, with the cups set into it (see styling options, below). A partial-band style has a band attached at the sides of the cups, with a center-front piece or hook separating them. The bra band may be a single layer or lined.
|
|
|


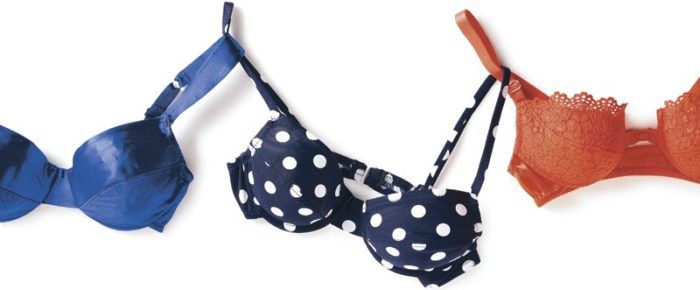
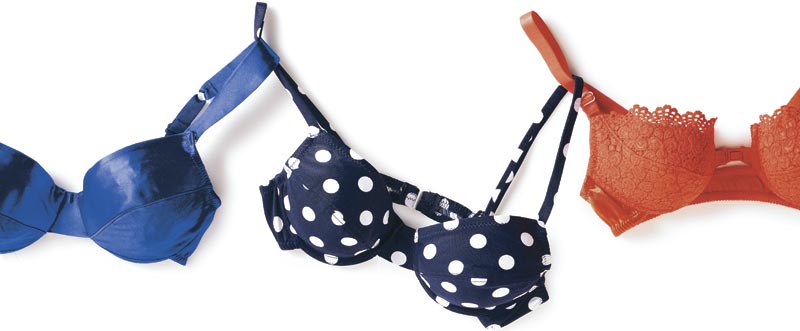
Cups can be made of one, two, or three lined or unlined sections, with two being the most common. Cups may or may not include underwires for shaping. Lace cups are often lined with sheer tricot to add stability and reduce scratchiness. You can even add padding to the cups to make a push-up bra like the orange lace one in the photo above.
Straps can be made of strap elastic (less stretchy than regular elastic), nonstretchy strapping, or self-fabric, with or without an adjuster (the most common is a ring-and-slide adjustment). Nonstretchy straps usually have some elastic at the back for ease of movement.
Bras close in either the front or back with hooks, and back closures usually have two or three size adjustments. Many sports bras pull on, with no closures at all.
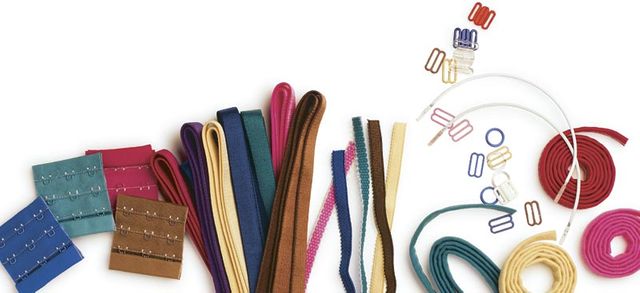
Each of the bra patterns available from Kwik-Sew, Sew Lovely, and Élan Patterns, made for sizes ranging from 32A to 48FF (see Bra-making sources by mail), will guide you through the construction for that style. To determine what size to start with, see the box below. The pattern will list the fabric options, findings, and notions you’ll need, like the plush elastic (cushiony on one side), strap elastic, back hooks, and underwires and their channeling. Or, to make gathering the parts easier, you can buy a kit with all the fabric and findings you’ll need; some kits have everything dyed to match.
To wire or not to wire
For maximum shaping and support, an underwire bra is the best choice for most women. The underwire shapes and holds the cup to a fixed diameter, which can benefit even a small-busted woman. Complaints about underwires are due mainly to poorly fitting bras, which can cause pinching and poking wires.
Fabric ideas
You’ll see bras sewn from a wide variety of fabrics, including tricot, lace, stretch satin, cotton/Lycra, and all-cotton knits and wovens. When making bras, you have the freedom to choose bright colors, jacquards, polka dots, or plaids, if you like. I suggest starting with a stretch fabric like two-way stretch nylon/Lycra satin, which makes fitting easier and forgives small errors.
| Good fit starts with accurate measuring
Taking exact measurements is the first step in making a bra that fits. You’ll need to calculate your bra-band size and your cup size by measuring around the rib cage and full bust, wearing your best-fitting bra. (Large-busted women especially need support for accurate measurements.) Using a full-length mirror, measure around the rib cage, making sure the tape is level around the body and pulling it snug. To this measurement, add either 4 or 5 in. to get an even number. Example: if the snug rib cage is 29 in., add 5 for a total of 34 in. This is the bra-band size. Next, measure the bust around the fullest part, again keeping the tape level, but this time don’t pull it snug. To determine the cup size, subtract the bra-band size from the full-bust measurement. The difference, in inches, tells you the cup size: 1 in. for A, 2 for B, 3 for C, 4 for D, 5 for DD (or E), 6 for DDD (or F), and 7 in. for FF. For example, if your bra band is 36 in. and the full bust 38 in., the cup size is B; you’ll make a size 36B. Remember that this is just a starting point. Your actual bra size may be slightly different |
The essential good fit
Let’s look at what constitutes proper fit in a bra, which will help when you’re measuring and deciding on your size. A well-fitting bra is comfortably snug around the body, with the breasts filling the cups completely–no excess fabric in the cups, and no breast tissue spilling out of the cup at the top, side, or bottom. The bra’s center front touches, or very nearly touches, the breastbone. The bra band doesn’t ride up in back, and the straps stay in place without slipping or digging into the shoulders. Ideally, the bust level is about halfway between elbow and shoulder, although this may not be practical for a heavy-busted woman.
To check the fit, make a sample cup with the pattern and fabric you plan to use, and hold it up to yourself. It should completely cover the breast from the center front to the side, and under the breast to the rib cage, with a little extra all around for seam allowances. Check that the breast fills the cup completely, without bulging at the sides or bottom. Can you pinch any excess fabric at the bust point? If so, make a note of how much and adjust the pattern pieces accordingly. (Two women may have the same rib-cage and full-bust measurements, yet still be different cup sizes. If you have a wide, shallow bust, use a larger cup size and take the fullness out of the cup. For a solution to this and other problems, see the box below) Now try the cup on the other breast. Many women aren’t symmetrical, so it’s important to check both sides. If your left side differs noticeably from your right, make separate pattern pieces for each side and label them.
| Common fitting solutions
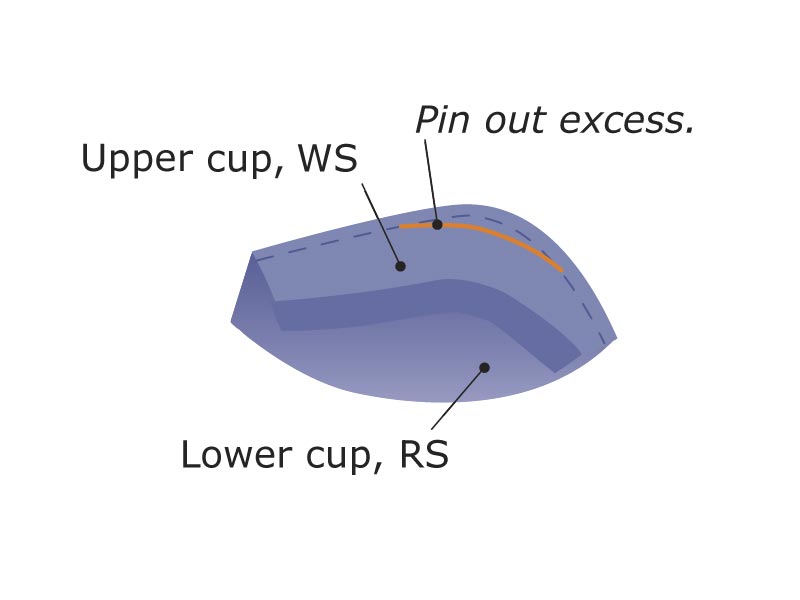
Most fitting problems are easy to remedy and often result from the mismatch of cup and band size. Check cups first: Cups that are too small will need to be larger (and vice versa). If cups fit correctly but bra band is too tight or loose, changing band size will also alter cup size. The C cup on a size 36 is about same size as B cup on a 38. And if you go down a band size, you’ll go up a cup size. Cup needs reshaping: If cup is too small, you can go to larger cup size and reshape tip, if needed, to remove excess fabric. Pin out excess on test cup, as shown above, tapering to zero. Make same changes to pattern.
Bra band rides up in back: Band is too loose, cups are too small, or both. Try going up a cup size or down a band size. Larger bust needs wider, closer-fitting band to support weight of bust. Straps won’t stay on shoulders: May be too loose or set too far apart for narrow or sloping shoulders. Adjust straps to give some lift to bust. If you like, stitch straps to stay in place. (A custom-fitted bra does not really need adjustable straps. Manufacturers use them to fit more women with fewer sizes.) You can move the straps closer together in back, or choose a different pattern. Straps dig into shoulders: Also indicates loose band or cups that are too small. Wider band and wider, padded straps help. You can really customize the fit with the help of a family member or close friend (you’ll need four hands). Hold the fitting cup up to yourself and have your helper hold the underwire against the cup in the correct position. Trace the entire bottom edge of the wire, using a pencil or fabric marker. Take it off and add 3/8 in. to the bottom for the channeling and seam allowance. |
Get ready to cut and sew your custom bra
Before you begin, read all the instructions for your pattern, put a new size 60/8 or 70/10 universal or ballpoint needle in your machine, and make sure your machine is lint-free for good stitch quality. Test your stitching on a swatch, using a straight stitch of about 12 sts/in. (2.5 cm). For Lycra blends, stretch the fabric slightly as you sew to add a little give to the seam. If your machine skips straight stitches, try a finer thread in the top and bobbin, or use a little silicone lubricant like Sewers Aid on the needle and thread spool. If you still have problems, try another new needle. For skipped zigzag stitches, change to a three-step zigzag, if you have one.
When laying the pattern on the fabric, pay special attention to the “grainline” mark. On a pattern designed for knits, this is meant to be placed in the direction of the fabric’s greatest stretch, which may be lengthwise or crosswise, depending on your fabric. Your best layout may differ from the one in the pattern’s instructions.
Because a bra is so fitted, a 1/8-in. cutting or sewing error can throw it off a whole cup size. I find a rotary cutter, mat, and weights to be the most accurate cutting tools. To mark dots and notches, make tiny 1/8-in. clips for notches and use pins to mark dots.
Add support for a large bust
Large-busted women can add support to the lower cup to help lift a heavier bust. Use a double layer of fabric in the lower cup or add a light-to-medium-weight interfacing, like a fusible tricot knit. Or use fusible web to join two layers of fabric for the lower cup. You can interface the entire lower cup (excluding the upper seam allowance), or only the outer bottom portion.
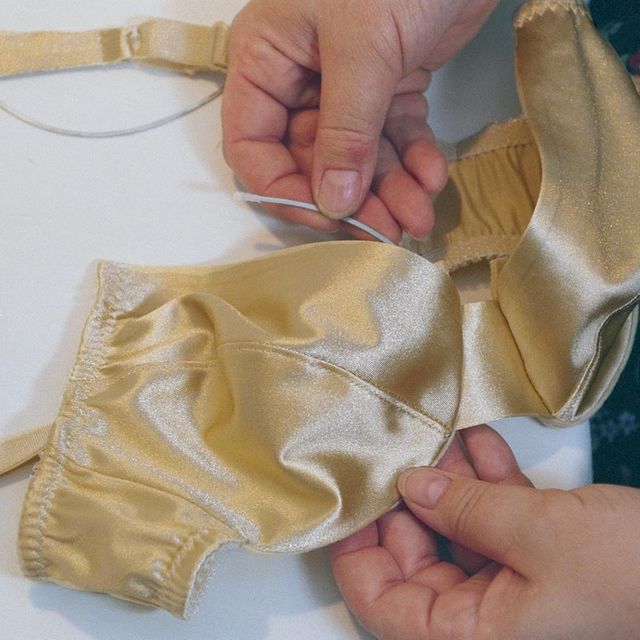
Uncomplicated custom bra assembly
To sew a bra, you’ll first make the cups and join them to the band, then add elastic, straps, and, finally, a closure. I’ll explain a few tips to help you get started on the construction for the basic bra style, shown in royal blue.
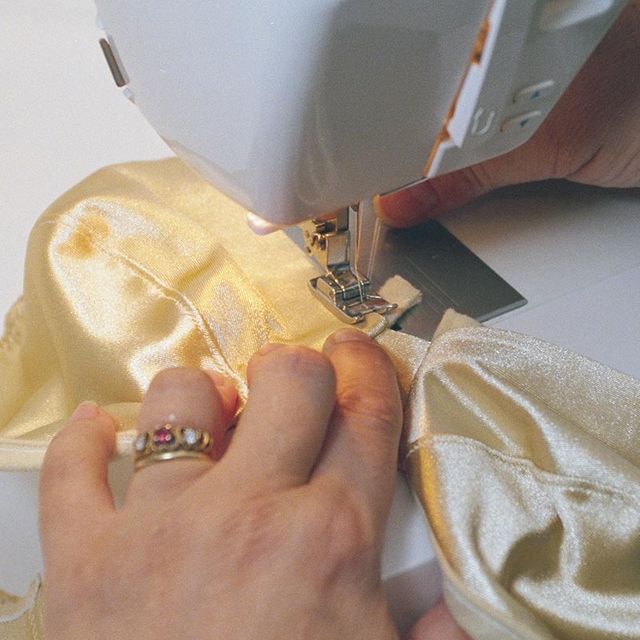
Stitch the cups first
To construct each cup, place the upper and lower cup pieces right sides together and pin at each end of the seam and at the dot or notch. Sew with the lower cup against the throat plate, stopping often with the needle down to reposition the edges, instead of using lots of pins.
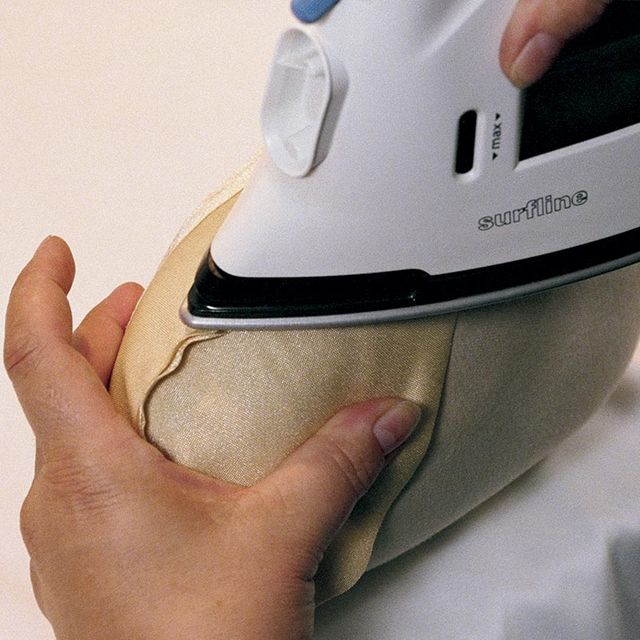
To finish the cup seam, you have several options. You can press the seam to one side (down for a single-layer lower cup; up for a double one). A tailor’s ham makes pressing curved seams easy, as shown in photo 1 below; make tiny clips in the seam allowance, if needed, so it lies flat. Then top stitch 1/8 in. from the seam, through the seam allowance, as shown in photo 2, and trim it close to the stitching. Or you can press the seam allowance open and topstitch on each side of the seam, then trim.
|
|
|


Another option often used by bra manufacturers gives a soft, nonscratchy finish. Press the seam open and center a 1/2-in.-wide lengthwise strip of sheer nylon tricot, Seams Great, or soft lace over the seam and stitch 1/8 in. from the seam on each side.
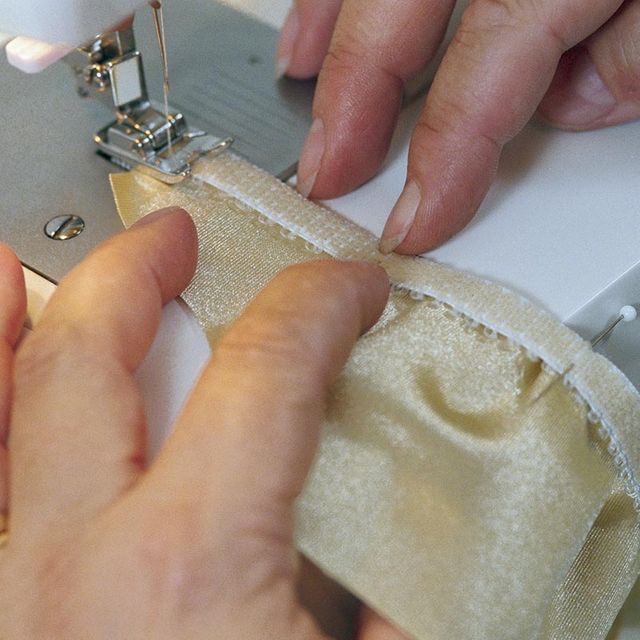
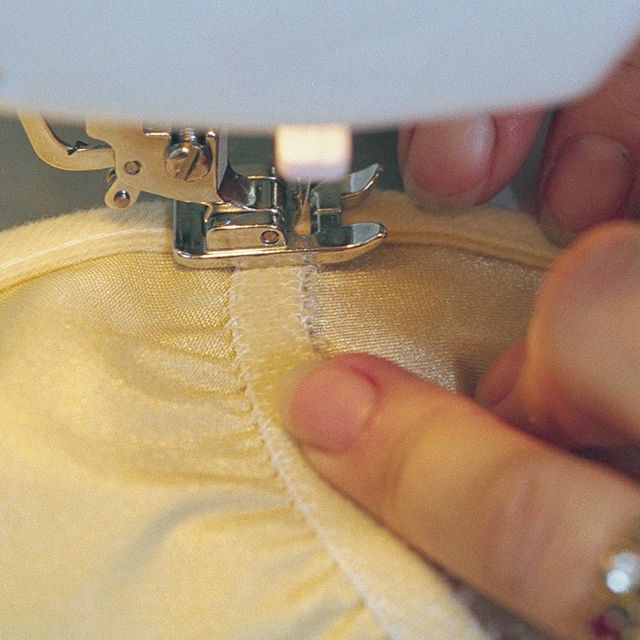
Add elastic to the band
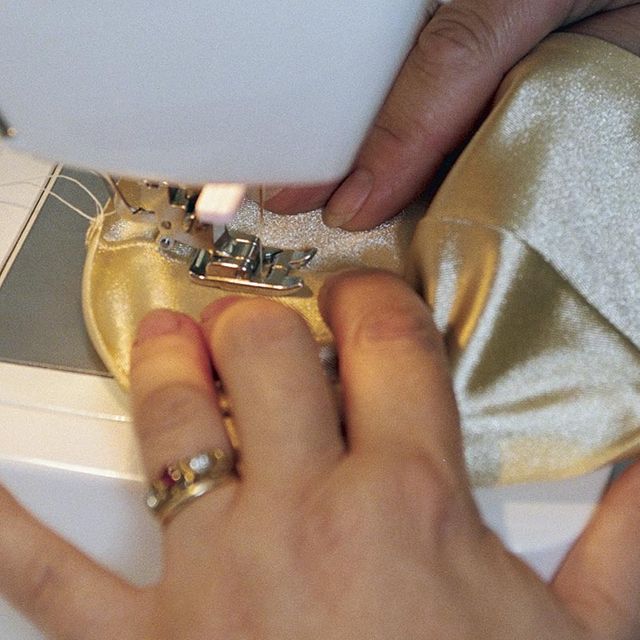
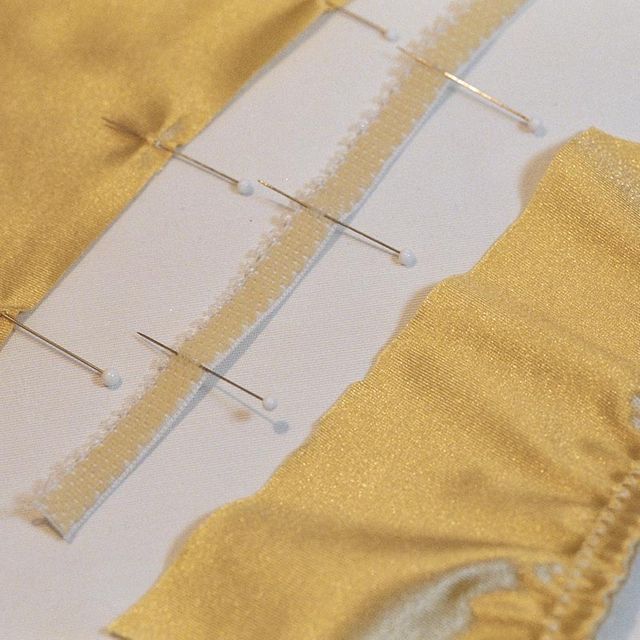
The elastic that finishes the band edges is usually cut shorter than the band and stretched slightly to fit during stitching. It helps to fold and mark the pattern piece and elastic in quarters, as shown in photo 3. When you sew the first line of stitching along the picot edge, the left swing of the narrow zigzag should just touch the edge of the elastic (photo 4). After trimming close to the stitching, turn the elastic to the inside and zigzag again along the straight edge, stretching the elastic as you sew. Or use a wide, three-step zigzag to sew down the center of the elastic.
|
|
|


When you attach the band to the outside edge of the cup, continue stitching around to the center front. This stitching will serve as a guide when you apply the channeling to hold the underwire.
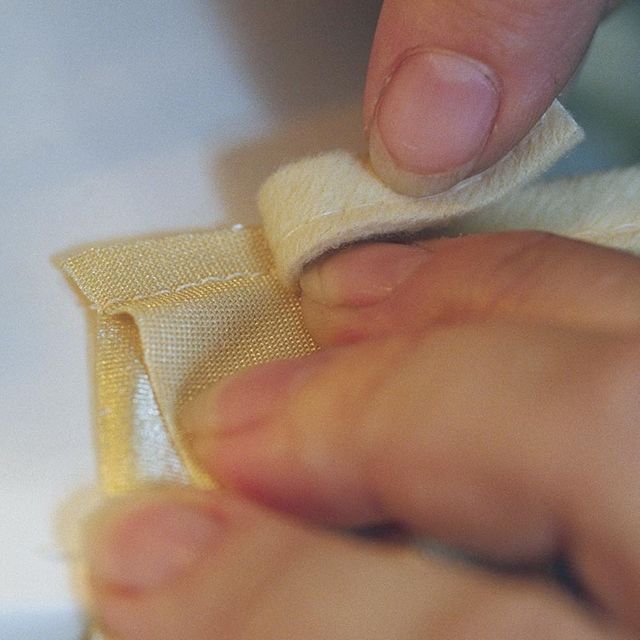
Comfy channeling
The nicest ready-made channeling for underwire consists of several layers, and provides lots of cushioning. Or you can make your own, if you like, with a finished width of 3/8 in. Two layers of bias-cut cotton flannel inside a layer of the bra fabric makes comfy channeling.
To add the channeling, lay one bra cup right side up on the table, fold the bra band and other half of the bra out of the way on top, and align the stitching on the channeling with the stitching guide on the cup, as shown in photo 5. Pin, covering the side seam, lower cup, and center-front seam, and leaving at least 1/2 in. of channeling at each end. Stitch close to the inner edge of the channeling (photo 6), pulling the channeling snug as you sew, which helps it roll to the inside. An option, after pressing, is to stitch close to each long edge of the channeling to prevent it from rolling to the outside, which gives a topstitched look.
|
|
|


Be very careful when you sew the underwires into the channeling (photo 7) — stitching over the wire may result in a broken needle and possible eye injury. With the wires fully inserted, you should have at least 3/4 in. of space between the end of the wire and the center-front edge of the bra. On the right side, sew a line of very narrow satin stitches at the center front of the upper cup, 1/8 in. from the top edge, as shown in photo 8, and trim the channeling even with the cup’s upper edge. Or you can turn the channeling under before sewing.
|
|
|


From bra to swimwear
Once you successfully complete a bra you like, it’s easy to make a few adjustments to get a perfect-fitting swimwear top, like the polka-dot one. You’ll need to lengthen each back band about 2 in., smooth the shape of the upper band, and trade the bra hooks for a swimwear slide closure. Add swimwear lining to the cups, and substitute 3/8-in.-wide swimwear elastic for the plush, cutting it to 90 percent of the band measurement. Sew the elastic inside the edges of the band, then turn and zigzag again, so the elastic is enclosed. And replace the strap elastic with a narrow, self-fabric tube with a strip of elastic inside.
I think you’ll find that making your own custom bra opens up an exciting new era of personal underwear fashion. What have you got to lose, except that frustrating feeling of being a fashion victim?
For more on sewing a custom bra, check out these articles:
- How to Turn Ready-made Bras into Strapless Dress Support
- Adapt a Bra to Accommodate a Prosthesis
- How to Install Bathing Suit Bra Cups
- Sue and Emma Folts of BraBuilders.com | Episode 42
- Pattern Roundup: Great Bra Making Patterns
Cynthia Elam of El Cajon, CA, teaches bra making and designs bra patterns and kits under the name Élan Patterns. For more on bra construction, check out Beverly Johnson’s article, “Clone a Favorite Bra,” in the February/March 2002 issue of Threads (#99).
Photos: Scott Phillips; drawings: Robert LaPointe


FABULOUS!!!!!!!!! JUST WHAT I NEED TO KNOW
My problem is that I am lager than a DD. In fact, I am a 38H. As you can imagine it is EXTREMELY difficult to find a bra at all. Can anyone help with where to get supplies, patterns, and suggestions on material please????!! If so please e-mail me at [email protected]
Thank you Cynthia. I've been looking at bra patterns--in fact yours--to get myself started making my own bras. This article is fantastic! Its so nice of you to share.
To jameseslipdip
I recently discovered the website http://www.BraMakersSupply.com. I live in Panama where the ladies are typically much smaller than us Gringas. It makes it nearly impossible to find bras that are comfortable and/or fit properly. I have undertaken the challenge of trying to make my first bra, and BraMakersSupply carries all the necessary supplies, patterns, fabrics, notions, etc. Can't wait for my order to arrive!
I'm not brave enough to make my own bra yet, but I do need to take in the bands. I have to buy a 38D even though I measure a 36 because I had a breast reduction and my shape is wide but shallow. I need to take in the band at the hook site. Does anyone know how to do that? I usually take them in on the sides, but that makes the straps fall off. If anyone has any info please e-mail me @ [email protected]
Hi,
I just wanted to point something out to you; the method of measuring for bra size that you have posted is incorrect. In fact this incorrect method, which is the one you'll usually find when searching on the internet ; is actually one of the reasons why such a large percentage of women wear the wrong size.
The error is adding 4 or 5 inches to the band size. This is not the correct way to measure; it is an old method which manufacturers no longer use to MAKE bras.
Nowadays, to get the correct size you either add 1 inch if the number is odd, and nothing if it is even. And then of course subtract that number from the bust measurement.
The support from a bra comes from the band(not the straps) so it needs to fit snugly, so that it does not ride up in the back. So obviously someone who measures 30 inches around the ribcage would get no support at all from a 34 inch band. I know this as well as anyone could since I used to wear anywhere from 34B to 38DD bras(vainly trying to find one that fit), none of them fit well. The boobs would always slip out underneath the bra and the band would go up in the back. generally I relied on the shoulder straps for support and they would dig into the shoulders.
When I discovered the correct method of taking measurements I was surprised to find I was actually size 32J ! Just in case you are thinking that I must be crazy and used the incorrect method; I ordered a bra in this size (from barenecessities.com in case you're looking for bigger bras!)and it fit PERFECTLY and supported BEAUTIFULLY, absolutely no bulging, falling out, or digging in anywhere. No bouncing around everywhere either for that matter.
So please, you would be doing a lot of women a huge favor by updating the method you posted to the correct one. Trust me on this one, I am one of those lucky girls who actually has bras that fit!
Cyanne89 can you post instructions as to how you obtained the measurements to sew bras? The method that you know seems better than the one shown on this article.
I've been searching on the internet, and it seems that there's conflicting information on this subject and that the method above has been critized.
I hope you Cyanne89 can see this request.
Thanks.
Ana
Hello, I'm still finding it difficult to get a bra pattern in my size- 30 D, no-one seems to do bands small enough! Is it possible for me to alter the commercial patterns? Or do i have to resort to chopping up one of my limited collection to make one that fits!?
thank you
Rosie
What do you do if you are a man? Say, creating a special present for your girlfriend? Or, I know this is *threads*, what if you use chainmaile?
Great ideas for making bras! One thing though - one of the reasons that so many women wear the wrong bra size is because of the myth that you're supposed to add 4-5 inches to get your band size. This is an outdated method of measuring, and as a result too many women are wearing bras with band sizes too big and cup sizes too small. It would be great if you could update this article to reflect the best way to get an accurate fit.
This article on Wikihow gives some good instructions for how to measure to determine one's bra size:
http://www.wikihow.com/Measure-Your-Bra-Size
I strongly suggest that you utilize a store such as Nordstom's to get you exact measurements.. I went and found that instead of the 44DD that I had been wearing I acutally wear a 38G or H, the G is US sizing and the H is UK sizing..amazing what a well fitted bra can do for one! Now to find patterns in this size?? any suggestions??
hello I created a bra but I can't sew,so I'm looking for manufacturing. Can anyone help me with that please?
Thank's kendra
[email protected]
By the wacky math used for these measurements, I have a negative cup size.
Ribcage 29" + 5" to make and even number 34"
Full bust 32.5"
Difference, -1.5
Yet in UK/European sizing I wear a 30 - 32 B or C depending on the manufacturer.
I don't get it. I smashed my girls into 34A and 34AA bras for years because that is what the sales clerks sold me - based on similar math. Those bras were freaking torture.
I was able to add 2 inches to my band size by going to a gym and working out with weights...then I had a size that was commonly available...a 34 instead of a 32..and I saved money too. You need to ask a trainer for the specific exercise. If its a small gym with a trainer owner you, like me, might get the information for free.
It would be nice to know from the author, which method of measuring for band size is the correct one..as another method has been suggested.
I am thinking of making my own underwires...from wire jewelery making I know that lightly hammering on wire causes it to stiffen...so if I shape the wire as desired and then hammer on it to cause it to take that shape permanently...I should have underwires..why do this? I live in the boonies..do not yet know the size of wires I need and the mail order business that sells the supplies...charges almost $20.00 for shipping. wondering how long it will take the wires to rust...
frogclan,
I would seal them. My choices would be something like Shoe Goo (shoe dept at Wal Mart) or a two-part epoxy like JB Weld (auto parts store or Wal Mart). I have not tried either of these but I suspect they would work. I'd try the JB Weld first.
Hi my name is Mary i really need some help i want to make my own bras. I'm a 52i and it is hard to find bras in my size can someone help me thanks my e-mail is [email protected]
can a non-underwire swim suit top be converted to an underwire one? I found a suit that I love but it does not come with underwire but I really feel uncomfortable without one. Is there anything I can do other than not purchase it?
To Cyanne89: Do you know where i can find a good, supportive pattern? I am a 32J also and I shop at barenecessities.com when there's a good sale, but a lot of those patterns are too "old" for me. Being under 22, I do not like half lace bras, I feel too exposed. I want young, fun-styled bras like those I see in stores. If anyone has anysuggestions, please let me know. my email: [email protected]. Thank you and have a wonderful day!!!
Hello Ladies,
I have just found the site thanks to my seamstress, and I wanted to say. I took time to read over each of the post I saw on the site under the "Bra Dilemma Solved" article. I would like to welcome you ladies, and any other new members to email me as well with "Bra" concerns. I have been working for the last 5 years on some Bras and am happily launching my full figure line soon. I will have most sizes starting from DD up.
I will also offer custom fit. email me at [email protected]
Just weighing in the band discussion. I have to side with the ones who disagree with adding the 4 or 5 inches. I'm a 32 DDD. The band measurement suggested in the article would make me a 36. When I try one that big around it falls to my hips.
I loved the article otherwise. Bras in my size are hard to find and cost a fortune. Wacoal makes one. Prices range from $55.00 to right at $100.00. Wacoal once made a bra with a molded contour underwire cup covered with lace. It was fabulous. I wish I had saved it for a model.
Just found this artical and it is very clear and easy to understand. Brilliant, I am constructing my first bra and this has made the patter cutting/ contruction process much faster! Thanks very much x
Another thing I'd like to add Bravissimo.com tells you how to fit yourself. So if you find a store that carries what you believe is your size but the sales person doesn't know squat you can accurately assess whether you have on a correct size bra.
I am unfortunately between sizes meaning that out of 40 bras I tried on all similar sizes only 4 fit... I am considering making my own bras because the retail ones break down on me so quickly and trying to replace it for $70 is just impossible for a college student. I would rather invest the money in the $35 (for 1 or 2 bras) kit and a $50-90 book and make tons of my own bras so I don't have to deal with the dressing room drama anymore.
I have 2 bikini tops, 1 is triangle ad the other is strapless. As i am a DD is there anyway that i can put
underwires in them for better support plus better apearance? I am not a sewer BUT will give it a go to do the alteration. Please I need your help !!!
I love this, it's so hard and so expensive to find a bra that fits. I can sew anything & you canbet I will be giving this a try.
I love this, it's so hard and so expensive to find a bra that fits. I can sew anything & you canbet I will be giving this a try.
Hi all I make all my wifes bras and panties because she is between sizes and i found this website is very good to get bra fabric and all the bits u need http://www.sewsassy.com and i found Kwik sew pattern # 2101 is very easy and quick to make and if you want make matching panties then use kwik sew pattern # 2100 i hope this a help to all
I have been looking for a decent bra making tutorial forever! I tried one about two years ago, it didn't turn out too bad - http://corsettraining.net/howtomakeacorset/bras-in-corset-making
but this has really inspired me to have another go :)
Anyone have any ideas re: what one could use as an alternate to traditional underwires. Eventually, they poke out, even on bras I've made myself. I'm thinking I'll experiment with cutting up a plastic margarine container for starters, but there's must be something more sturdy, but still a little flexible, preferably wider than current underwires. I'd like to put holes in each end to sew them into the bra fabric to keep them in place better....
Jameseslipdip, if you have not found what you need to make bras yet, I suggest that you check out http://www.bramakerssupply.com. This is Beverly Johnson's store in Canada (in addition to home sewers, she also teaches professional bra makers) and has a fantastic array of everything you need for bras, panties, shapewear, etc. She also has patterns, but her patterns work from the high bust measurement above the bust instead of the underbust measurement, which is affected by breathing, fluid retention, etc and the high bust measurement. If you use her patterns (and I recommend them) you will want to leave you preconceived idea of your bra size behind and go from the measurements she calls for alone and how they work with her patterns. Better yet, she has two classes on Craftsy (I have taken both) and some wonderful manuals if you really want to get into this field that are very informative. If you decide to order from Beverly, she has arrangements with SweetCupsBraSupply in the US to carry some of her materials without custom fees, as well with a European source and an Australian source. Her staff is knowledgeable and ready to help however they can. Another source is BravoBellaBras.com. Monica Bravo uses most tricot for her bras and has a few free video to acquaint sewers with her methods and suggestions. I hope this helps.
Ltuhy, how to add underwires would depend on whether your swimsuit is considered a partial band or a full band because these differ in how the channeling is applied to the cup to hold the underwire. Beverly Johnson's second Craftsy class starts with how to convert a full band bra to a partial band bra and the information could be reversed to help you add underwires to a full band "bra" swimsuit. You may be able to contact her at bramakersupply.com. She is extremely open to sharing her knowledge and she can either point you to the right place to obtain the information or help you with the process.
eimat, if your underwires are poking, it is because they do not fit. You can go to bramakersupply.com and print out a PDF of all the bra wire sizes (be sure to set your printer to Actual Size). Then you can cut the wire sizes near what you think will work out of something like shirt cardboard. Hold your breast up and place the wire where it fits under the breast. It should fit around the breast perfectly. You could even buy wires and change them out in your RTW bras as long as the sizes are close. The other option is to check out bravobellabras.com. She uses a different type of wire for her underwires that she says is better. I haven't tried them but you can view the same YouTube about it that I did on her website.
https://pp.vk.me/c629431/v629431708/315c9/DjqQ4Djjvic.jpg
Мимоза оптом, Все города, доставка от Питера до Владивостока. Оптовая цена на мимозу от 180 рублей до 250 рублей за 1 кг, мимоза продается коробками по 7 кг, в 1 коробке 50-60 веточек мимозы, 1 веточка мимозы стоит от 50 до 150 рублей в розницу!!! Вы легко, торгуя в розницу, продав 1 коробку мимозы, заработаете минимум 2000 - 3000 рублей с 1 коробки! С 1 точки продается в день от 5-10 коробок (в зависимости от места)! Все расчеты сделаны по самому минимуму! +7 988 319 9104 +7 988 319 9180 +7 989 750 2132 http://mimozaopt.ru Момоза по самой выгодной цене, только у нас на сайте http://www.mimozaopt.ru Заказывайте мимозу на 14 февраля и 8 марта Мимоза оптом. Мимоза с доставкой в мой город +79883199180 +79897502132, +79883199104 Пишите, звоните по Viber, WhatsApp, Skype: vita3031 Почта [email protected] Сколько вам нужно кг мимозы В какой город сделать доставку? Ваша почта или телефон Если вы хотите получить самую выгодную цену, просто напишите да! Почта [email protected]
Мимоза оптом с доставкой http://www.mimozaopt.ru/
мимоза оптом,куплю мимозу оптом,мимоза оптом москва,мимозы оптом +к 8 марта,мимоза оптом +из абхазии,мимоза цветы купить оптом,мимоза оптом продам,мимоза оптом цена,где купить мимозу оптом,купить мимозу оптом +в москве,купить мимозы оптом +к 8 марта,мимоза оптом +к 8 марта 2016,мимоза купить оптом украина,мимоза оптом +в адлере,купить мимозу оптом +в сочи,мимоза оптом спб,мимоза оптом +к 8 марта 2015,мимоза оптом продам 2016 год,мимоза искусственные цветы купить оптом,купить оптом цветы мимозы +в россоши,мимоза оптом +к 8 марта 2016 украина,мимоза +в абхазии 2015 купить оптом
Your fitting method is WRONG! It dates from the 1940s when elastic was less stretchy and women needed the extra inches for breathing room. Modern lingerie elastic can fully accommodate any ribcage while still being supportive. The bra band should be tight enough that it can stay in place WITHOUT straps!
Please consult bratabase.com for proper bra fitting methods, a bra size calculator, and extensive information on worldwide brands and size ranges.