
Machine Quilt a Supple and Stylish Garment

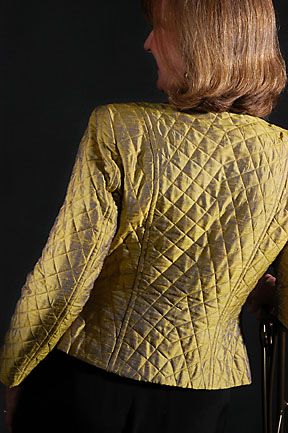
Straight line quilting by machine adds great detail to a silk dupioni jacket.
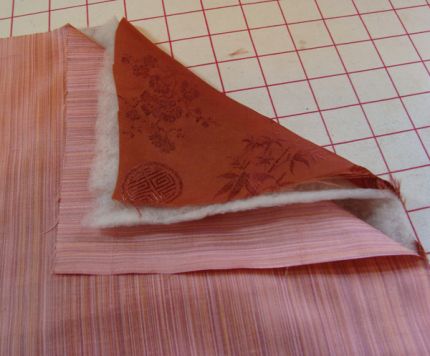
It’s that time of year when a cozy quilted jacket is just the thing. But you don’t want to look like you grabbed the cover off your bed and threw it around your shoulders. Here’s how to make a quilted garment composed of three layers – fashion fabric, batting, and backing—that has shape, some great surface texture, and is stylish and flattering to wear.
Start with great fabric
Most any fabric can be quilted, but for best results choose a light- to mid-weight fabric that’s not too tightly woven. I think natural fibers work best—cotton, silk, linen, light-weight wool, and rayon. The backing, or lining fabric, needs to be smooth so it slides easily over other clothing. I love using silk for a backing, but smooth cotton batiks and Bemberg rayon work well, too.
For this sample I’ve used silk taffeta fabric and a silk/rayon lining with bonded wool batting in the middle.
Batting is key
There are lots of different battings available in all fibers and types. My favorite is Hobbs Heirloom Wool, which is a soft, bonded product that’s easy to work with and wonderful to wear. Cotton flannel fabric also works well (be sure to preshrink before cutting). Be careful of firm needlepunch battings that have a lot of body and are great for wall quilts but can be too stiff in a garment.
Thread is the icing on the cake
Choose thread carefully. You can use regular sewing thread or a decorative embroidery thread that’s a size 30 weight or 40 weight. Heavier cotton threads work well, too, when you really want to emphasize the stitches. Color is a factor. Threads that are darker and lighter than your fabric will stand out. Variegated threads are great when your…
Start your 14-day FREE trial to access this story.
Start your FREE trial today and get instant access to this article plus access to all Threads Insider content.
Start Your Free TrialAlready an Insider? Log in


I am wondering what seam finish is used. Pressed open? Serged together? Flat-felled? I think the seams are where a lot of the bulk in a jacket lies, so the article could have gone on a little longer with even more tips. Can we please have more?
I would like to know more about the pattern for the jacket and where I can get it! Thanks
I would love to know the pattern you used. Please share.
the gold jacket appears to have flat felled seams ..and, yes,i wished that the article would have gone on longer
I purchased a similar quilted jacket this summer that did not have a batting at all. It is quite nice - a lightweight cotton, inside and out but in a very simple boxy pattern. I would like to make one but worry about the bulk of the jacket with batting. Is this wool batting available in the common fabric stores?
That's it? How do you deal with the bulk in the seams? How did you get the effects of channels on the back of the jacket? What about collars and/or cuffs? What kind of style is best suited this type of quilted jacked (what kinds of patterns should I look for). Great idea, just wish there had been more information.
I have made several quilted jackets. I live in Florida and do not need anything too heavy., I find that flannel is wonderful as a batting in jackets. I preshrink it. It is inexpensive and makes very soft and supple batting. I have also used different straight line quilting designs on different parts of the jacket. I use lines that create the most slimming illusion. I use straight lines on sleeves and and elongated diamond on the back with fake princess lines on the back and front..again to create an illusion of slimness. On the other side of the "princess" lines I use straight lines angled at a 45 degrees from the side seams down to cause the eye to travel down and in. I hope this makes sense.I just adore quilted jackets. The pattern is not relevant as long as it is simple. I serge finish the seams.
A neat embelishment is to sew a seed bead on the points of the diamonds in a few select areas of the front.
I totally agree ~ What pattern, please, Mary?? The shaping is beautiful, and not easy to find... It *looks like* at least the back princess seams are flat-felled, but also agree that a couple more sentences about finishing would be helpful.
Kharmin
Yes, I would like to know more too. Does using the wool batting make the jacket really warm, perhaps too warm for those of us in a less wintery climate?
And how does one finish the seams?
These jackets are lovely but would they make one look, ahem... dare I say it, fat... ok... fatter?
Does one bother with interfacing?
So many questions! I must clear the 4 year backlog in my sewing room and get to work!
I too would be interested in knowing what pattern was used for the pictured jacket.
I hope this interesting article is Part 1 of a two-parter, the second part being how to finish the garment's seams and hems. Clearly, from the comments, there is a lot of interest in completing this garment. I would love to give it a try, and would, if I had the full picture.
Hi there Mary,
Thank you for a wonderful tutorial. I think it is you modelling your fabulous jacket??
Like a lot of others, I would love to know what pattern was used, the back shaping is wonderful and I would really like to make this jacket, following your very clear instructions.
Also, it would be fantastic if you could do a follow put, Part Two on seam finishing etc.
Again, thank you for getting us all motivated! Going back to the U.K. for Christmas, so it would be an opportunity for me to buy what I need for this Jacket............not easy to buy supplies where I live!!
Hoping for an up-date from you Mary. Thanks a million
Smockerlady
Mary, I love the quilting design you chose for the back. While you are tiny, I believe the design enhances the figure and would create a slimming effect. I note that several have asked about your finished seams, I too would like to know what method you used since the seams could end up bulky. Without your input my first inclination would be to use a method in quilting where you quilt each block separately then join them together. You sew the front seams together then trim batting so the pieces abut each other, then hand finish the inside so that all seams are now encased.
When living in a remote area I created a quilted jacket. Since I had no batting available I used an old mattres pad. The center was worn but there was plenty of material around the edges. Once it was washed I was ready to go. Though I lived at 8,000 ft. it was warm enough for a light jacket. The great thing about it was since it was pre-quilted, it didn't shift while quilting and I had the warmth without the bulk.
Nice start but incomplete. Where's the next page?
How do I sew the seams, finish the edges, buttonholes or what kind of closures?
I can take guesses, like felt seams, bias binding, serged edges...but why not write the whole tutorial, why stop with the darts, those are usually the first thing we sew...then comes the hard part.
Love this jacket and would like to know what pattern it is, especially with the seaming down the back. I guess I'm not the only one who would like to have more of this article. You left us hanging. More please!!!!
I have made many quilted jackets and have used a technique learned in Threads using cut squares (2"x2") or whatever works- laying them along the seams or facings and sewing them on top. You can use any stitch pattern or thread to match or not. You can wrap them around the facings. I have also sewn them down sleeves and around pockets. Patterns with the sleeve attatched is a lot easier. You can add length to the sleeve like a cuff if fabric width is an issue.
This is simply beautiful! I love the elegance that the gold fabric creates. It is my experience that a seam can be created in the back of almost any jacket pattern by not cutting on the fold but adding one half inch for the seam. I have needed to do this on more than one occasion especially with a vest pattern when I didn't have enough fabric. I too think that flannel is an excellent sandwich inner. Love the suggestion of various ways to quilt and tools to help. It looks to me as if you folded the seams in and topstitched (I'm sure this has a name)The entire effect is very sophisticated! Thanks for the inspiration.
I also love the look of this jacket. When I googled Mary Ray to find out if there are more articles on this project her web site comes up with a photo of the front of the jacket.
have a look:
http://www.maryraydesigns.com/workshops/edge.html
Thank you all for you comments. I'm really glad you want to hear more. So -- stay tuned for Part II which will include additional pattern/design info and seam finishes.
Please, please give us more information about this exquisite jacket! A picture of the front is shown on the Mary Ray Designs website. I too, would like a pattern suggestion as well as pictures of the wrong side to view seam finishes. Thanks so much for sharing!
if you google Mary Ray her website comes up with a class that has this picture attached.
http://www.maryraydesigns.com/workshops/edge.html
I agree with Michianna; the article seems to stop short of the actual construction technique. I remember seeing once an assembly method that started at the centre back seam and enclosed all the seam allowances as you went around the the pieces toward the front centre seam, I think it's a quilting method of assembling squares. Does anyone have a reference for this?
I'm late to the party again...This is so cool Mary, its so nice for you to share your method with us. One benefit of catching this article much 'after the fact' is that I'll bet the follow-up article is already posted! :^)
I love asian clothing, especially Japanese and Chinese, and this makes me think of the thicker Japanese kimono worn in wintertime. I'm wondering if this is similar to the way those would have been made. They did use wool fabric, and I don't know what was used for the 'filler' for loft and insulation.
Hmmmn, Another item for my want-to-make-sometime list. Thank you for posting this intriguing application! Its such a great inspiration.
This is a course Mary is teaching online at craftsy.com