
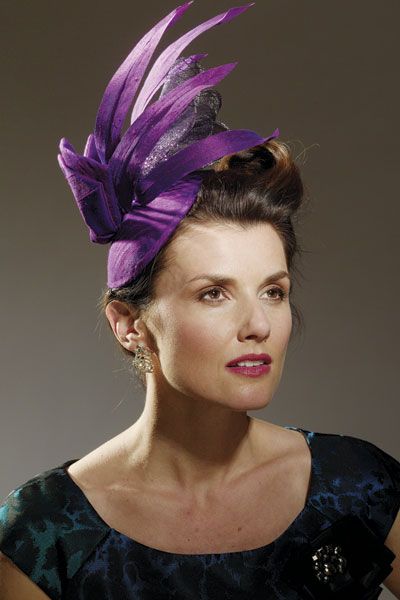
Fabric bow and feather embellishments transform the hat base from simple to stunning.
Soft hats and caps are well and good for casualwear and baseball teams. A really stylish chapeau, however, calls for structure, a shape that supports lovely extravagances from bows to veils – a hat base.
Traditional millinery techniques require costly equipment, such as hat blocks and steamers, in order to create stiff, shaped hats. I’ve found an alternative means to make hats. It’s done with inexpensive materials and doesn’t require much fabric. The supplies are readily available, with the exception of heavyweight buckram, milliner’s wire, and wire joiner, all of which can be ordered online. My method is so simple-you don’t even need to measure your head.
Here, I share my technique to make the “pod,” a brimless oval contoured to fit the head. A hat in its own right, the pod is also the foundation piece for brimmed styles. To see more detail on these styles, see the full article in Threads #153, and don’t miss other fundamental techniques like this one by purchasing a print subscription of Threads magazine.
Form a hat base from buckram
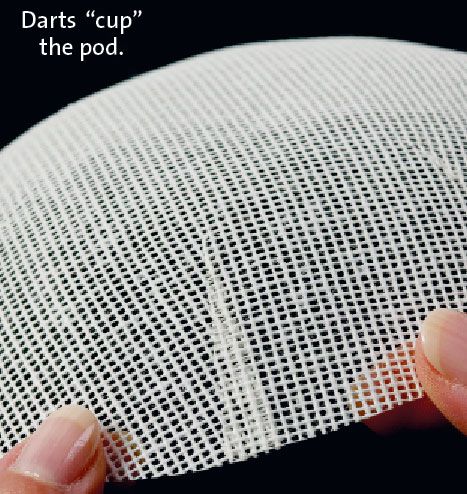
The stiff, slightly cupped “pod” is an oval of heavyweight buckram. Lapped darts shape the pod, and lining covers the underside.
Shape the buckram
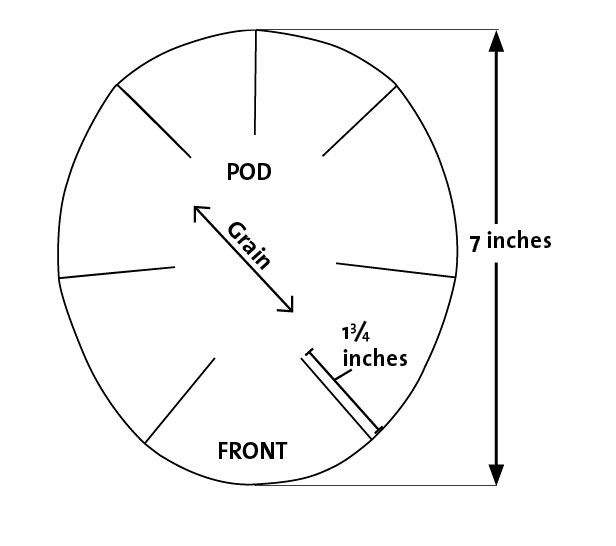
1. Cut the pod pattern from heavyweight buckram. Download the template. Trace the pattern on the buckram, and cut out the pod shape. Make seven cuts, each 1 3/4 inches long, from the pod’s edge toward the center.
Click image below to download template.

2. Shape the pod with lapped darts. Buckram is stiffened with water-soluble vegetable sizing. When wet, it’s limp and malleable, but it regains its stiffness when dry. Lightly moisten and overlap each cut to 1/4 inch at the edge. For larger heads, reduce the lap to 3⁄16 inch to increase the circumference close to 1/2 inch. Use a hot iron tip to seal each dart.

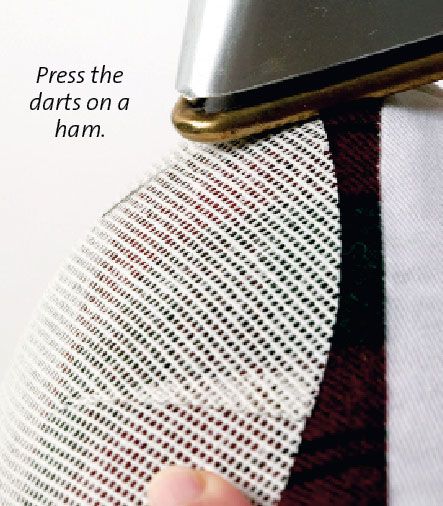
3. Press and shape the buckram. After the darts dry, place the pod on a pressing ham or a tightly rolled towel. Lightly steam and press each dart point to smooth any imperfections.

Line the pod
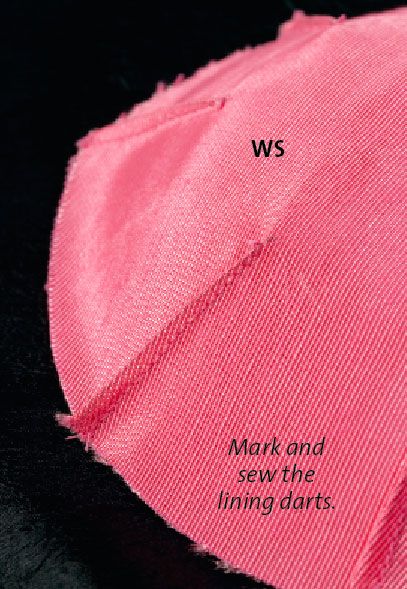
1. Trace the pattern on the lining fabric’s wrong side. Cut out the pod outline, but do not make the dart cuts. Mark the dart lines on the lining’s wrong side.

2. Sew the lining darts. Fold the fabric on a dart line. Begin your dart stitching at the edge, 1⁄8 inch from the fold, and taper the dart to a point at the slash line’s inner end. Stitch the darts at all the slash lines.
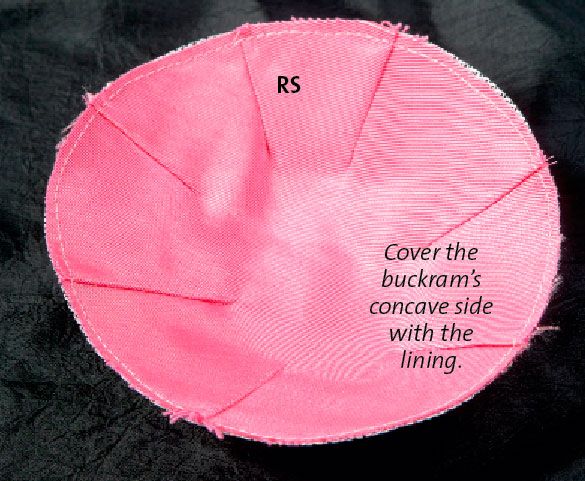
3. Attach the lining to the buckram. Press the darts flat. Position the lining on the pod’s inside, aligning the darts. Pin and baste close to the edge.

Fashion a little chapeau
Now that you have a hat base, expand on it by encircling the pod edge with millinery wire to strengthen it. Then, cover the pod with fabric, use bias tape to finish the edge, and add an elastic band for fit.
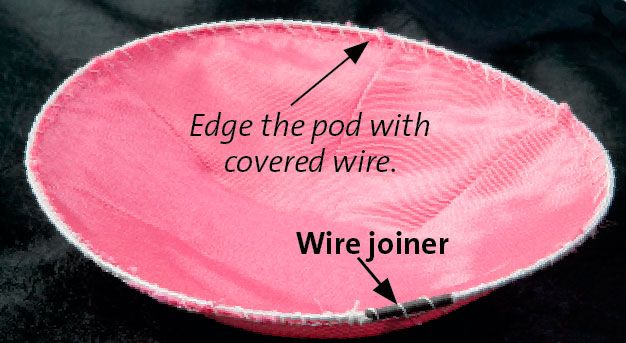
Wire the pod edge
1. Cut 19-gauge millinery wire about 3 inches longer than the pod’s circumference. (If you use a wire joiner, cut the wire only slightly longer than the pod circumference). The joiner must be crimped onto the wire with wire cutters (be careful not to cut through). Starting at the pod’s back, whipstitch the wire to the edge with button thread. Overlap the wire ends or trim excess wire, and insert the end into the joiner. Crimp to secure.


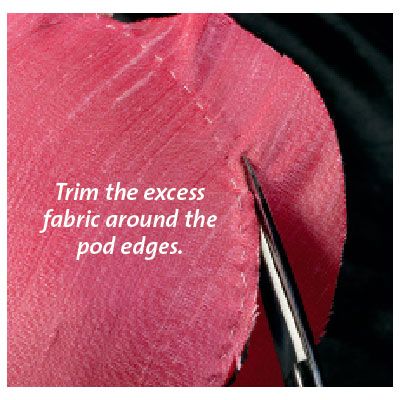
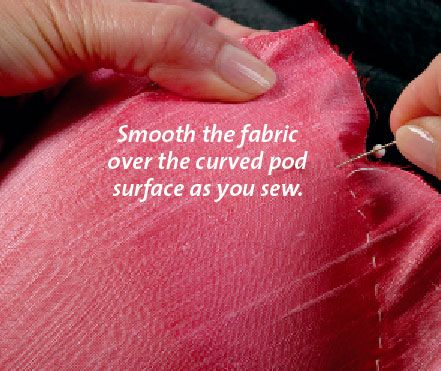
2. Cover the lined and wire-edged pod. Cut the fashion fabric about 1 inch beyond the pod pattern edge. Pin in place as you gently pull each bias. Hand-sew the fabric to the pod, using small stabstitches close to the edge. Instead of weaving the needle through the fabric, make two motions, a stitch through from front to back and another stitch from back to front. Remove the pins, and gently pull the fabric taut as you proceed. Trim the excess fabric when you’ve finished sewing.


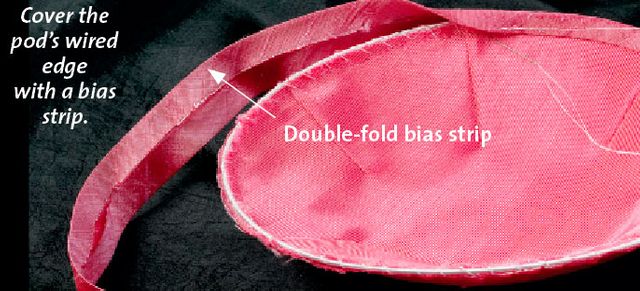
3. Bind the wired edge. Cut a 11⁄2-inch-wide bias strip several inches longer than the pod circumference. Use a fabric that creases. My first choice is the hat fabric. However, if the material doesn’t crease, use bias-cut bengaline. It looks like petersham, a traditional hat binding. Cut, fold, and press it into a double-fold bias strip. Start at the pod’s center back, and wrap and sew the strip over the edge. Use tiny stitches, and catch the folded edges on the pod inside and outside. Pull the bias strip taut as you sew. Right before the strip ends meet, trim the strip at the center back, leaving a tail long enough to turn under. Lap the turned-under end over the strip’s beginning, and blind-stitch to finish.

Sew on the strap
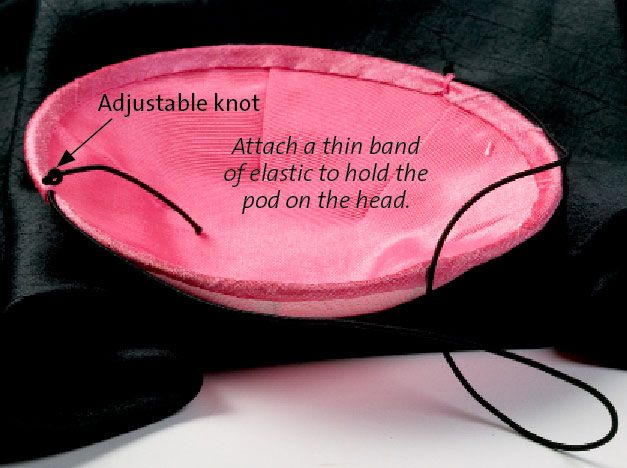
1. Make the elastic strap. Cut black elastic cord 22 inches long. The elastic cord is worn behind the head, covered by the hair. If you think the elastic is too lightweight, double it.

2. Attach and adjust the strap. Knot both ends, one loosely for later adjustment. Sew the ends to the pod’s lined side, just in front of center on left and right. Try on the pod, and pull the elastic until snug. Reknot it to fit. Trim the excess elastic.
SOURCES
Fabric and craft stores stock most of the materials to make the featured hats.
Hats By Leko, HatSupply.com, and Judith M Hats & Supplies, JudithM.com, carry the following millinery supplies:
- Heavyweight buckram in black and white; a pod, as well as a brim, can be made from 1/3 yard.
- Covered millinery wire, also in black and white, and gauges 19 (heavy) and 21 (light)
- Wire connectors/joiners (optional)
- Veiling (optional)
Jo-Ann Fabric Stores, JoAnn.com, stocks the common sewing supplies and notions for hat making. I’ve included my specific recommendations for some materials:
- Heavy-duty thread—button/carpet
- All-purpose thread
- Fashion fabric
- Hand-sewing needle—no. 14, “milliner’s,” or no. 3 “sharps”
- Lining fabric
- Crafting adhesive—Aleene’s Tacky Glue
- Fabric sizing—Aleene’s Stiffen Quik
- Fabric stiffener—Aleene’s Fabric Stiffener & Draping Liquid
Tutu.com offers a selection of bengaline fabric to make bias strips.
Excepted from “Millinery Marvels” by John Koch in Threads #153 (Feb./March 2011), p.49.


Good instructions and will work well in a mixed media of sewing and crochet. Not expensive to make either. Love it!
Well-detailed, clear instructions. Looks like great fun, and makes me long for the 80's when bridal parties wore hats! This would be a fun project to show off your skills and creativity, and could be used as a decorative accent if not on a lady's head!
I want to try my hand at these types of hats/fascinators. I found preformed POD's to try my hand at. I will have to look at them more closely to see if they need wiring.
Thanks for all this great information.
Well done. Hats and bags are my favourite accessory pieces and this will expand the repetoire -
I make clothes for fashion dolls. Hats are a mystery. I will try this. If it works, I'll send Threads a photo.
Petite Moonbeams
Thank you!!! this is a lovely tutorial, so well explain and with easy to get materials!!! Wish you will teach us more about hats!!! thank you and happy new year!!
As a professional milliner for 25+ years, I compliment you on a well written and explained tutorial and am looking forward to more articles on millinery. Thank you!
Where can I find the veiling for hats? I have scoured the internet and cannot find any. HELP!
My mom got me a subscription to Threads for Christmas. I've received my first issue and can't wait for more. I absolutely LOVE pushing the creativity envelope with great new ideas and techniques.
If you are looking for millinery supplies, check out http://www.hatsupply.com. They have veiling and buckram by the yard.
I read the article in the magazine, which I have been getting for years. I really enjoy each issue. In the article it said to log into ThreadsMagazine.com to learn how to make the bows, veils and feathers. I don't see any links to this information. Am I missing something?
Happy Sewing.
happysewing, If you're missing something so am I. I searched and only found a silk flower. Very pretty, but I'm not a flower kind of gal. I would like to make the "leopard" hat, only not "leopard." Since I missed the sources online and just saw them in my latest issue, I was afraid it was just me.
Since I also could not find the instructions for the bows and veils, etc. I wrote to the editor and got this response
"Keep watching! We have 3 additional posts coming up (scheduled for Thursday this week). The plan right now is to add a new post each week until the additional posts are complete."
Louisegtx - Gee, what a great idea! As my mother always says "When in doubt, ask?"
I'm excited. I love to try new things.
Also, the article on slow sewing...that's amazing because I've recently decided to slow down when I sew. I'm always in such a hurry to get everything done. When it's done, I just kind of look around and wonder "OK, what next."
I do that with books, too.
love. would also be great with crochet.must try it soon. am currantly making comfort caps. for cancer and also for people how just like hats.
I LOVED the article on hat making. I have have been experimenting with hatmaking and remaking for the last few years, trying to figure it out on my own. I have ordered some very good books, but they often call for equipment I don't have or can't justify in my budget. This is a great article and I can't wait to try these things. I'm posting in the Reader's Closet a couple of the hats i made with florist wire, buckram, remnant fabrics and trims, craft store feathers and other odds and ends from patterns i figured out on my own. Thanks again for a great article.
I absolutely loved this article. So informative from start to finish. Eash step had great detail. Well done!! Can't wait to give this a try!!
Your hats are beautiful but what happened to the practical working girls hats of the 40s? You could tilt them to one side and they complimented the lady's face. The looked great with suits or dresses and were so practical. Maybe a small feather but no lace. I guess it was a more tailored look. It had a short crown and about a 3 or 4" brim.
It was worn to work each day, and would look great with slacks. I enjoy watching the Turner Classic movies and the ladies who wore their hat so well.
I've tried to find one but I'm still searching, is their a pattern? Maybe I could make one.
Hi - quick question - I'm not that young but I have never worn many hats, but when I even try to wear a headband (The stretchy kind) they slide off the back of my head. Do you use bobby pins or what?
I am a Red Hatter and I love to wear hats of all kinds. I have several ways of keeping a hat on my head. One way is to make a small ponytail in my hair where I want the hat to set and then I anchor the comb on the hat or I use a hat pin to catch the pony tail. Sometimes I anchor the hat to a plastic head band (not stretchy cloth) which I have glued felt patches on so I can sew the hat to it. If your hair is fine, tease and spray it a little before making the pony tail. Hope this helps.
I love wearing hats, and the instructions and ideas in the article and online have encouraged me to think creatively and try making one of my own. Thanks!
Love this! Would love to see how you finish off your hats. How you you add your embellishments!
Exquisite Fabrics has a good selection of buckram fascinator forms online. http://Www.fabricsdc.com.
I was hoping to see Margaret Atwood’s 12 hats!!