


This high fashion buttonhole treatment is a perfect solution when fabric is very dimensional and a machine stitched buttonhole that’s not perfect can ruin a beautifully sewn garment.
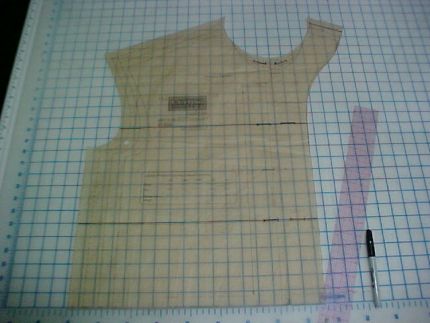
1. To minimize the front bulk use a jacket pattern with a cut-on facing. That means the facing is one piece with the pattern and is just folded under at the vertical front edges.
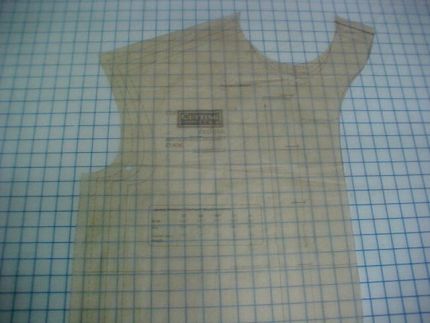
2. Draw two lines perpendicular to the center front line.The first line passes through your bust point and the second line is 8-inches below the first line. These lines will become the horizontal seams that house the slot buttonholes. The seams can be sewn on the jacket front only or completely around the front and back. If the seams are to be featured around the circumference of the garment, mark the front pattern piece first and then align the back side seam with the front and continue drawing the horizontal seam lines in the same position so the front and back match.

3. On the horizontal lines draw buttonhole placement lines on each side and equal distance from the front fold line to position the buttonholes. Mark the ends of the buttonhole. These marks indicate the stitch termination points when sewing the horizontal seams together. In the example pictured the buttonholes are exactly 1-inch long. Make a sample with your fabric to see if the buttonhole size is right so the button can pass easily through the slot once completed. The thickness of the garment fabric and interfacing can make the finished buttonhole smaller than desired.
4. At the neckline stitching line, mark the buttonhole the same distance away from the front fold line as the others. Mark both the garment front and facing. If it is difficult to mark the stitch termination dots along the collar stitching line, wait until…
Start your 14-day FREE trial to access this story.
Start your FREE trial today and get instant access to this article plus access to all Threads Insider content.
Start Your Free TrialAlready an Insider? Log in


Hi Louise,
I love this idea and it looks so beautifully tailored! I'm thinking it might be possible to do something similar with one vertical seam which takes in all the buttonholes on the front of a jacket, shirt or dress?
I really like the look, but don't think I would ever leave an 8 inch space between buttonholes.
The idea of a vertical sounds interesting 'withagee' but there might be a problem with the buttonholes gaping.
This is a great idea! Thank you!
Of course, I'm now wondering if any jacket with a center front opening can be made with a cut-on facing! Just lay the facing pattern piece next to the jacket front, line up the seam lines and tape it together?
have I missed something, when do you make the button hole
is it made on the cut on facing.how does it get to front
it sounds great, as button holes are so scary when you have sewn something you really are happy with, button holes are the nightmare.
Louise, I want to learn this technique. The instructions, as usual are very clear and precise. I especially loke the picture of the coat at the end of the article. New Pattern?
I have made slot buttonholes on the vertical by making the seam at the center front of the garment. This works really well if you are using polar fleece which does not lend itself well to regular sewn buttonholes.
The horizontal seams on the coat shown are quite lovely but in order to prevent gaping, the coat may require snaps inside if the buttonholes are too far apart.
This is a terrific idea. I hope to adapt it to use it for the handle of a shopping bag that I intend making shortly. Thank you.
I love these buttonholes... a closeup shot of the finished buttonhole would be helpful.
I love this buttonhole! I have 1930's coat pattern that has this buttonhole between the collar and coat front. It looks lovely and I put a statement button there. I needed to cover some very large snaps with lining fabric to put between the buttons to prevent gaping. Worked like a charm. And covering large snaps was kind fun too.
The "old fashioned" way to finish up these buttonholes without using the fusible Steam-a-Seam 2 is to invisibly stitch the facing to the outer fabric around the buttonhole by hand.
I've seen this done in vintage clothing from the 30's and 40's utilizing a shaped rather than straight horizontal seam. Either way, it's a lovely addition to a fine garment. Thanks for the clear instructions and illustrations!
I have been doing variations of slot buttonholes for years but mostly vertical so I can put in as many as needed on dresses etc. I like the idea of horizontal which make the seamlines part of the design. I have had no problems with gaping. Depending on fabric, sometimes I put seam lines in the vertical instead of interfacing for lighter fabrics which makes it easy. On heavier material interface or a light cord works well too and adds insignificant bulk.
I have been doing variations of slot buttonholes for years but mostly vertical so I can put in as many as needed on dresses etc. I like the idea of horizontal which make the seamlines part of the design. I have had no problems with gaping. Depending on fabric, sometimes I put seam lines in the vertical instead of interfacing for lighter fabrics which makes it easy. On heavier material interface or a light cord works well too and adds insignificant bulk.
@denise ~
In this example, the buttonhole is sewn in BOTH the front and the facing - your stitching simply skips over the two matching slots. I hope this shows what I meant it to ~
---| buttonhole |-----C|F-----| buttonhole |-----
(hooray! that's exactly what I wanted it to look like.)
@denise - you really can't *add* this to a finished garment - it has to be done during the the design/cut phase, because of the extra seam allowances needed for each buttonhole-in-a-seam.
Louise (or Vicki) ~ I agree with MeSewPretty - could a close-up photo of a finished slot-buttonhole be added? Ideally with hand-finishing? Thanks!
Louise, you have once again inspired me to try something different. You are a genius!! The seams for the slot buttonholes could be made by rotating the bustline darts to the centre front, or by attaching a pieced section, turned on the bias, at the centre front of the garment with the buttonholes in the piecing seams, or?????
I love your articles because not only do you explain clearly, you inspire me to experiment, and think outside the box, or in this case, the pattern envelope!!!!
Please continue to be a Threads contributor. Threads editors, if you lose Louise Cutting, you may make me rethink my subscription!!!!