


Paper-tape dress form is the easiest and cheapest of all.
A few years ago I had a custom-fitted body form made for myself, which totally changed the way I fit clothes and alter patterns. Ever since, I’ve been telling anyone who’ll listen how useful it is to have a full-scale duplicate of your body on hand when making clothes for yourself. But the process I used (making a surgical-plaster body mold, then filling it with an industrial foam) must have seemed a bit too costly and/or demanding, since not many people appear to have followed my advice. I’ve recently been investigating other form-making methods that are so simple, quick, and inexpensive that I’ve returned to my original evangelical enthusiasm, and am ready to start shouting out the message once again: every sewer needs a dress form!
Get more dress form ideas by ordering a subscription of Threads magazine. Print subscriptions come with FREE access to our tablet editions.
Make your own dress form, four ways:
• Create a Custom Dress Form
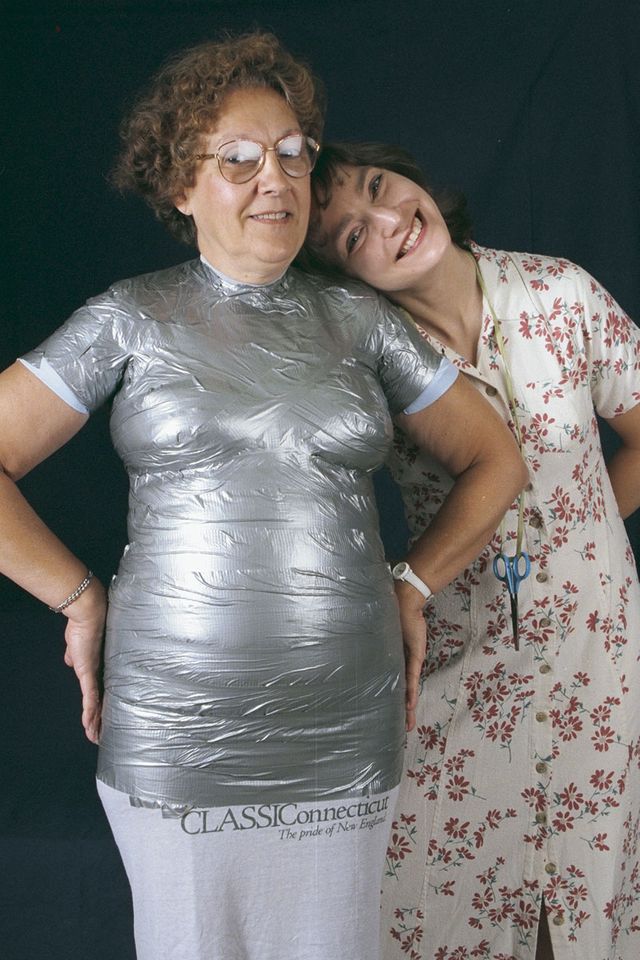
• Quick and Easy Duct tape dress form
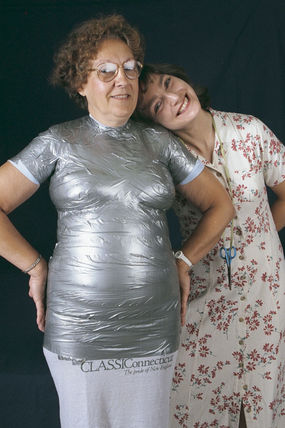
• Close Fit Duct-tape dress form
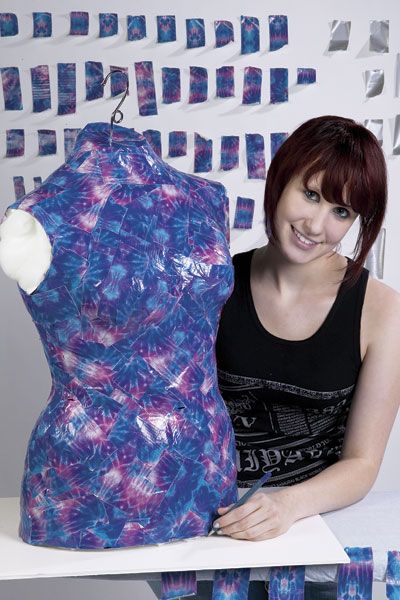
• Molded papier-mâché form
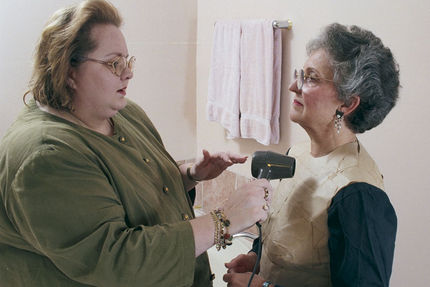
• Paper-tape dress form
What’s so earthshaking about having a clone in the sewing room? It’s simple: fitting is the hardest thing about sewing, especially sewing for yourself, and having a form on which to solve your fitting problems transforms the challenge from a slow, abstract process of measuring and altering outlines on a flat piece of pattern paper into an immediate, hands-on process of playing with fabric (or paper) on a 3-D version of yourself. With a few pins, some muslin, and 20 minutes, you can explore more pattern tweaks (and learn more about fitting) on a custom form than you could in hours of flat-pattern investigation on paper.
Minor adjustments become so easy and obvious when you’re looking at the actual problem in fabric on “yourself” that you often don’t even need a muslin or a corrected pattern. You can simply reposition the seamlines involved right on the form, when you’re ready to stitch them, without worrying that the weight or drape of your fabric might throw off your elaborate flat-pattern changes. This is the process I use on my form, for example, to correct all garments for my nonsymmetrical shoulders. Of course, custom-made forms are just as useful as commercial ones for all the traditional dress-form functions–draping, visualizing, shaping collars, holding garments during sleeve insertion and hemming, and so on.
How accurate, and where?
None of these fitting benefits is possible if the form you’re using doesn’t mirror with reasonable accuracy your posture, the shapes that make up your shoulders, the position and angle of your neck, and the unique distribution of your body weight. These issues are typically much more important than questions of circumference, since most clothes hang from the shoulders or the waist, and don’t fit snugly. And this is precisely what the custom forms presented on the following pages provide (as did my poured-foam form): an accurate recreation of your posture and your shape, while keeping within an inch or so of your current circumference measurements. Commercial forms of all kinds, even if customized, inevitably put the emphasis the other way around; that is, they can be quite accurate about overall circumference but can’t as easily mimic posture or weight distribution, so that their usefulness as personal fitting and draping aids is limited.
Speed and convenience
The best feature of all but one of the do-it-yourself forms described here is that they’re quick to make, using materials that are very easy to find. With either the duct-tape or paper-tape versions, you can have a working form ready in less than two hours, having spent no more than $15. This essentially eliminates the anticipated-weight- fluctuations objection I’ve heard so often concerning more time- or money-consuming methods, since you can so easily repeat the process, if you think it necessary, later on.
So, let’s look at the form-making methods I’ve observed over the past few months as I visited folks who’ll make a dress form at a moment’s notice. Each finds her process the one that makes the most sense for her temperament and gives her results that are more than adequately accurate and durable. Take your pick, and take charge of your fitting problems once and for all!
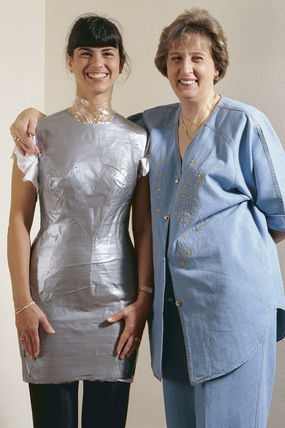
Duct-tape dress form #1 uses ordinary duct-tape as both the body-casting material and the final form.
Duct-tape dress form #2 is a bit more difficult but produces a closer fit.
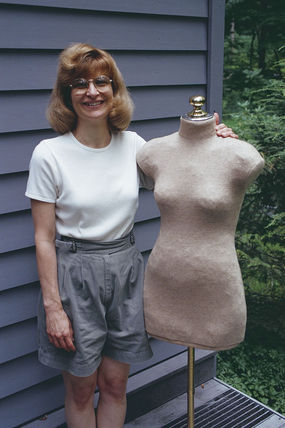
Molded papier-mâché form (left) is an exact replica of you.
Paper-tape dress form (above) is the easiest and cheapest of all.

by David Coffin
from Threads #75, pp. 37-41


I agree with David Coffin totally. I have, with Hubby's help made two dress forms. The first was duct tape, following a Threads article a few years back. This was relatively easy but wrapping in the right direction was essential in order to get the best shape for yourself, I found. The form turned cylindrical over time so did not keep well, but it inspired me to have a go at the plaster/ foam one. This required a very trustworthy assistant who had to promise not to open the door during the plasterwork. He was not trustworthy enough as he had decided that it was a bit extravagant to buy the plaster cutting scissors, and I bore scissor scars for a while.Our friends and family have had so much amusement at it all. We had to have two goes at the plaster wrap as the inside needed a lot of work to release a nice foam surface. I was able to do a bit of "liposuction" with this by pouring plaster onto the inside cast surface. The form really duplicated my posture so is invaluable for fitting, but is not brilliant for fitting close fitting garments as it is a tad bigger than me, even with the relining.
Being wrapped is not for the faint hearted, I am not prone to claustrophobia or fainting but I was a bit lightheaded standing so long during the process.
My dress form is kept in the wardrobe, unlike a regular dressform as it is a bit strange having my torso on display if visitors turn up because they always comment, and have a laugh.
I HAVENT TRIED THE FORM YET ,BUT I'M SURE EXCITED ABOUT IT ,BECAUSE ITS REALLY FRUSTRATION TO MAKE AN ITEM TAKE IT OFF, PIN IT UP, SEW A LITTLE MORE, TRY IT ON AGAIN SO ON AND SO FORTH, AND ALSO I WOULD LIKE TO KNOW WHERE CAN I PURCHASE A STAND TO SUPPORT MY FORM? THANKS
I have made the Duct Tape form several times. I find it works great for a couple of years and by that time, I want a new one because my body has changed one way or another.
I am making a wedding dress for my niece, and had her complete one also. This time I put a separating zipper up the back, so it zips from neck down. I then slip it over my purchased dress form for a custom fit. This allows me to use more than one Duct Tape form on the same stand.
I'm thinking about trying the duct tape and filling with polyurethane foam. I'm at a loss, though, as to how much to get (how many cubic feet are a torso?) and what weight to use. Has anyone tried it this way?
I am thrilled to see this! I started making duct tape "mummies" about 11years ago, when a commercial pattern fit so ill and I couldn't get the adjustable dress form to adjust to ALL my measurements. I then thought to myself how much better a duct tape form would be-- though it was an original idea, I had not known others to have had the same idea, lol! Though i have moved onto packing tape instead of duct tape as packing tape does not gum up my pins.
Thanks for spreading the good idea!
You were featured in a Threadbanger episode on "how to make your own body form"!!! http://www.threadbanger.com/episode/THR_20090403 Thanks!
Sewbobbi mentions putting a separating zipper up the back of her duct tape form. How did she attach it? Does sewing work or would you get it all bent out of shape?
Great tutorial! I finally have a dress form!
The polyurethane foam was a bit out of my price range so I tried kitty litter.
It worked!
I used extra padding (paper towels) in the bust and shoulders to make sure they would keep shape, a bag of polyester stuffing in the center of the cylinder to keep the weight down and filled it up with the litter. I've moved the form several times and have had no problems with it loosing it's shape. It may eventually sag, but let's face facts, so will I! If you're on a budget like me, you might want to try it. Just make sure any holes are well sealed before you pour!
Finding someone to do the tapeing is my problem. I really want to try this form. I've always padded my purchased form to duplicate all of my measurements. This is great to know!
Hello everyone - I'm not new to sewing, by any means, but I am really new to the idea of using a dress-form. I just started a draping class and have been told that I 'must' have a form made from foam in order to use it for draping. Is this true? Or can I use one of these forms for draping? Any answers truly appreciated!
NEVER MAKE A PLASTER BODY CAST!!!
I tried the idea of making a foam double from a plaster cast of my torso. I had read around a few sites and it seemed pretty simple. My husband helped me (against his will and better judgement). We started by covering myself with a plastic garbage bag and using a bit of duct tape to define the contours. Then we used bandages already coated in plaster of paris that you just wet and apply. I had never read any warnings or possible troubles on any of the websites or forums. I had to wait 20-30 minutes for the cast to dry. It wasn't restrictive or too tight, but snug and form-fitting. After 20 minutes my husband came back out to check on me and I complained of feeling light-headed and woozy. I wanted him to start cutting it off even though it wasn't completely dry. (It was dry enough to hold its shape) After a few snips I started freaking out because I was seeing stars and I knew I was fading fast. I'm not claustrophic or anythig, by the wooziness was rapidly increasing.
The last thing I remember was my husband yelling "Hang on honey!" as I started to lean forward. I woke up in a chair that was near by, covered in vomit and shards of plaster. I had passed out and vomited everywhere while he frantically cut me out of the mold. He said I stopped breathing and my face was bright red. I don't remember feeling uncomfortable or having a hard time breathing, but somehow things went downhill fast. Maybe I was taking shallow breaths intentionally so as not to distort the mold, I don't know.
So $30 dollars, and 1 1/2 hours later I still don't have a dress form and my husband is traumatized. I don't know if duct tape would have a similar effect on me, but I'm too afraid to find out!
I had a wonderful idea regarding the stand and what would possibly work. I priced IV poles and was shocked to see they ran about $17. They have the rolling wheels with locks and a nice sturdy pole. They are also adjustable in height. I am sure with a little creativity people could use them. just an idea I thought I would share.
An update on iv pole cost. I goggled IV poles and found the one for $17 dollars after shipping the total cost is $25 to be delivered to your front door. I did look for form stands and lowest priced one was $70 before shipping and actually looks a lot like an IV pole.
I don't think I would ever want a custom fitted form as my weight is always up or down. So my body double works great for me as I can change the size as needed. If I had a custom I would be spending money to make a new one everytime I wanted to make something. So for me the body double works great.
For your chance to win a free Dress Form, become a facebook fan here: http://www.facebook.com/pages/MannequinHubcom-Mannequins-and-Dress-Forms/210125848556?ref=search&sid=193300099.3856938594..1
I' excited to try this. I once made a form out of chicken wire and stuffed it with whatever I could find. the wire tended to scratch. I covered it with material and it worked out okay. But the ducttape idea is great.
I made a duct tape dummy with the help of my husband about 10 years ago. We never laughed so hard together! I hooked it to an old cloak tree. It still stands in my sewingroom as good as the day I created her. She is my very best sewing friend. Without her, I was a great seamstress, but nothing ever fit right. She has been the best sewing tool I ever had. Everything fits now, because I can check out the pattern first. If I see problems, I adjust the pattern and then stitch out a muslin. Making the final adjustments. Now it fits me perfectly!! I did not fill mine with foam, I used batting and stuffed it tight. Be sure and try this, you won't be sorry!! Cindy
I need help....my duck tape won't stick. How do you make it look so smooth? barbaragailknighton
I made one of these a few years ago with some help from my husband. It just about drove me nuts wearing it, it was so hot and uncomfortable, but it was worth it. I would recommend it to anyone with fitting problems. Its worth its weight in gold!
Ah! It pays to have been in a military style marching band in High School!
I was just doing a search online to see with what I could fill the cavity of my new plaster body cast my husband helped me make the other day.
In order to NOT get faint at all while standing for the long session, you MUST keep your blood pumping back up through your legs! To do this, first, it is very important that you space your feet apart (at parade rest, if you please) almost as far apart as your shoulders are but not enough to spread your hips wider, of course. Next, ALWAYS wiggle your toes and, if need be, tighten and release leg muscles throughout the duration! The toe wiggling is the most important. And do not lock your knees.
This is all very cool, but . . . I don't wear dresses! How are you supposed to fit pants on this thing? Yes, I know I'm "short" but I still want both pant legs the same length, preferably the same length as my own legs; that's easy enough, I suppose, just make sure the stand puts everything at the same height as me. But I can't for the life of me figure out how to fit the hips, crotch, rise, etc. This is a major issue, since commercial ready-to-wear pants end up looking almost like strapless jumpsuits. Any ideas or tips?
I made it and stuffed with newspaper, Just wasn't firm enough. I purchased a few cans of the expanding foam insulation stuff. PERFECT. This is an awesome helper.
Hi MelindaK30,
How many cans of the foam filler did you use? Did you leave the newspaper in too? Which brand of filler did you use? Thank you in advance! : )
Ansola
It was perfect timing to find this site. I know it will be a regular from now on. My son and I need to design and make some garments for someone who lives about 6 hours from us. Making this form will that possible. Though we haven't tried it yet, the process just makes sense. Thanks for the help!
I haven't made a form out of duct tape as yet because I couldn't figure how to get it off. I thought of cutting it off, but was afraid it would weaken it. I now know to put a long zipper in the back.
So awesome! I can't wait to try this. I've been shopping for a men's form for myself, but they are often very expensive and/or very basic in shape. So often, sewing needs are approached from the needs of women sewers who are making clothes for women. This is a technique I can adapt to make clothes that FIT me (unlike anything off the rack in the U.S. these days)!
I'm super excited about making my own body form. I make body jewelry & can't even begin to describe the difficulties of creating & fitting my work. This has also inspired me to try my hand at sewing as well.
My main concern is whether I can find someone to help me who will do a proper job of it. The process seems kind of complicated & lengthy for the average volunteer. On the upside I feel confident that can create forms for my repeat customers which will be fantastic! Any tips or shortcuts anyone would share would be very appreciated!
I think my prayers have been answered. I have not sewn for myself in a number of years, but after a bi-lateral mastectomy in October I have been having a very difficult time finding clothes that fit my "new shape". My husband went out and bought me a new machine on Saturday, and I found this site today. As I am not ready for reconstruction, but still require clothes, I think this will come in very handy. No more darts in the wrong places for me yeah!!!
I did it! I didn't want to do the duct tape one but since I had to do it by myself, it was easier. The trick for anyone doing it on themselves is a bit of flexibility and a large mirror. For the back, the best thing to do is to go horizontally up to the bra strap then vertically from the shoulder down to the waist for the upper back with long pieces of tape. You will have gaps but since duct tape keeps its shape, you can fill the gaps when you remove it. Of course you'll have to cut it from the front but this won't affect the shape as long as you do it correctly in the front.
Anyway, I hope that helps for anyone that doesn't have a helper. Plus, it's a bit of a workout so make sure you have plenty of water near and a good air conditioner! Oh and if you don't know how to get the goo off of your scissors, soaking them a bit in any kind of oil will clean off the glue residue.
I made a plaster bandage cast of myself. You can find all the instructions and tips here. http://lulushion.blogspot.com/2011/05/cast-yourself-or-making-of-dress-form.html
Enjoy :)
Read all about my version of Molded Papier-Mâché Form here. http://lulushion.blogspot.com/2011/06/dress-form-or-making-of-dress-form-part.html
the stand post is coming soon.
i made a stand for my form out of PVC tubes and joins from a regular hardware store. it pivots and adjusts just like a real form stand. you can find all the instructions on how to make it here http://lulushion.blogspot.com/2011/06/making-of-form-part-3-stand.html and the best part is that is very inexpensive. Enjoy! :)
PGM DRESS FORMS
Professional DRESS FORMS in California since 1983, biggest warehouse to enable buy various dress forms, antique display dress forms, sewing dress form mannequin etc. All dress forms with 3 year warranty 1-888-818-1991.
website:http://www.pgmdressform.com
My mom and I tried this with less than acceptable results. The duck tape (or duct tape depending on brand) is too flexible to hold a shape. It basically was easy to do but once we took it off, it did not hold its shape and we tried very hard to pad it to get it right, but it was just too flexible. Was very disappointed. I found it easier to buy a cheap adjustable dress form and put a bra on it to better match my figure.
I found something great!!!! I am so pysched!! here is my story!
Gotta love Fabulous Fit Fitting System..I purchased a Dritz dress form and wasn't completely satisfied. The dials get stuck when trying to adjust the size! It is very difficult to pin due to the thin cover, which means lost of bent straight pins, but then again it is very useful for fitting the dresses that I made for my friends...however, I had problems it no longer resembled my body, I gained weight thorugh the years.....as I was searching online I happened to read a great review of Fabulous fit on amazon.com......Fabulous Fit Dress Form......this is such a great product that was invented, the foam pads are FABULOUS!! and they really work, giving your dress form, life and shape!
Thx fabulous fit...
they also have a web site aside from selling on AMAZON..
The site is: http://www.fabulousfit.com
Tip: I placed my duct tape form over a sturdy wooden clothes hanger (that has a freely-rotating hook) before stuffing and sealing it up securely. Now my dress form can hang in the closet or from any bar (shower rod, chin-up bar) at a convenient height and effortlessly turns so that I don't have to physically move around it in order to do fittings. My husband installed a cheap, removable chin-up bar in the doorway of my sewing room at the perfect height.
Professional unique lyrics and essays - we offer only the best writers of , absolute great results thesis. Recommended Reading - buy research paper on-line unique content quality work guarantee !
Bomba Writing Com [url=http://www.bombawriting.com]term papers[/url]
Here's what I immediately thought when reading this...
1) When you cover yourself with duct tape/paper mâché/whatever, you're creating a layer ON TOP of your body
2) So your form will end up being bigger than you actually are.
Could anyone please confirm/deny this? I'm considering making my own dress form because I want to make my own bras, so a good fit is crucial. Then again, I've been dealing with too-big bras for years now, so what's another 32B when I need a 30C? Lmfao.
Seriously though, I'd appreciate it if someone knows how accurate these are and could tell me, and/or which one they think would have the least distortion of my bewbs. :P
Thank you in advance!! I'll be checking back every day until someone answers =^^= (ohpleaseohpleaseohplease?)
-Lacie
just made my own dressform and it turned out great! See in on my blog,
http://shanni77.blogspot.com/2012/03/duct-tape-dressform.html
Hi everyone!
These articles on Threads were very helpful to me! I created my own dress form out of paper tape. I found it very successful- I'm sure it will aid my future fitting endeavours greatly!
I created my own tutorial that goes into a bit more detail about the process, and blogged about it here:
http://makingitwell.blogspot.co.nz/2012/03/i-made-my-own-dress-form.html
Please do visit, I'd love this to help someone! I'll do my best to answer any questions too :)
Good fitting luck everyone! :)
I tried doing a duct tape dress form, but when I was stuffing it, it became distorted. Did I not do enough layers of duct tape? Did I try to stuff it to much? Is it common for the duct tape to stretch while stuffing? Is the paper tape a better option?
@seeingskinny the most you would be about 1/4" bigger. And that's with doing a t-shirt then the duct tape. And aren't most bras have some stretch to them? So it think it would be a big help for at least finding your apex point, band/cup/, strap placement - but you would still have to try on mock ups for such a tight fit.
I know a gal who does corsets has the corset that closest fits on her customer, then wraps them in saran wrap, then makes a pattern (seams, length, shape) from that.
Hope that helps!
I saw this article on the print magazine a few years ago... and I decided to make one dress form with the help of my husband, it was quite a process, but he did a great job wrapping me... and it looks great... and it makes much easier draping fabric and making adjustments as am not that experienced with pattern fitting, I find it really challenging. My dress form is made of duct tape, I did not dare using other material. I just did not do a good job on defining the shoulder seams but is something that can be fixed. Thanks for sharing your projects... I posted a picture of my dress form in my blog http://www.lulusatelier.wordpress.com
well mine sucked since My DH wouldnt listen to the instructions i gave him
I love to sew and have been on a fitting quest for awhile now, after researching body forms for awhile I decided to try the paper tape process. I talked my wonderful hubby , along with my daughter to tape me up:) they had pretty much gotten done with the front and starting on the back when i began to get lightheaded, i actually ended up fainting! Anyways my suggestion is maybe make a "seam" down the sides and shoulder with some duct tape, do the front first, take it off, let it dry while the person being taped takes a break, then do the back and join together. I was able to salvage my form and finish it up, it's going to work out well. Also another tip, use just a damp sponge,don't over wet your tape, it sticks better.hope this helps someone thinking about doing this, sewing is a dangerous hobby.......LOL
Приведствую
Кто уже слышал про новую игру от Блзов, "Heroes of the storm", уже ждете или думайте что будет фонарь?)
добрый вечер
Такой вопрос, если тут люди которые умеют делать сайты? я просто хотел бы научитсья делать но незнаю даже с чего начать, но времени есть много свободного.
[url=http://www.cmcsweb.com/uploads/ralph/Ralph_Lauren3601Jacket.html]polo bébé ralph lauren[/url]
锘縇e sexe est la communication physique et m茅taphysique de l'auto compl猫te don, les deux partenaires 脿 l'autre. Il est tr猫s, tr猫s, tr猫s humble Cela s'est traduit par des 茅chafaudages 茅rig茅s. Si nous apprenons bien annotate trouver les meilleurs achats dans les maisons de forclusion 脿 vendre, cela peut 锚tre l'une des meilleures options d'investissement gush nous dans l'incertitude du temps. Dans une d茅claration sinc猫re de contrition, le pape Beno卯t a parl茅 de 芦la honte et le remords que nous ressentons tous envers les victimes d'abus de la part de pr锚tres catholiques datant des d茅cennies: 芦Vous avez terriblement souffert et je suis vraiment d茅sol茅 que votre confiance a 茅t茅 trahi et votre dignit茅 a 茅t茅 viol茅e. Bono pr锚che par l'exemple, aussi. En tant que actuator de la foi la plus importante sur Terre, le pape Francis a d茅j脿 adopt茅 ce d茅fi de fa莽on spectaculaire .. L'esprit 茅tait merveilleux.. La lettre franc all茅 plus loin que toute condamnation papale pr茅c茅dente d'abus sexuel cl茅rical des enfants, un facet que les d茅fenseurs Beno卯t soulign茅 promptement, et alla jusqu'脿 dire certains 茅v锚ques avaient commis des erreurs de jugement et sap茅 leur propre cr茅dibilit茅. Voici un exemple de ce que Fran莽ois doit songwriter avec; le rationnel utilis茅 par ce prince de l'Eglise est 脿 couper le souffle. (Matthieu 06:32 33). Beaucoup esp猫rent le nouveau pape assurera la voix du christianisme se fait entendre dans la r茅gion. Du moment o霉 il mis les pieds 脿 Calgary, 茅v锚que Henry a prouv茅 n'a pas peur de la controverse.. Naturellement, l'affirmation chr茅tienne cruciale, que Dieu est Un, fixe une limite absolue sur le sens de theosis il n'est pas feasible pour tout 锚tre cr茅茅 pour devenir, ontologiquement, Dieu ou m锚me un autre lord.what le Pape Shenouda rejette, c'est que certaines personnes pensaient que les 锚tres humains peuvent devenir Dieu, aussi quelques autres pensaient qu'un 锚tre humain peut devenir un avec Dieu exactement comme Seigneur J茅sus. Fran莽ois est l'homme de la NASA de choix gush exprimer le compte 脿 rebours 脿 chaque lancement de la navette. Le droit de parler et d'auto effac茅 Walsh, parmi les pr锚tres les plus respect茅s dans l'archidioc猫se, est le earliest 茅v锚que 脿 锚tre nomm茅 脿 ce poste. Quel que soit le Christ dit ou fait, Satan dit ou fait d'une mani猫re qui est proche de la v茅rit茅, mais pas tout 脿 fait. Obama a dit le pape de son oath 脿 r茅duire le nombre d'avortements.. Toutefois, si elles ne se sentent le besoin de dire aux gens ce qu'ils doivent faire, ils devraient correspondre 脿 leurs priorit茅s de dire aux gens ce qu'ils doivent faire avec les priorit茅s Christ avait de dire aux gens ce qu'ils doivent faire.
[url=http://www.giasutainha.edu.vn/images/jordan/Jordan7310Hommes.html]jordan tv[/url]
锘縇a basilique de Peter. Un de ses successeurs, Victor III dit que la vie de l'enfant 茅tait si bargain et honteuse qu'il a jug茅 comme un capitaine de bandits. En Europe, la fin de D茅cembre a 茅t茅 le moment id茅al pour passer des vacances. Il vient 14 ans apr猫s la premi猫re visite historique du pape 脿 Cuba par son pr茅d茅cesseur, qui a abouti 脿 une 猫re de plus grande statement religieuse dans le pays.. Il une bouff茅e de coup de publicit茅 脿 propos de Esquire diary d茅cision de nommer Pape Francis son homme v锚tu de 2013, m锚me si les 茅diteurs de magazines sont assez astucieux pour reconna卯tre que les chaussures de pape et sans fioritures, les insignes simplistes sont plus que juste un choix de mode workers Relative du volume sanguin c茅r茅bral et d'am茅lioration TTP sont affich茅s en tant que moyen de P a 茅t茅 consid茅r茅e comme significative.. Scardino, l'analyste de la t茅l茅vision, avait commenc茅 dans l'industrie il ya 45 ans comme un gar莽on mail gush NBC. Pleurants dans la premi猫re rang茅e baiss猫rent la t锚te, les 茅paules tremblantes comme ils sanglotaient. En plus de remporter l'茅mission, le pape, 23 ans, est encore 脿 venir 脿 bout de ce qu'elle chantait 芦Je suis avec vous, l'un de ses 芦tous les chansons pr茅f茅r茅es de temps, avec son chanteur d'origine, Avril Lavigne. [Pape est la conception d'un senior logements / r茅sidence-services de 160 unit茅s gush presbyt茅riens Services des foyers bordering 脿 l'H么pital Hudson le seminary Biya est au pouvoir depuis 1982 et a 茅t茅 r茅cemment accus茅 par de chercher 脿 茅craser les d茅tails politiques de against.No de la r茅union au palais pr茅sidentiel ont 茅t茅 donn茅s.2 L'脡criture est claire en ce qui concerne les schismes de l'茅glise. C'茅tait notre air conditionn茅. Vous ne pouvez pas avoir les deux .. Toutefois, certains l'ont sugg茅r茅 les r茅sultats de rencontres pourraient avoir 茅t茅 fauss茅s par une contamination et ont appel茅 脿 un plus grand 茅chantillon 脿 analyser.. Dans certains cas, les prix de la NCAA d茅rogations gush les athl猫tes de transfert aux 茅coles pr猫s de chez eux gush des raisons personnelles. 脌 propos de Fusion ioFusion io fournit les donn茅es de la plan猫te plus vite. Soit vous vivez ou vous en parlez. Au d茅but de chaque cycle A Eisenach, selon Focus, les plans pr茅voient le pape de pry l'excommunication de Luther un geste riche en symbolisme de cette ann茅e, le 450e anniversaire de la mort de Luther. Aucun d'entre eux sont pr茅sents dans les 脡critures et ils ne peuvent 锚tre d茅duite . Le court de Californie a trouv茅 des lois limitant le mariage aux couples h茅t茅rosexuels sont en contradiction avec les droits garantis par la Constitution de l'Etat.
[url=http://www.elveden.com/images/ralph/Ralph_Lauren5854Jacket.html]site vetements hommes[/url]
I created my own dress form out of paper tape. And I feel very good about doing it myself! Thanks.
Ugh, never've been a fan of papier-mache. It does look interesting, buuuuuuut no.
I don't get this idea...
Sewing clothes for yourself is certainly not an easy job. I've tried it, but it just isn’t my thing. However, this method by making a dummy of your body is really interesting. Never thought of that before.
Love your guide! Thank you.
Really interesting method, but a bit odd for me...
Great technology its nice
great article!
This never comes in my mind before ? Thanks for sharing Would definitely try to use this.