

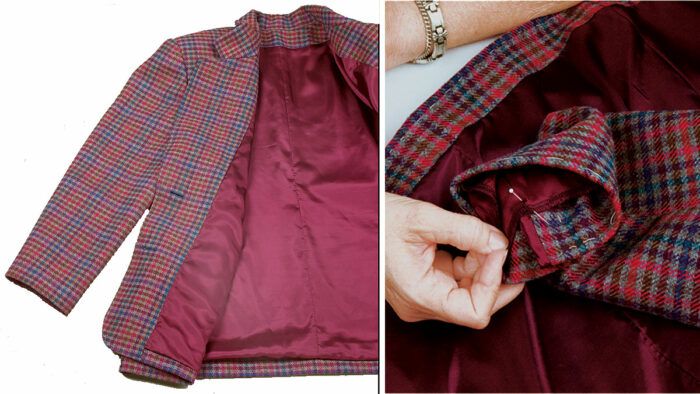
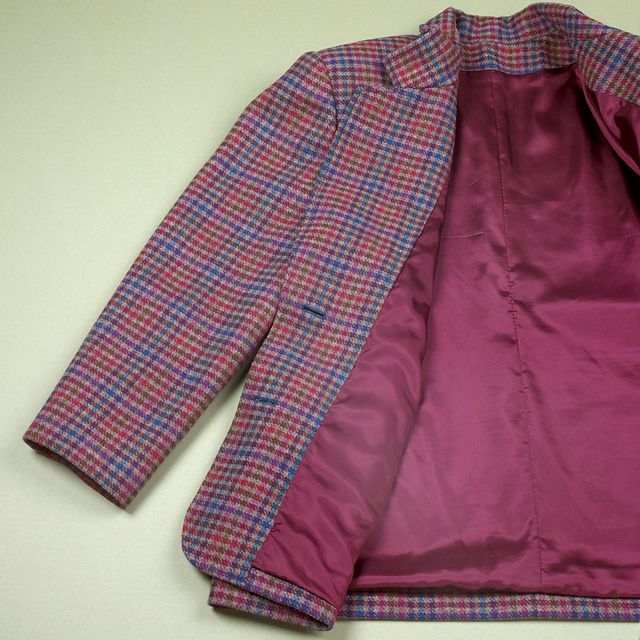
Sewing jackets is something I like to do, but lining them is another matter. By the time I get to that point in construction, I’m ready to put on my new jacket and sashay out the door. However, I’ve found that lining a jacket need not be difficult or time-consuming if it’s inserted with the bagging method, often used by ready-to-wear manufacturers. I arrived at this conclusion after trying all the alternatives, including sewing a jacket lining by hand and not lining it at all. The bagging technique eliminates almost all handwork, with the major lining edges joined to the jacket by machine. Although bagging is standard in the industry, I’ve tweaked the procedure for the home sewer, and streamlined the steps so you won’t think twice about inserting a lining. You’ll get great results every time.
Prepare to bag
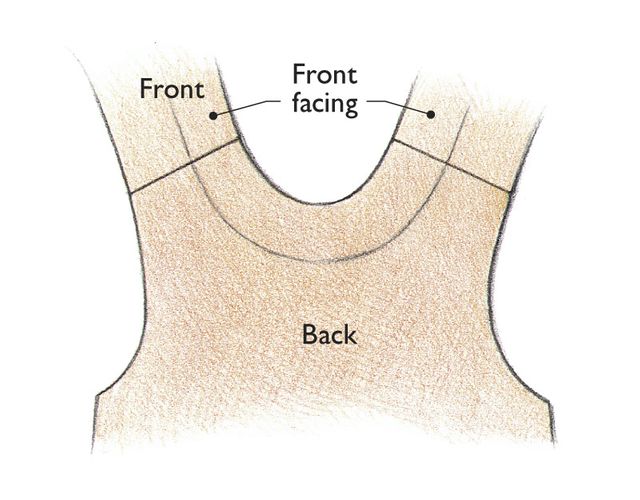
All jackets benefit from having a lining; it lets the jacket slide easily over other clothes, drape correctly on the body, and stand up to wear and tear. Any jacket pattern, whether it includes a lining or not, can be used to make a bagged lining. If you’re using a pattern without a lining, it’s easy to make a lining pattern. Keep in mind that the bagging process won’t work without a back neck facing, which is also a cinch to make a pattern for, as shown in the same drawings. And if you’re one of those people who always needs to shorten or lengthen a jacket’s sleeves or body, alter your pattern before cutting it out, because it’s easier to work with a pattern that has the correct hem and sleeve lengths.
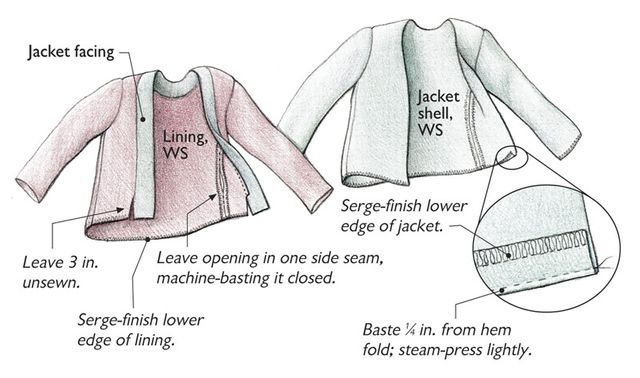
The bagging procedure begins only after the jacket and lining have been constructed, but there are a few details to attend to before construction. The first step is to serge finish the seam allowances of both the jacket and lining hems, side seams, sleeve hems, underarm seams, and the jacket’s front facings. Aligning raw edges is much easier to do when they’re serge finished, and results in more accurate stitching lines. You won’t see these seam allowances after the jacket is lined, but you’ll know they’re not raveling during wear (which many fabrics tend to do). I don’t serge the neck edges or armscyes, as they’re mostly cut on the bias and don’t ravel.
Since the jacket’s seam allowances will be pressed open, don’t serge any two seam allowances together, as you might be tempted to do, for example, on the center-back seam. If you don’t have a serger, don’t zigzag the edges, as this stitch tends to make the fabric fray more rather than less. Instead, cut cleanly and sew as accurately as possible.
Now, construct the jacket, including setting in the sleeves and collar, following the pattern instructions up to hemming and inserting the lining. Attach the sleeve heads and shoulder pads, too. And check to see that the hem of the jacket is even and the sleeve lengths are correct.
The next step is to create a temporary hem on the jacket. Hand baste both the entire jacket hem and the sleeve hems 1/4 in. up from the hem’s fold and lightly steam-press the folds. This step will save you time and hassle when sewing the hem in place later on. And, as you’ll see, the hem crease will serve as a stitching guide.
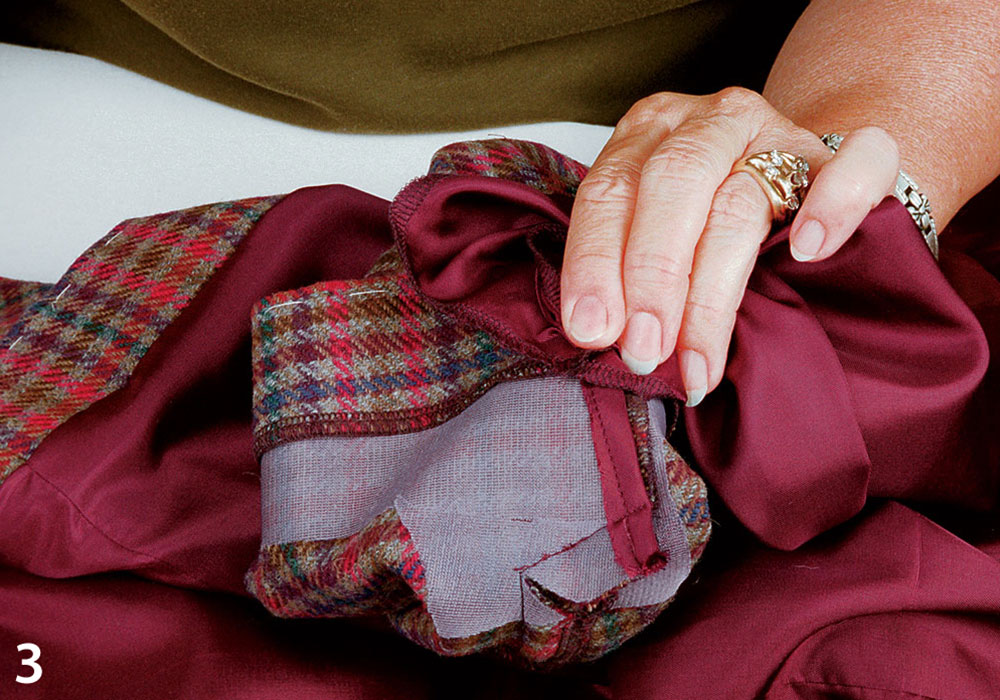
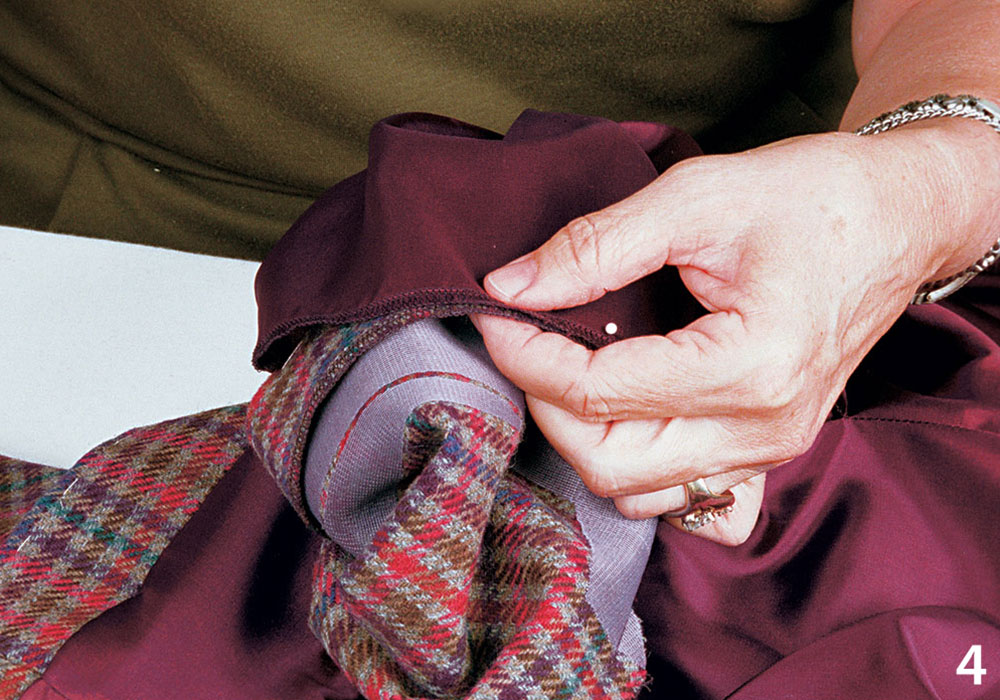
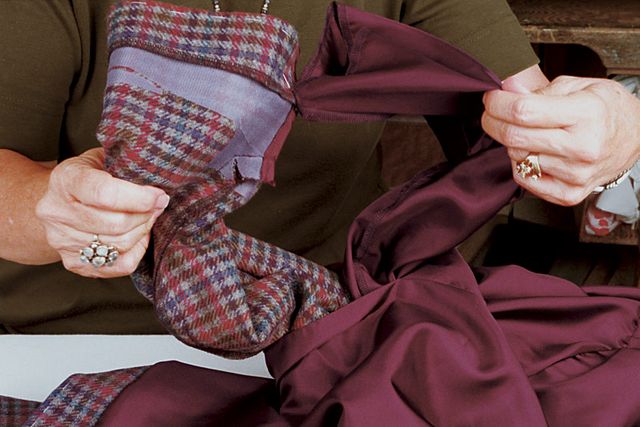
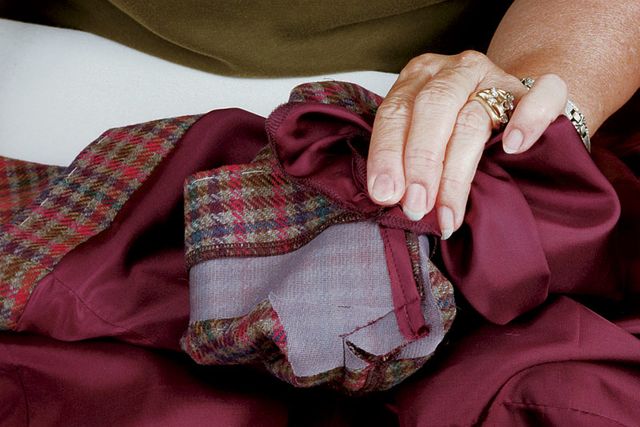
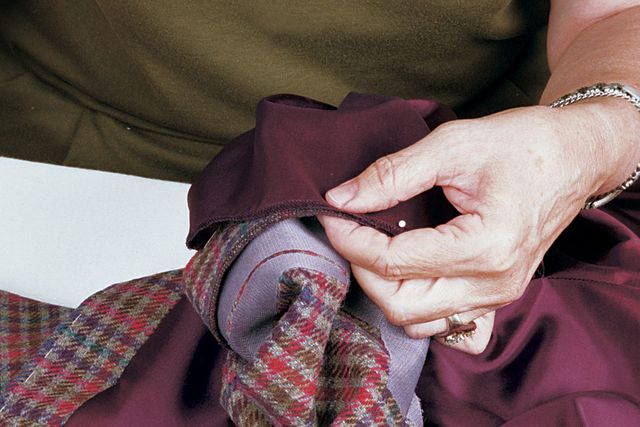
To sew the sleeve hem to the lining: With jacket and lining right side out, push sleeve lining down jacket sleeve. Then use one pin to secure jacket sleeve seam to corresponding lining seam (1). Turn sleeves wrong side out through side seam opening (2). Pull sleeves apart, so they’re facing each other, joined by the one pin (3). Remove pin, roll lining so wrong side is out and repin. Line up raw edges of jacket and lining sleeve hems, then stitch close to serged edges. Turn back through opening right side out, and press (4). Photos below: Laura White.
 |
 |
 |
 |
Leave an opening in one lining seam
Complete the lining, including setting in the sleeves. Lining seams can be serged together in a Single pass on the machine, except for one side seam that needs to have an opening through which you’ll turn the jacket right side out later. If your jacket pattern has an underarm side panel, make the opening in the seam that connects the panel to the back. This designated seam needs to be sewn conventionally, so that the seam allowances can be pressed open. The creases of these seam allowances will serve to guide the little bit of hand-sewing at the end of the project.
After sewing and pressing all the lining seams, sew the jacket facing to the lining, as per the pattern’s instructions, but leave unsewn the bottom 3 in. of the facing hems.
Easy steps to bagging a lining
Sew lining and jacket shells
Sew lining and jacket as usual, with these two exceptions:
1. On lining, leave opening in one side seam. Machine-baste opening closed.
2. On jacket, turn up hem and baste 1/4 in. from fold. Steam-press lightly.
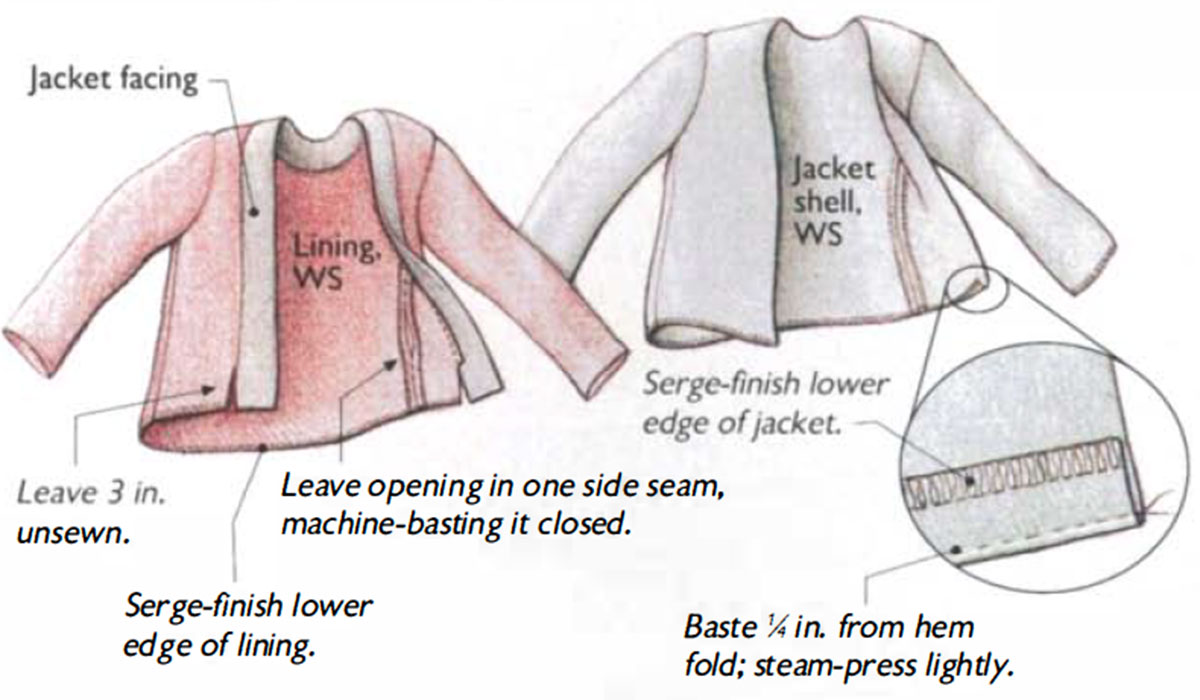
Sew lining to jacket’s front edges and hem
1. Starting at crease formed by hem fold, and with jacket on top, pin, then sew, jacket to lining along front and neck edges to opposite hem crease.
2. To sew hem, align serged edges (see text) and stitch.

Turn jacket right side out
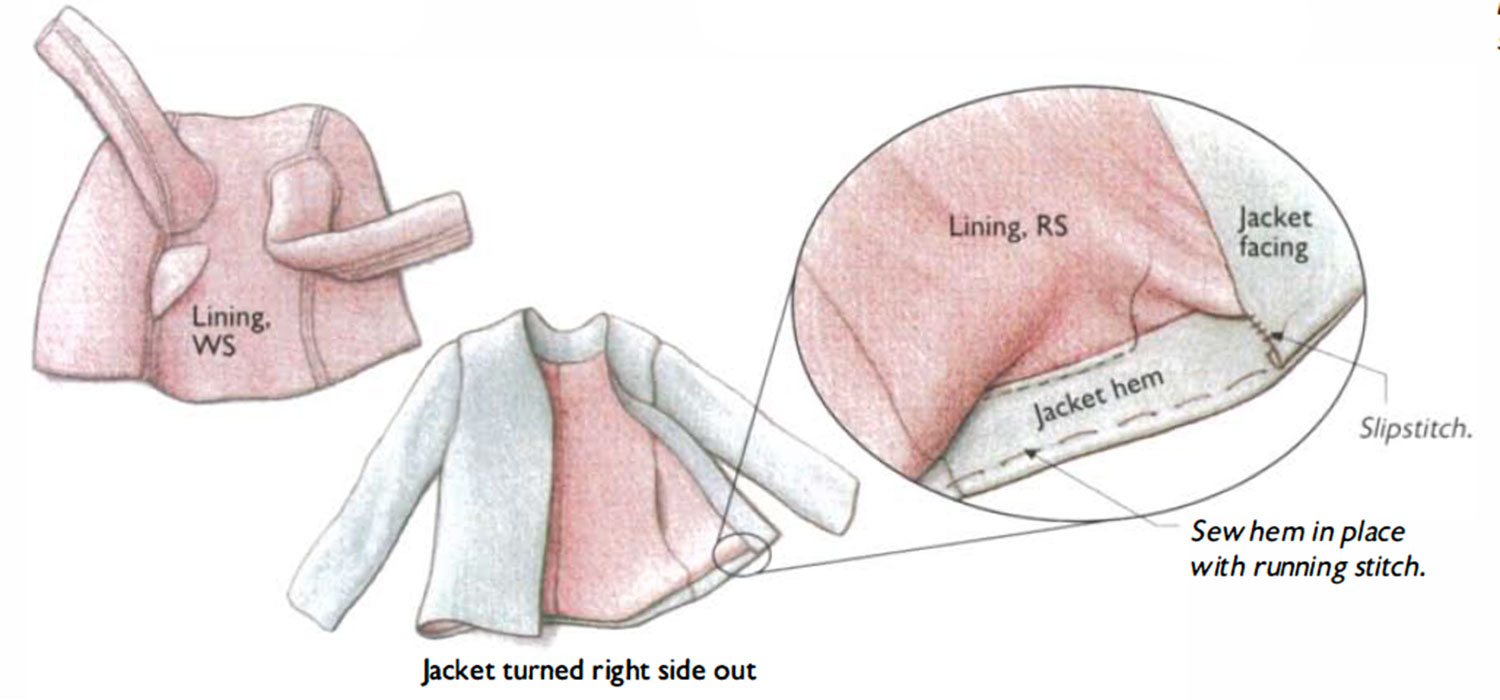
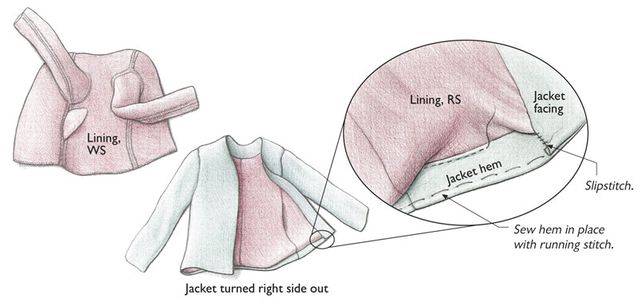
1. After removing basting stitches in lining’s side seam, reach through opening, grab back neck area of jacket, pull jacket right side out through opening.
2. Push up lining at hemline, stitch hem with running stitch, using thread that exactly matches jacket’s color and taking small bites into jacket about 1/4 in. apart.
3. Slipstitch unsewn bottom of facing.
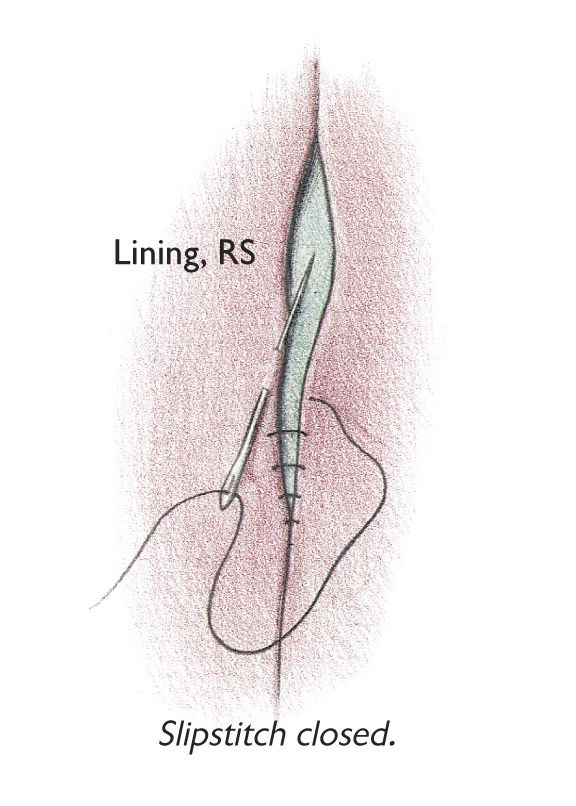
Stitch opening closed
Make invisible stitches by starting a stitch directly across from previous stitch, push needle along inside of crease, emerge same side, stitch across. Pull up stitches.
Prepare to sew lining to jacket
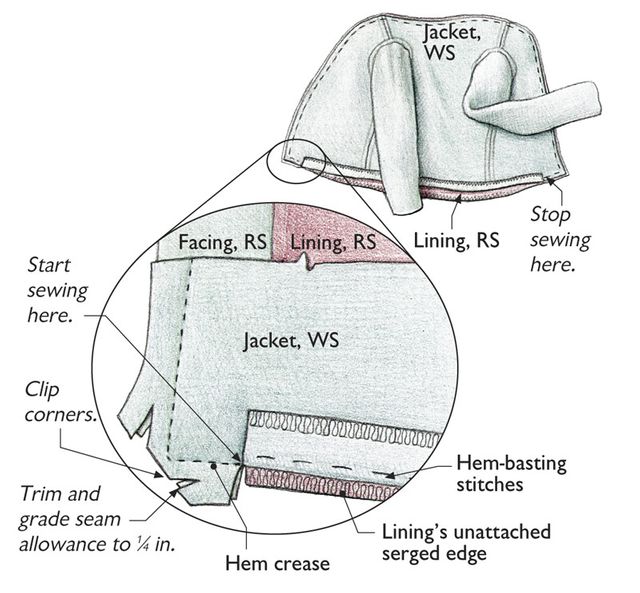
At this point you’ll have an assembled lining and a complete jacket shell, which are ready to be joined completely by machine. But first, at each end of the jacket hem, pull out the basting stitches for the depth of the facings, so you can sew the lining’s facing to the jacket’s front.
Now, take the time for this next important step: Compare the width of the lining at the hem to the width of the jacket. If they don’t match exactly at the side seams and front edges, even them up by either letting out the lining if the lining is too small or taking it in if it’s too large. This precaution eliminates the need to ease a lining that’s too big (which causes the lining to ripple) or the opposite problem, to stretch a lining that’s too small to fit the jacket (which causes the jacket hem to pucker). Repeat this step for the sleeves. If your lining and jacket widths are unequal, make sure to cut out the pattern for your next jacket accurately, and sew exactly on the stitching lines. The day I learned these lessons, the quality of my finished garment improved tremendously.
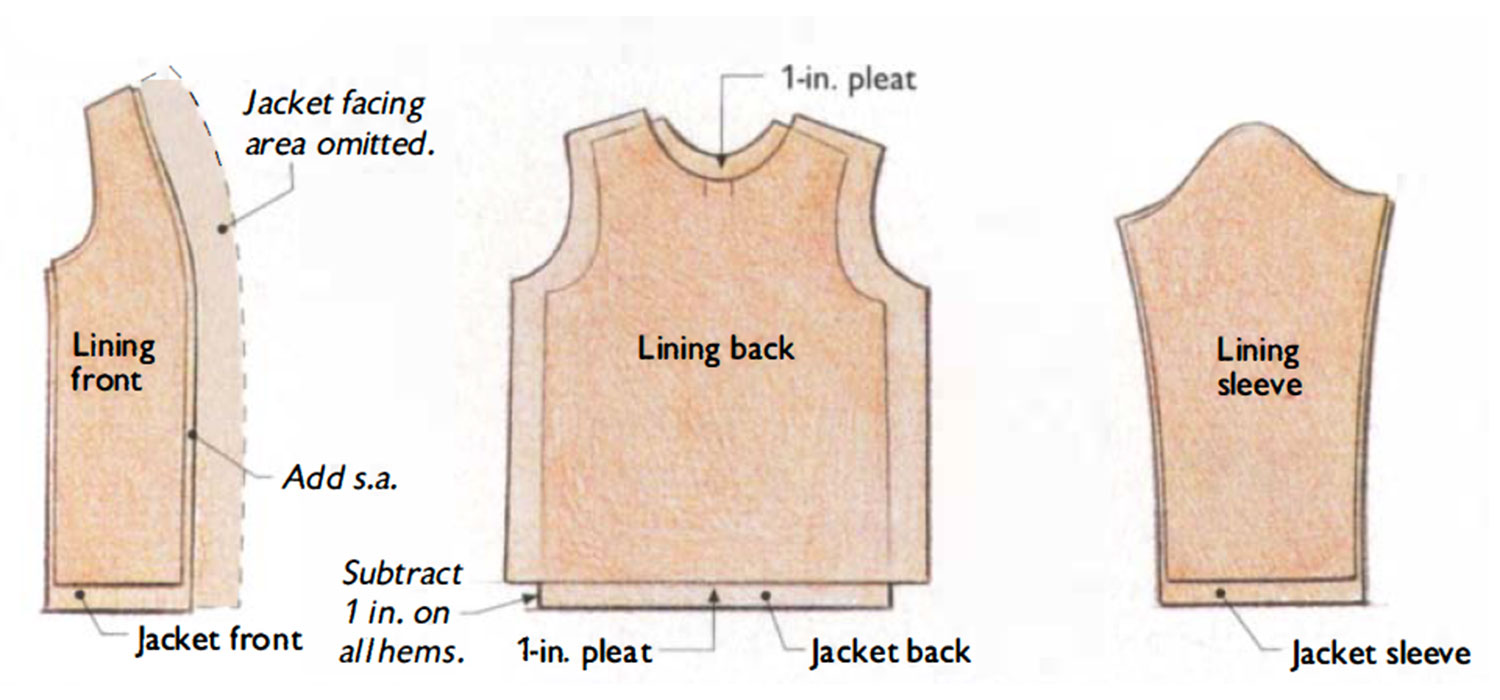
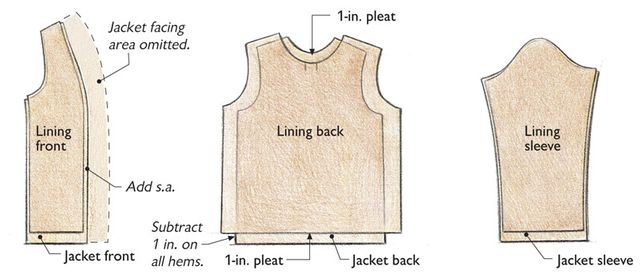
Make a lining pattern
Use jacket’s pattern pieces to make lining pattern. On front, trace pattern, omitting jacket facing area, and add seam allowance (s.a.) to front edge. On back omit facing, trace pattern, adding 1 in. at center back for ease pleat. On sleeve, trace pattern as is. For all three lining pattern pieces, subtract 1 in. from hems.
Join lining to jacket
Ready to sew nonstop? Rev up your machine, and sew the lining to the jacket front and neck edges in one continuous seam. Next, sew the jacket and lining bottom edges together. Here’s the payoff for pre-measuring the lining and jacket widths-sewing the hem is a breeze. Keeping right sides together, flip the jacket’s basted hem open, but don’t remove any basting stitches along the hem. Align the serged edge of the jacket’s hem to the lining’s serged hem, matching all of the lining’s side seams to the jacket’s corresponding side seams.
Pin the entire hemline, and then stitch the two together just inside the serged stitching. Take care not to stretch the pinned fabrics. That’s it! Now turn the jacket and sew the hem in place, following the steps outlined in the drawings above.
Make a back-facing pattern
If jacket pattern doesn’t include back facing, which you need for the bagging process to work, align pattern pieces at shoulders. Trace back neck edge and extend front facing to around back.
Sleeve hems by machine
The last major step is to sew the sleeve lining hems to the jacket’s sleeve hems. You’ll be grateful here that you made the lining widths match those of the jacket. Shove the sleeve lining down the jacket’s sleeve and unfold the hem down and out of the sleeve, then follow the steps shown in the photos below. As was done on the jacket hem, use a running stitch to securely tack the hem of the jacket’s sleeve, remove the basting stitches, and repeat the procedure for the other sleeve.
All that remains is to hand-stitch the lining’s side-seam opening closed. With a Single thread that matches the lining color, hand-sew with a ladder stitch back and forth between the pressed seamline creases as shown in the top right drawing. The seam will be invisible and look like a regular machine-sewn seam.
Now sashay out the door in your newly lined jacket, knowing that you’d still be sewing it had you not used the bagging method. Might as well head to the fabric store for material to make the next one.
—Sandra Millett sews nonstop in Trophy Club, Texas.
Drawings: Bob LaPointe.
From Threads #88
More on lining
• A Shortcut to Great Linings
• 15 Ways to Master Lining, Underlining, Facing and Interfacing
• The Scoop on Linings


jacket linings have been a thorn to me. Thank you for this explaination. The instructions were a bit rocky until the pictures and the written explanation at the end of the piece but I get it and I am off to fix my jacket with this method.
I use this method and it does save a lot of time but there are times that the lining or sometimes the jacket has a pucker somewhere along the hem line. Looking for suggestions
Waterfox
Please can we have a Little more explanation re a collar and
the front and neck facing area please my jacket pattern has these facings included in the pattern
Also are these comments read by the author of the article once in a while or should we email the magazine direct
for queries
Great guide, thank you so much...you made my day!
I kinda got lost on the sleeves. I've always wondered how it was done because I've taken an old jacket almost apart and could see that the sleeve lining and fashion fabric were sewn together by machine, it sure looks better than doing it by hand. It was that first picture that I don't understand, she says "with jacket and lining right side out". Does she mean as they would be worn with the lining in the sleeve which in that case means that WRONG SIDES ARE FACING EACH OTHER. Guess I'll have to try it and figure that part out.
I'm surprised to see the lower part of the facing finished off by hand. It's so much easier and neater to stitch that last bit by machine when bagging the lining.
I am so happy for this site and for this particular instruction on jacket lining. So happy that I must express myself in Jamaican dialect.
Laaks chile yuh really know how fe explain things, and yuh know bout sewing tuh.
This is such a fabulous tutorial. I used it once a couple of days ago when making a coat, and will be doing the same tomorrow for another coat. Loving it!
at college, the way my teacher described how to join the sleeve-ends to the lining was "Make the sleeves dance"
(so the seam join together, but onlythe seams, not the rest of the sleeve)
if you think about it like that, still right sides together, you can't go wrong.
you'd be amazed how it works!
So what issue is this article from? It sure isn't the one pictured at the top.
Saudações. Na verdade, eu fiz algumas navegar na web e dar início a este blog. Vimax Eu firme especial deste blog apresentam-se e é bastante incredible. Vimax I indubitavelmente genuinamente prazer o seu website.Perfectly, o pedaço de postagem é no juramento do melhor, Comprar Vimax pelo menos nesta genuinamente pena apesar assunto. Onde Comprar Vimax, Comprar Vimax. Vimax.
I am struggling with this method......how do you hem the jacket? Running stitches?? by hand??
I am confused....
S
I still keep coming back to this post. It's such a handy reminder when I move away from making jackets and coats for a few months - like when summer arrives!
This is a needlessly complicated method. Yes, lining can be tricky doing it the way pattern instructions tell us. Yes, bagging is the easiest method by far. But 'tweaking' the method for the home sewer does what for us? It compounds the problems that home sewers already have when trying to make it look like ready-to-wear... by telling us to do it differently. Please stop insulting the intelligence of home sewers by assuming that we can't handle the methods the industry uses. Also, how can you streamline a process more than the industry? Streamlining = greater productivity = greater profits. They wouldn't do things a certain way without a reason.
Please don't take this to mean that I am not appreciative of the fact that a lot of work goes into making these articles, and I will readily agree that this is one of the better ones out there geared to home sewers... but implying that we need things simplified for us is doing everyone who reads this a great disservice.
If anyone wants to know how bagging is REALLY done by the industry, have a look at the Nameless Tutorials series (http://www.fashion-incubator.com/archive/name_this_tutorial/)
and the bagging tutorial (http://www.fashion-incubator.com/archive/22692_bagging_tutorial_2/). While there, take the time to read all the tutorials... you might be surprised how much easier the methods are when they aren't dumbed down for the home sewer.
hi i am new to this forum
I realize that this method has been around a long time, but, linings get the best of me and I been sewing most of my life. I hope someone included the "bagging method" in the "Teach to Sew" series of DVDs. Just one illustrated lesson in person would be worth the cost. I know my remarks are late, but would someone
please consider my request. Really, at this point, I think the ladies and gents would be thankful to receive any lesson that includes a human being not a drawing and wording. Please excuse me if I am speaking out of school. Thank you!!
I thought I signed in for a video on how to line a jacket. I have not found only diagrams.
Where are the videos??
This looks doable. Great illustrations, thanks.
Great solution i'm impressive