


Many people have sewn their whole lives without a custom dress form and didn’t suffer a lick. But if you’re lucky enough to have one, it sure is nice. Just imagine making little style changes and fitting improvements on a 3-D version of yourself. Here’s why a custom dress form is great and how you can make one, with a little help.
Minor pattern adjustments become easy and obvious when you’re looking at the actual problem in fabric on “yourself.” Of course, custom-made forms are as useful as commercial versions for all the traditional dress-form functions—draping, visualizing, shaping collars, holding garments during sleeve insertion, hemming, and so on. But none of the fitting benefits are possible if the form you’re using doesn’t mirror, with reasonable accuracy, your body shape and posture.
The shape of your shoulders, the position and angle of your neck and the unique distribution of your body weight are issues far more important than questions of circumference, since most clothes hang from the shoulders or the waist, and don’t fit snugly. And this is precisely what a custom form provides: an accurate recreation of your posture and your shape, while keeping within an inch or so of your current circumference measurements.
The best feature of the do-it-yourself, duct tape form described here is that it’s so quick to make you can have a working form ready in less than two hours. And, you can accomplish this for about $15.
Also, check out four other dress form methods in our article, Clone Yourself A Fitting Assistant.
Dress-form making is fun and fast, and will improve your fitting results like nothing else.

Gear up
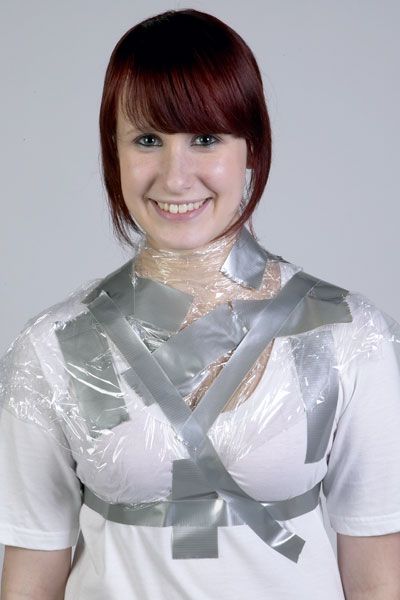
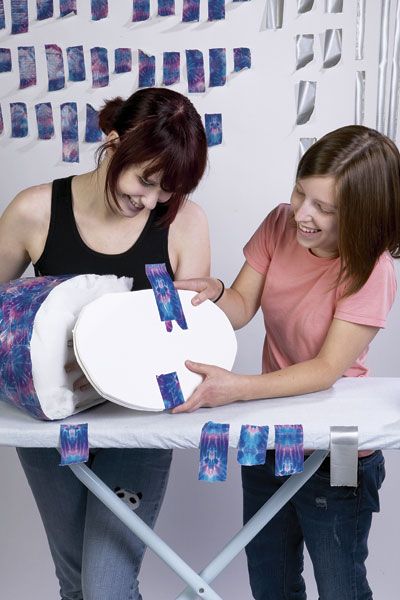
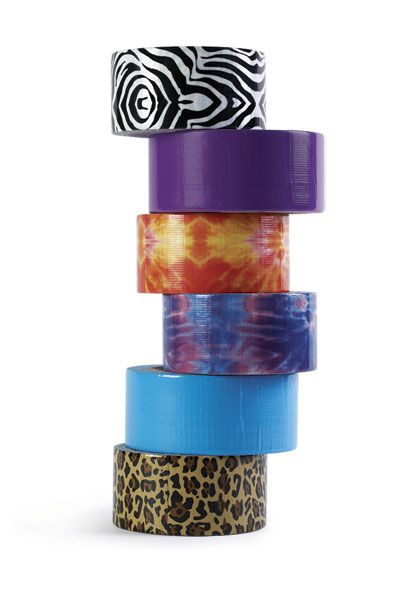
If you can, recruit two helpers: One cuts the tape into suitable strip sizes; the other applies the tape. Use old scissors, as the tape adhesive gums them up, and precut 4-inch to 6-inch strips and longer strips for the waist and crossing the heart. You will need two to three 60-yard rolls of 2-inch duct tape. The brand makes a difference, because some tape shrinks over time and change the size of your dress form. Ace Hardware house brand holds up well, as does Duck Tape.

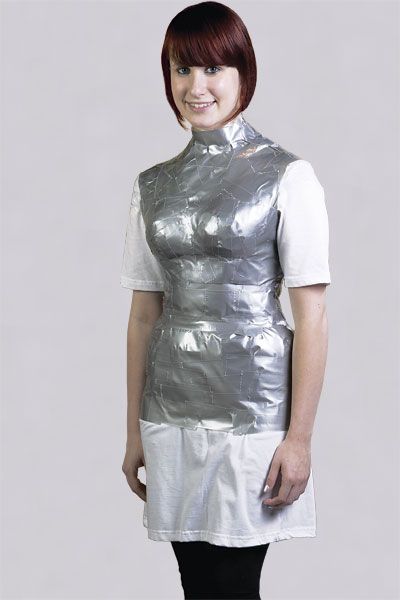
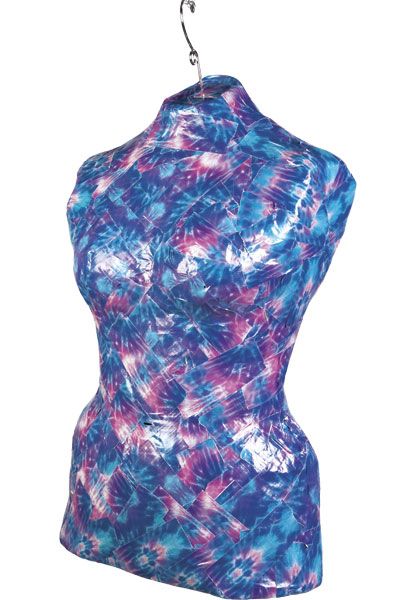
The form doesn’t have to look like a tin man. Choose colorful duct tape for the last layer.
Prepare the wrappee
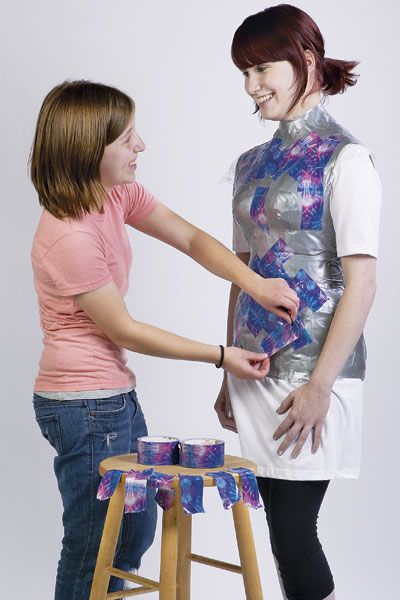
Wear well-fitted undergarments. Tape a 2-inch strip cut from a file folder to your skin and over your underwear, down your center back from your hairline to below your hips. This protects you and your underwear when you cut off the dress form. Then put on a long T-shirt. This remains inside the form, so choose one you don’t mind sacrificing to the project. The T-shirt needn’t be too tight, because the tape pulls it in. A turtleneck T-shirt is ideal, or you can fill in around the neckline with plastic wrap before taping.
Apply the tape in layers
Start wrapping under the bust. Wrap snugly, but not so tight as to rearrange or compress the body. At the waist, wrap a little more loosely on the first layer, allowing folds to form in the tape as you follow the contour, if necessary. Proceed to a “cross-your-heart” taping that goes from one shoulder under the opposite breast then around to the back, to define the bust area. Wrap the tape horizontally at the bottom, down to mid-thigh. At the bust and underarm, cut the T-shirt sleeves, if needed, to allow the tape to follow the figure, and use shorter pieces fanned out over the bust. Protect the neck area with plastic wrap if the T-shirt doesn’t cover it. Tape the edges at the neckline and armholes similar to those you’d want on a fitted bodice, giving your form a neck. When the first layer is complete, wrap twice more, first vertically, then again horizontally, further compressing the waistline to fit each layer more closely, and smoothing over any wrinkles this causes with more tape.


Let yourself go
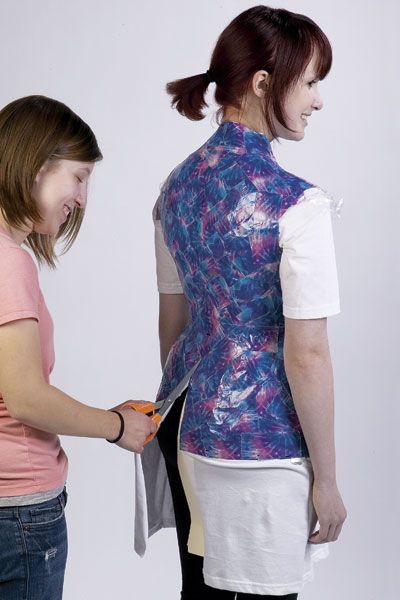
When finished, but before removing the form, have the “wrappee” bend slightly sideways to reveal her waistline, and mark it (and any other points you want identified) with permanent marker. Mark the final layer carefully with plumb lines at the center front and center back, around the waist, and carefully establish the proper height and posture by marking a line parallel to the floor below the hip level around the form.
Cut through the tape and T-shirt layers up to the center back, with your scissors sliding along the paper strip you taped on the body. Carefully step out of the form.
Stand and deliver
Cut along the horizontal line at hip level to establish a base line. Trace around the base of the dress form, cut a cardboard or 1/2-inch foam core base to match, and cut a hole in it if you plan to fit a stand pole. A strong wooden hanger placed inside the shell supports the shoulders. Tape the hanger to a PVC pipe or a wooden pole if you plan to make a stand, and tape it inside the form before stuffing it. Otherwise you can use the hanger on a ceiling-hung chain or hook to hang your dress form. Then start stuffing the form by supporting each breast on the inside with a taped or glued-in foam raglan shoulder pad if the bust contour needs the additional support (larger bust shapes tend to cave in over time without support). Stuff and tape over the armholes and neck, and solidly stuff the entire form to support it. Use a fiberfill intended for toys or pillows. Push the foam core base into the bottom of the dress form, and tape it in place. Compare the wrappee’s measurements to the form. If necessary, you can adjust the form by cutting slits to create darts, or by squeezing or padding the form to the new dimension, and retaping.


Not ready to make your own dress form? Learn about options for purchasing a dress form.


Good one but have seen variation on facebook, Threadbangers does one using brown,water activated packing tape. An additional variation was to fill the form with the the spray foam (closing arm holes, neck, and bottom), using pvc pipe to make a rolling dress form...
http://www.youtube.com/watch?v=x--8bbDFR3U
I loved the article Threads printed some years ago about making your own form, via duct tape, paper tape and foam. Have always wanted to make a duct tape form, but don't have a partner to work with. Is anyone in NY, NY interested in trading off?---you help me, and I'll help you.
doglove:
I'm a New Yorker and I'd be willing to work together. I've always wanted to try this, but I have to be honest, whenever I've asked for the opinion of people who sew or design professionally, they've either not heard of the method, or they think it's silly, compared to padding a form. I've also heard that the forms don't always fit the body, or collapse in short order. In addition, it may be difficult to establish the lines one needs for draping on such a form.
But I'll try anything once.
If you can think of a discreet way for us to exchange email addresses, I'd be happy to contact you.
I'll try to check this space once a day for the next couple weeks.
Point Patou
JoleneKay:
I once bought a CD that illustrated a similar method using mailing tape. Only after watching the entire demonstration did I realize that I also had to make a muslin cover, but the website selling the CD didn't offer a pattern in my size. *urgh!*
What an ingenious idea! I suppose with a little initiative, one could also make a fitted cloth cover for it as well!
@ doglove and PointPatou ~
I don't know if there's any way -from here- to exchange emails, but ... if you both join the "Gatherings" forum, (see the button at the top), use the same (or very similar) screen names when you register, and enable Private Messages from Members, you can do it there.
There have also been some extensive discussions about dress forms, over the years!
"Fitting lines" can be drawn on with a marker, before you cut the form off your body.
Have fun - let us know how it goes!
Be careful with this, referring to the duct tape form----I did it and got extremely hot. I felt I was suffocating. I would suggest wearing nothing but what you absolutely have to---no leggings, socks, stockings, etc. Just what you have to wear. I was able to finish it but I was getting very, very anxious. My husband taped me and I was glad it was him b/c he was able to get me out of it quickly and cool me down quickly. Make sure you stuff it well. I only wanted it for jackets and I did use it but in the end, I went for a professional dress form with padding and absolutely love it. I sewed 50 years w/o a form. I like the form for my very nice clothes and for being 'creative.' I use Wild Ginger Boutique program for drafting my clothes and it is nice to try something new and put it on the form to see just how it will look.
Try to make your own---nothing ventured, nothing gained. Just be careful!
T
KharminJ:
Thanks for the suggestion re the forum. That's a good idea. I'll see if the other person responds.
I know that one can draw lines, but drawing them on the molded shape of a real person is probably trickier than applying a style tape to a dress form, just as draping on an actual human is different and usually harder than draping on a mannequin.
I'm open to trying it, and no part of me is eager to spend hundreds of dollars on a used or new dress form (I've always been told that Wolf makes the best ones.).
But I have worked with professional dress forms a bit, and understand how having a sturdy, pinable form with a collapsible shoulder, heavy metal base and a pedal that allows the form to be raised for tasks like hemming would be more helpful.
gansettgal:
Thanks for the warning about feeling "smothered." I've read about that as well. Glad to hear you like the Wild Ginger software.
I want a dress form for fitting, and ultimately, draping.
I've made the duck (duct? whatever) tape dress and the mailing tape dress. I was happiest when I spent the money and bought a personalizable dress form. The duck tape dress made all of my pins sticky, and the mailing tape dress form added too much girth. The Uniquely You dress form that I bought is a high-density foam with a zip-on muslin that you have a helper fit to your body. My non-sewist husband was able to do it with my direction, and I'm really happy with the product. I've had it for years. It's steamable and pinnable, and the best part is that if your body shape changes (and whose doesn't, really?), you change the muslin instead of creating an entirely new form. I purchased a second muslin and made a body-double of a friend of mine who has a similar shape, too. When she was having her wedding dress made, her seamstress used my form and saved my friend many fitting trips. If you sew a lot of your own clothes, this is a worthy investment (about $140).
LarissaR:
What you've said tracks with what I've been told for years, with the exception that I was told to get a Wolf.
Thanks for the feedback.
I did this for myself for an elaborate costume. I set it up on a stand that would be my height when wearing the shoes for the costume. It was great - I had a custom form in about an hour, and my girls thought it was hysterical to put tape all over me. I didn't get that hot, but it was pretty snug - a panic attack would be bad. It was cheap, easy, and, if I change shape, I can just whip out another one! I would not have been able to make the costume without it.
I have read this article many times over the years and I still have one question. How well does it correspond to your bust line? I don't know why this troubles me, but that is my major sticking point about trying this. I actually have an old size 10 Wolf type form which I would like to adapt, I just haven't worked up the courage to corner my fella or my daughter in law to get them to fit a muslin that I would (hopefully) slip over the old Wolf form and stuff where needed. Lots of stuffing! Hey I just had a brain wave! I could put a bra on the form and stuff that! - ? At least it's a start. What do you all think???
M
I've had a duct tape dress form for 3 years and it's the best thing I ever did for fitting my self. I recommend it to anyone who has fitting issues especially with a full bust and small back.
I purchased a dress form with all the pads to make it "fit". Never have managed to get it to fit. Also made a duct tape form but don't believe my husband did the taping accurately. Last year took some classes and found out I have an additional 2 inches in my upper torso and 2 inches in my lower torso. The dress form I purchased won't accomodate dropping the bust two inches or the waist. Very frustrating experiences.
I have made the duct tape forms twice--once for me and once for a student. They work great. I covered them in a heavy knit, and applied twill tape lines. On stuffing: I tried the spray foam, and it seemed fine for a day--but then began to collapse, and I had to bridge over the resulting dimples with more tape. I had better luck with wadded newspaper. For the stand, buy a floor lamp at your local thrift shop, cut it to the right length, and attach it to the (plywood) bottom of your form with a pipe flange. Floor lamps have a nice heavy piece of cast iron in the base that keeps the form stable.
I make gown patterns and coutour wedding gowns for a designer in Birmingham, AL. have made one of these for my niece it did great for her prom dress. She has already outgrown it. But is good to use for draping. I have all the sizes of the My Double Forms and a Wolf form-problem is all the busts on the forms are too low for most of the people I have fitted. So I have several padded bras cheap ones. I cut the cups loose and pin them to the form using the nip to nip across measurement and nip around neck to nip measurements and stuff them with a little batting and they fit much better. Don't know why the form companies make the busts so high but seems the women today all have lower busts. I also have the Uniquely you dress form but I don't really like it.
A friend of mine and I created duct tape forms on a sewing weekend. We laughed a great deal as we created ourselves. We stuffed our "bodies" with all kinds of old batting, shoulder pads (great for the bust), etc. Our forms really were a double of our bodies and I found mine to be quite durable. I made a knit cover for mine which made it look more like a purchased form and aided in pinning on fabric for fitting.
I've changed sizes (again) and am in need of a new form. I'd be interested in hearing from others who have used the spray foam, and what results have they had. One comment was that it deteriorated. I'd like to hear from others, and what type of spray they used. I understand there is a variety to chose from.
I made a duct tape form for my daughter's wedding dress and found that if you are not careful to support it properly, it will distort front to back and side to side. I used parallel line to measure chest, waist, and hips, and cut wood strips which were nailed together. I wrapped the form with old tee shirts cut into strips so I wouldn't have to pin into the tape. So my recommendation is to pay special attention to the form after it is assembled because if distorted it is not accurate. My daughter's dress was Elizabethan and everyone in the wedding had a picture taken with their "body double. It was as much fun as it was successful. A study form is a necessity, specially if you have 5 layers of dress to support.
I made one a few years ago. Instead of taping up the back, I reinforced both sides of the back cut and put in eyelets. I laced up back like a corest. Now I can adjust the size up or down if I gain or lose weight. The laced up back also gives me access to the interior of the form to adjust any malformations that may occur.
I made one of the duct tape forms successfully a few years ago with my sister in law. We had great fun while making it... imagine the young mother dashing out to the front yard chasing a 6 yr boy while the mom is half covered in duct tape! Anyway, the form worked well; we stuffed with pillows and batting and then shipped the form from CA to NY (where I live) so that I could sew for her. Really good fun and it worked. It is hot, so those who are claustrophobic, try something else. Careful marking enables you to mount it correctly (I had to redo this part). If anyone is in the NYC area, I am happy to help. Look for me in 'gatherings' under the name Rotchen.
My sister and I made one for me a couple of years ago. Since both of us could shed about 60 lbs. it turned into a laugh fest like no other. I discovered thru the process just how long I could hold my pee (from laughing so hard!!)
In any event, it was a success, and since I have a Best Form that I bought umpteen years ago, I mounted my double on that and secured it and stuffed it thoroughly. It was a RUDE awakening to really see 'me' and I have decided to keep a dress on it at all times!
As for the fitting aspects, it has helped tremendously. I don't actually pin anything to it, but rather work with the fabric and adjust and pin fit the garment. If I decided to pin directly to the dress form, in order to save my good 2" pins, I would buy some T pins from a local craft store, and use those since duct tape really does gunk up needles.
I've sewn for over 40 years, and never really realized that I fitted the garments for everyone else, but not myself. This really has made a great difference, and it really worth the effort to make......just make sure you go to the bathroom BEFORE you start your project! :o)
About 15 years ago I made a polyurethane foam dress form that has held up extremely well. With the help of my husband, I tape-fitted a large plastic bag to cover my torso and neck. We then covered it with gauze-and-plaster bandages used for setting broken bones. (Purchased at a surgical supply store.) They were easy to use - dip in a pan of water for a few seconds and then apply. We applied the strips in a similar way to the duct tape described here, going diagonally from under-bust to shoulder, horizontally around waist and hips, etc. Then let the plaster set. This was the hard part as the plaster gets hot as it sets. I stood in front of a fan! We cut the mold down both sides under the arms using a thin saw. Since it is not flexible, a single cut down the back would have cracked the plaster getting it off. I pulled the plastic bag out of the mold (comes out easily) and filled some of the rough places on the inside with some more plaster to smooth it out. We then duct taped the sides of the mold together, trimmed the bottom and arm openings flat, put cardboard ovals in the arm openings and plywood in the bottom, secured with more tape. Then we mixed up the two-part polyurethane filler and quickly poured it in the neck opening. It expands into the whole form and out the top. After it set, we trimmed off the excess foam with a saw, opened the mold and removed the foam form. It needed a little sanding. We then mounted it on an old music stand base, attaching it to the plywood bottom. The stand is adjustable and is set to my height. I made a cotton/spandex cover for it with center front and back seams that I lined up with the centers of the form and then marked the waistline with fabric marker. I made a pin cushion to mount on top of the neck which covers the raw foam. I can pin into it as the foam holds pins quite well. I gained some weight and all I had to do was remove the cover and pad the form a bit with batting. I can also put a bra on it for further shaping. It's wonderful for fitting; it shows how my shoulders slope (slightly different from each other!), it shows how garments gap at the back of my neck. It's great for pin-fitting patterns as I can pin them right to the form, lining them up with the center lines. It was well worth the effort.
Good idea, but beware if you have claustrophobia. My husband helped me and had to hurry the last layer as I was starting to hyperventilate. He didn't have it too tight either, I just don't do well if I feel that my breathing is being restricted in anyway! I'll just "pad" the dress form I already have and that will have to do. Good luck.
My Twin Dressforms is a product highly recommended by a former senior editor of Threads, David Page Coffin (can't find the article, but he wrote about it).
I once asked the opinion of users on another forum, and they warned about getting a custom form if one's body will change. There's a price break if you buy a kit and I believe that they will have someone help if there's a group of at least four (I haven't looked at the site in some time).
I once asked the opinion of some professionals and they still recommended getting a Wolf dress form. Maybe they thought it would be more flexible.
http://www.mytwindressforms.com/
Re My Twins Dressforms
The last time I inquired about this there was a New York representative; I assumed it was a relative of the owner of the company.
In July, 1988, using the "Angelina di Bello Personal Dressform Exclusive Method" outlined in her booklet, I made the brown paper tape dressform. I'm still using it today.
Now in that time the waistline has required a little adjustment (lol) but for draping, the form still works perfectly well. I did fill it with the expanding styrofoam insulation about six years ago, sprayed into the neck opening directly from the can. This little bit of inside support has kept the form standing straight, without adding much weight to it over all. As several others described, I cut the neck opening foam overflow, off level with a knife and use the neck for holding a padded pin cushion. The brown tape method does not create the heat issues encountered with the duct tape, but is slightly slower going as you do need to wet the tape strips. Twenty-two years of regular use has really improved my fitting and draping techniques.
Does anyone have an opinion on the Dritz Double Deluxe dress form. I have been thinking about buying one, but would like to know if anyone else has used one and if they liked it or not.
I tried a duck tape one using someone else's instructions. Those didn't include the instructions for a stand or what to do about the sticky residue on the edges of the duck tape so I threw "me" away. I'll make another one now that I know how to solve those 2 problems.
Thanks so much.
I second the comment by sewingmonk about doing the brown paper tape method. I think the last time Threads did an article about doing your own double (in their magazine) they included instructions on how to do it. The paper tape wont stretch or gum up your scissors, is just as cheap to buy, and acts more like paper mache and you can (carefully) put pin holes in it and draw on it!
But having two people help is best, and if you do get the brown paper tape - use warm water to wet the back before sticking it on. And you'll be standing for 1-2 hours so have a high stool or ledge to be able to lean on, and wear the bra you would normaly wear. Though I have done forms on people while wearing a corset so they could then drape/fit the costume they would wear the corset under.
I live in NYC also, and would love to get in on the duct tape model making party. I've always wanted to do this, but have never had a partner to help me. Doglove, PointPatou are you up for a threesome?
I tried to post this comment a minute ago, but it didn't seem to work. Sorry if this turns out to be a repeat. Anyway, I too live in NYC and would love to get in on the duct tape double making party. Doglove, Point Patou, are you up for a threesome, LOL?
Has anyone made the form and the put it on top of an existing dress form? My dress form goes really small so this would be easy to do. Any problems with the bust?
I would also like to include upper legs/thighs so I can use the dress form for fitting trousers. Fitting pants is the most difficult thing for me, and I think having a form would help tremendously!
Has anyone ever tried this?
Flowergarden129, Doglove, and any other New Yorkers:
I'd be up for trying this, or at least helping. If nothing else, maybe someone could measure me so I could finally make a sloper.
BTW, here's another method that I've read about, which involves making a block using Saran Wrap. After carefully molding the wrap around the body and marking it up, one cuts it apart and lays it flat, drafting a block from that.
http://www.fashion-incubator.com/archive/saran_wrap_pattern_making_method_1/
http://www.fashion-incubator.com/archive/saran_wrap_pattern_making_method_2/
Listen, I've created a temporary email address. If you're interested in pursuing this, send me your contact information, at least an email address:
[email protected]
Hope to hear from you. :-) Thanks a lot, Threads, for sparking this discussion!
MarieJessie:
I'm not an expert, but the other day I was reading an article on considerations for home sewers in buying dress forms. It said that a full-body form wasn't as necessary as one might think because most pants were in fact developed though the flat pattern method.
Ah, but PointPatou, I'll bet a lot of these sewers have similar problems to mine, that they are longer in the front than the back or vice versa. My problems with pants began with back surgery, which has permanently tilted by pelvis forward. Add to that a bone graft wedge of about 3/4 inch and you have a real pant fitting nightmare! So, I am really thinking of doing a form and extending it about half way down my thighs. That way I would get the waist, the tilt, accommodate my permanent "bustle" (protruding butt) and any posture adjustments I need too. I guess I would just be trimming at a level slightly below the crotch.
Oooo I am beginning to get up my courage!
thanks all
I tried a duct tape form last night per the instructions here, and it did not turn out well at all. Very bulky even with the tape wrapped very very tight and smooth. After removing it, the tape warped and wrinkled and collapsed before I could get it stuffed. So tonight (as I type actually) I am making a form in a sort of paper mache style. Fabric Mache to be exact.
I took a very form fitting knit tshirt, added some darts, took in the side seams and the sleeves a bit and added a turtle neck collar and a piece of knit to extend the length past my hips to about mid thigh. I just made is super skin tight. Nice thing about knit, even when skin tight, it was still extremely comfortable, no fainting here.
I put the modified tshirt on and painted paper mache goo (Flour, Elmer's Glue and water) on all over it, applying thoroughly and generously. I've been standing in front of my laptop at my kitchen counter, surfing all sorts of sewing sites while awaiting the drying process. In all, it took about 1.5 hours to dry, which flew by while on the internet, and it is rock hard and PERFECT!! An exact replica of myself.
Cut off in two halves, cut up at the sides so that there is a front and a back and taped back together. Now I'm just debating within myself if I want to apply another real paper mache layer to it or just leave it as is. I think a newsprint collage would be a neat treatment. :o) Ether way, I think it's much more accurate then the duct tape and it should last longer from what I know of paper mache.
Wow! I haven't had time to check the comments since I first posted on Oct. 18th, and am thrilled to see that others would like some help, also. I'll send a note to your temporary email, pointpatou. Seems like you're the point person, indeed.
I'll also go to the "gatherings" section as another person suggested.
Flowergarden129, are you there? This is doglove, and I've contacted PointPatou through her temporary email: [email protected]
Please write if you'd still like to have a duct tape dress form get-together in NYC. And if there are any other NYC readers interested, please make contact with us. Thank you.
Flowergarden129:
Yes, as doglove wrote, she contacted me through my temporary address. If you and any other NYC-area want to get together to try this, or something related, write me at:
[email protected]
I'll get back to you.
PointPatou
After collecting duct tape for years with the intention of making one of these, I finally made a "clone" of my 17-year-old daughter this weekend. It took about 2 hours, and we still haven't stuffed it yet. Here are a couple things we learned: 1 - the Duck brand tape (which we used for the 3rd layer) was much stickier than the Ace Hardware brand (which we used for the first 2 layers). The scissors gummed up faster and slowed the process down which was no fun since my daughter was starting to feel a little claustrophobic, but that 3rd layer seemed to be much stronger; 2 - Once I started taping the neck she started to feel a little anxious. I wish I had left all 3 layers of the neck until last because I was really rushing at the end since she wanted to be cut out so badly!
Right now the hollow form is on a hanger in my sewing room. Before I stuff it I'll slip it back on my daughter, mark some lines, and take some measurements. It seems to be fairly rigid and I don't think it's sagging or collapsing at all. Hopefully we'll finish it soon, then it's her turn to make a dress form for me.
This is great. Will let you know the results after I have tried it
I love this. This is the best thing for me since slice bread.
I made the duct tape form with a friend. What an experience! I started having a panic attack from not being able to breathe-your torso can't expand while all taped in! Then after seeing it I joined Weight Watchers and lost 40 pounds. All in all a worthwhile experience, although the form was never used.
There is great information about fitting custom made dresses (though not using duct tape) in "The Party Dress Book" by Mary Adams. She also gives great tips on different techniques like layering colors, piecing scraps, incorporating vintage fabrics, making ruffles, french seams, etc.
I live in Brooklyn i would love to get together and make a duck tape form i have big problem fitting my self my e-mail is [email protected]
I have made a duct tape double using the threads instructions and it was servicable, but not fantastic. I am "curvy" in many areas and the duct tape turned those curves into lumps. I then found Jean Haas dvd's (Clone Yourself a Dressform) and found her very detailed instructions to be the key. She shows the order and method for taping over curves, "inbedded waists"
i.e. love handles, bustline, shoulder caps, etc. Her method was remarkably more effective and included how to make a stand or use an old form, how to stuff and how to mark the final form. Well worth the money if you do much sewing for yourself.
jmspencer,
Your method sounds really interesting! I've tried the duct tape method before too and was dissatisfied with the lumpiness and warping.
I was wondering how thick the knit fabric you used was, and if the fabric was thinner, do you think there would be any problem with the mache goo soaking through to the skin/undergarments? (Or should I just wear a layer of something underneath it?)
Also, as far as a second layer goes, do you think covering it with plaster (the plaster gauze strips) would help reinforce it enough? or would that make it too hard?
i made a stand for my form out of PVC tubes and joins from a regular hardware store. it pivots and adjusts just like a real form stand. you can find all the instructions on how to make it here http://lulushion.blogspot.com/2011/06/making-of-form-part-3-stand.html and the best part is that is very inexpensive. Enjoy! :)
PGM DRESS FORMS in California since 1983, biggest warehouse to enable buy various dress forms, antique display dress forms, sewing dress form mannequin. All dress forms with 3 year warranty.
PGM-Pro, Inc.
5041 Heintz St. Baldwin Park, CA 91706, U.S.A.
Tel. (626)338-1990; Fax. (626)338-1995
TOLL FREE : 1-888-818-1991
http://www.pgmdressform.com
I have a Dritz My body double dress form & recently lost weight. I was remeasuring & when adjusting the dressform noted I had the wrong neck to waist measurement on the form. I have lost the booklet it came with & cannot remember how to lenghthen it.I cannot find a specific dial & cannot figure out how to do it- I appreciate any help you can give me!
Rubbing alcohol will clean your scissors of the tape gum.
Hi everyone!
These articles on Threads were very helpful to me! I created my own dress form out of paper tape. I found it very successful- I'm sure it will aid my future fitting endeavours greatly!
I created my own tutorial that goes into a bit more detail about the process, and blogged about it here:
http://makingitwell.blogspot.co.nz/2012/03/i-made-my-own-dress-form.html
Please do visit, I'd love this to help someone! I'll do my best to answer any questions too :)
Good fitting luck everyone! :)
Wow it worked, check out my DIY dress form experience on my wed site at CreativeDressmakingAtHome.com
me and my mom did these. or more i should say attempted. we got to drinking during the process, and by the end were both so slumped over that the forms weren't all that accurate. not to mention pulling a couple layers of skin off around the neck and arms because we forgot to put plastic wrap around there.
overall a very funny experience. just make sure you stand naturally during the process or the form will be misshaped.
I got my husband to do the tapeing. He used pieces that were too long and it ended up feeling very tight. Near the end I started telling him to hurry up and get it off me as I was getting light headed.
He said "You can't faint - I would be too embarrassed!"
"Why would you be embarrased dear?"
"Because I know every First Responder in the area and I couldn't even begin to explain why my wife is passed out on the kitchen floor wrapped in duct tape and me with a pair of scissors in my hand!"
My attempts at making a custom dress form were all failures. It's too much work and frustrating. I tried to buy a custom dress form (since I want to sew mainly for myself, what the point of having a dress form that doesn't have your body measurements?), that proved to be equally difficult, not to mention quite costly. Although, if you want to mainly drape, the ideal would be a custom half scale dress form, I would imagine.
Well, if any of you is after a custom dress form, have a look at provaform(dot)com , I'll be staying tuned to see what they're up to...
This is really a cool idea, I read a post and it was like making a form with plaster powder on our own body which is quite sticky. I am impressed with your article. Thanks for sharing.
The patterned tape is cute. But I tried a duct tape dress form and hated it. It's too heavy. I made one using paper tape and I love it. It's light weight and the paper tape was easier to shape because it acts like paper mache.
My ASG group helped each other make forms. We used paper tape. Everybody was warned to go to the bathroom before the process began. We found that a small electric fan helped the one being taped, especially near the end. Some placed the fan between their legs and aimed up. :)
Since I had a commercial dress form that did not fit me well, I placed my tape form on the commercial form. It took some pushing and pulling and a little padding but it has held up perfectly for over 5 years. I love my little Pammie.
Some years ago I went to a Palmer Pletsch school and one of the things we did was be prepared for a form using the plaster cast bandages.
One thing we were told was not to stand with our knees locked because that can lead to problems some have already mentioned. One of the participants unfortunately had the habit of standing with one hip thrown out and when it came time to learn to use our forms (included in the program) she was very unhappy that her form mirrored her bad posture.
An advantage I see to this method is that if you lose weight you can shave off whatever foam is necessary to adjust the form to your new "you". We wore a good bra not a wornout one. Of course if you gain weight :-( you can always pad out the form. I'm going to have to measure my form and me to adjust it after losing 30 lbs.
Be extra careful in using a commercial form. If the shoulder to bust measurement is too different, it is very difficult to rectify. When I studied Fashion Design, one of the classes required that we buy a form and pad it to fit ourselves. I bought an 18 and only after doing all the work to make the cover did I find out that this measurement was way off. I should have bought a 14 and although it would have meant more stuffing at least it would have fit. What I finally wound up doing was putting the cover on my P/P form and stuffing that out to fit the cover. That is when I recovered my good bra and reverted to using it normally.
Beverly A.