

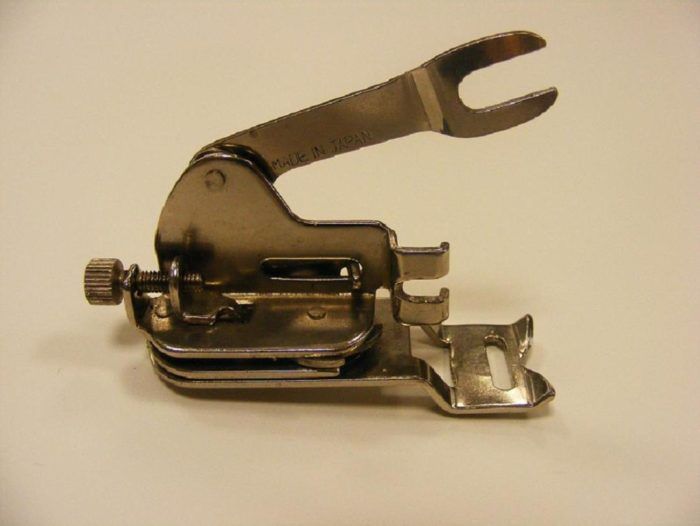
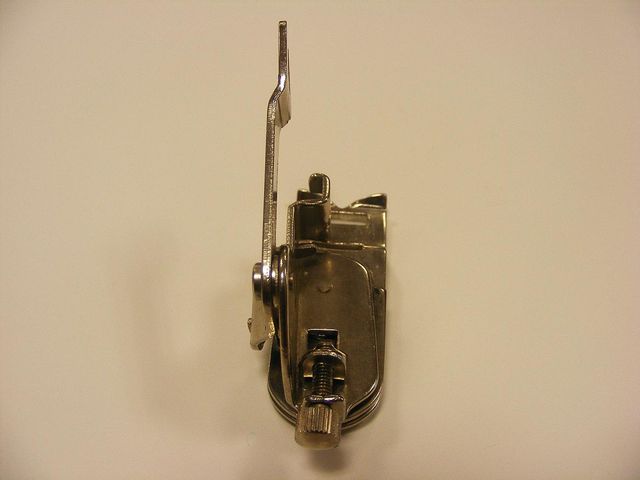
Side view of my mystery sewing machine foot with the "fork" in the up position. Note the small bar in the middle right. It moves left to right as the fork rises and right to left as the fork falls (see next photo).
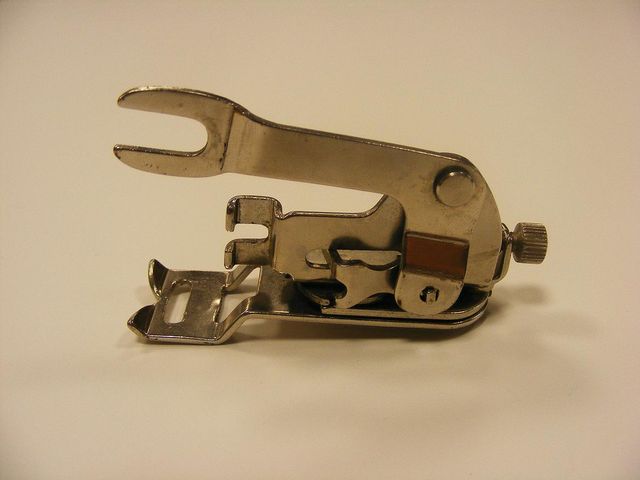
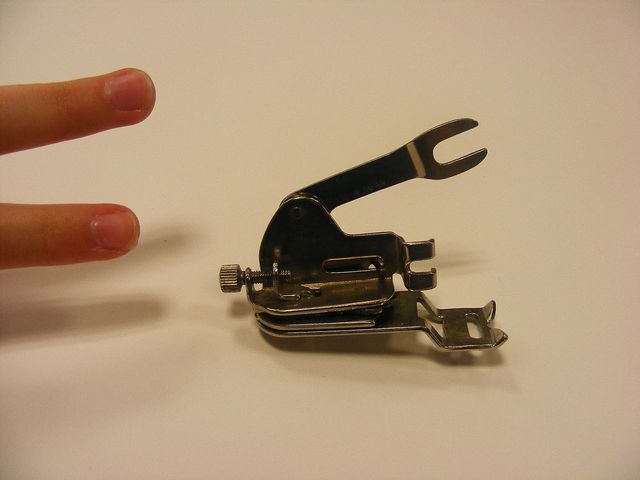
Since writing my sewing-machine-foot blog article earlier this month asking you which sewing machine foot is your most important must-have foot, I’ve been trying to find out what the foot (pictured in the photos above) is used for. It’s not mentioned in “The Sewing Machine Attachment Handbook” by Charlene Phillips, a fabulous book that we reviewed in the current issue of Threads. No. 145–although every other foot in my stash was described in the book.
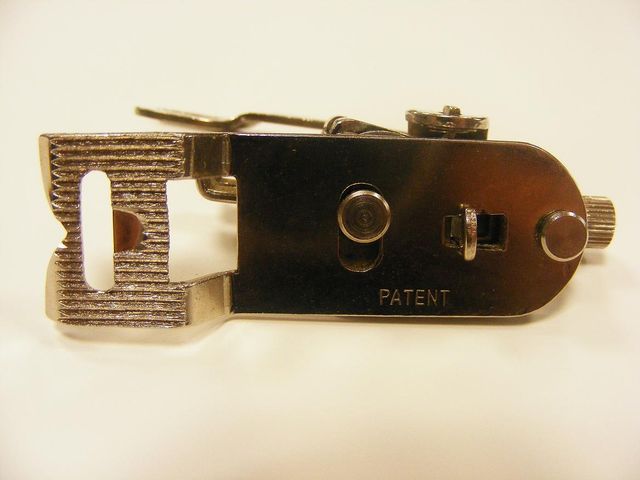
I received the foot in question without instructions or paperwork, and I haven’t been able to find anything like it. I can clearly see where it attaches to the machine’s stem, and it’s obvious that it works using a zig-zag stitch given the width of the needle hole. There’s a screw toward the back which apparently controls the length or depth (or some other measurement) of its stitches or maybe of the amount of fabric being pushed under the foot. The “fork” goes up and down as it stitches which causes a gear to circulate. The gear reminds me of the gear on a can opener.
I guess I could just place the foot on my machine and begin to stitch to see what happens, but I’d love to have a rough idea about what it should be doing.
Have you ever used or seen a similar foot? If so, what is it used for? Do you have a foot that you keep but don’t use, because you don’t know what it’s for? Wouldn’t it be nice if we could solve all of our sewing mysteries!?


it looks alot like the pleating foot
Pattyv thought has merit. And as mentioned, putting on a machine & givingit a try might be helpful. I say "might" because the fork that attaches needs to be the proper alingment to the needle bar screw.
As to your other inquiry, I have presser feet I need to figure out for my mother's Singer industrial.
An added thought - you could try posting this on Gatherings. Bill Holamn recently offered a reply as to a Europro machine. He has extensive knwoledge about sewing machines. Any of his insight would be on target.
Resembles more of a ruffling attachment, to me.
This appears to be an adjustable zig zag attachment, to achieve a zig zag stitch on a straight stitch machine.
I agree. this is nothing more than a zigzag feet. but it looks like something rare.
I searched and searched the internet and the closest foot I could find that resembles yours is a "Side Cutter Foot". I never knew such a foot that cuts as you sew existed. Going to have to get one for my machine now just to have some more fun ;)
Ooops, forgot to ask you to let us know what is when you find out please and Thank you !!!
Of course, VintageModiste is right! I just pulled my old zig-zag attachement out and it is very similar-shows how often I use that one, ha!
From looking at it I would guess that it is a foot which helps make a manual buttonhole on one of the first zigzag machines. It is obviously a simpler thing than a buttonhole attachment with cams, but those were made for straight stitch machines so they had to really hold that fabric tightly and shift it in all directions, left,right, forward, around those lovely rounded corners and then back again.
A zigzag machine already has the needle moving left to right so a simpler contraption could be used since it doesn't have to force the fabric left and right.
The screw at the back of the machine must allow you to set the length and then maybe it works similarly the way a cam does in a buttonhole attachment. Since manual buttonholes can be made on a zig zag machine it seems as though this would help you do it with consistency.
Please let us know what you figure out with your experimentation.
P.S. In an old manual for a White Zigzag automatic it shows a buttonhole foot with an adjustable gauge on the side. At least this confirms that there is such a thing as an old fashioned buttonhole foot. None of my straight stitch vintage manuals show anything like it.
After thinking about it even more ... I'd have to say that vintagemodiste is probably right. I'd have to see what happens as the fabric feeds under or through it. Wish I had it here for experimentation. None of us are going to sleep tonight if we don't figure this out!
April,
What happens when you tighten or loosen the little screw. What changes, is the movement affected on the little thing that goes left to right, does it restrict the distance the fabric can travel ... those are just things I'm guessing could be going on and there may be something entirely different. Please let us know. Are you experimenting with it? Do you have a machine there that it fits on?
At first glance I thought it was a pleating foot, but it is quite different from the old pleaters I have (several different ones). The grooves on the bottom of the foot seem to be there to create tension to avoid the "fabric" from slipping. The wide slot in the front of the food appears to me a place to slide something through. And, the zigzag motion seems to be for zigzag sewing on a straight machine. So my best guess is that it is designed for applying trim, mostly likely ric-rac.
At first glance I thought it was a pleating foot, but it is quite different from the old pleaters I have (several different ones). The grooves on the bottom of the foot seem to be there to create tension to avoid the "fabric" from slipping. The wide slot in the front of the food appears to me a place to slide something through. And, the zigzag motion seems to be for zigzag sewing on a straight machine. So my best guess is that it is designed for applying trim, mostly likely ric-rac.
At first glance I thought it was a pleating foot, but it is quite different from the old pleaters I have (several different ones). The grooves on the bottom of the foot seem to be there to create tension to avoid the "fabric" from slipping. The wide slot in the front of the food appears to me a place to slide something through. And, the zigzag motion seems to be for zigzag sewing on a straight machine. So my best guess is that it is designed for applying trim, mostly likely ric-rac.
This is a walking foot. You use it in quilting or when you have a heavier weight of fabric, for instance, the cotton fabric and two layers of batting. You can use it daily instead of the normal presser foot. You can set the needle on the right side, the middle, or the left side. I have a Viking Designer I embroidery/sewing machine.
I know it is a ruffling and pleating attachment. I have one.
I bought one to make ruffled curtains for my daughter
so many years ago. It has since made many
skirts for the girls when they were young,
prom dresses now that they aren't so young,
Civil War re-enacting skirts and more curtains
as the years go by.
I have a foot exactly like this. I got my first sewing machine in 1950, a Singer treadle machine to which I later had an electric motor added. I don't think the zig-zag machine had yet appeared on the market then but this foot did and was advertised in some small magazine and I ordered it. I used this all the time and thought I was very advanced - I found it very easy to attach and use.
Zig-zag machines came later. I still have this foot but of course it has long since been retired.
I believe this is a foot that causes a straight stitch machine to do a zigzag. Obviously, you'd have to have a zigzag plate on your straight stitch machine before using it. Could it fit a Singer Featherweight?
hi ok i found your mystery foot here is the link and description:
http://www.raindropkites.co.uk/sewingmachines/bigatts.html
ZZ006 Regular Singer Zigzag foot - £12 as shown, £14 with joining plate (not shown) Instructions but no box.
This is a walking foot. Great for all types of sewing, allows the layers to move independent of each other. Machine quilters say it is great to prevent bunching on the back.
I'm sure it is a zig zag foot for a straight stitch machine. It works just like the old Greist Buttonholer. The grooved bottom of the foot acts like a gripper on the fabric, and the needle arm moves the forked lever up and down which causes the foot to slide the fabric back and forth over the throat plate. I could have used one of these for all the years I worked on a straight stitch machine!
i would assume that it is for applying an elastic. it probably stretches and holds the elastic while you zig zag over it.
It looks like a ruffler foot. The screw may be a device to measure how many pleats per inch. I have used mine several times and it's a really neat foot, especially for home deco.
I think it is a walking foot, useful when you have many layers of thicker material.
aloooha
Maui
I belive that it could be a zig foot for a straight stich machine. They had them for the older machines before that would only do straight sitiching.
I believe it looks like a zigzagger foot.
I also believe it is a zig zag foot. My mother had one for her old post-war Singer straight stitch.
I'm pretty sure it's a ruffler. I have a foot like that for an old sewing machine. I used it to make ruffels for my girls dresses when they were little.
I inherited my Mother's ruffler that attached to her trusty black Singer. Your mystery foot looks like it.
This is definitely a zig zagger foot. I have the foot and the extra plate/section which is only attached if you require to join two pieces of material together or for lace insertion. I also have original two page instructions which state that as well as making a straight stitch machine sew zigzag it can be used for cording, buttonholing and blind hemming.
As I purchased this attachment recently I have only tried it out briefly on my old Singer 99K and it worked perfectly.
I would be happy to scan and send instructions if required
I read llg93's reference that supports Melanie's post.
It's a zigzag foot for a Singer straight stitch machine.
The old fashioned buttonholers (read llg93's reference further down the page) don't require a zigzag machine as people who have used or owned older straight stitch machines will tell you.
I think this Thread series will be fun, educational, and for some a trip down Memory Lane.
It looks similar to a ruffler foot for singer sewing machine
I've got several old rufflers and pleating feet and that's not what it is. Not for buttonholes, either, but an interesting suggestion.
It looks similar to an adjustable zigzag foot for a straight-stitch machine. If the bottom part of the foot doesn't wag back and forth with the middle part, check to see if it should if lubricated. It might just be stuck.
But...if the bottom part of the foot doesn't look like it's supposed to move at all -- then my guess is that it is for machine couching on a straight stitch machine. That was my first inclination upon reading your description of what it does.
So...if the bottom part could (or does) waggle too, it could be a zigzagger. if it does not -- then it's for couching down braid, rickrack, and other similar trims.
Give it a try on a regular low-shank machine, set for straight stitch, and see what it does!
Pam
This is a zig-zag attachment for the older Singer machines such as the Model 99's which were straight stitch only. Since the needle couldn't move, the foot had to.
It's a ruffler. My mom used to make curtains and little girl dresses with yards and yards of ruffles. I have a ruffle attachment for my older machine, but not with the newer one. This attachment was a great time saver when we made bridesmaids dresses for a family wedding.
I have never seen one like this before, however, it looks like it was made for a straight stitch machine, like the old Singer Featherweights.
That "can opener gear" probably provides the side to side movement necessary for these machines.
It probably created a zigzag stitch, and the big open space above the foot looks like you could run braid through it. I'd guess that its for attaching braid and other trims, with a zigzag stitch, on a NON-zigzagging machine.
Could you upload a video of it operating on your machine, using a straight stitch? That would certainly help.
Emmy
i had just purchased a shark sewing machine and on page 88 of the instruction book is a similar foot this piece is a walking foot used to help match plaids, stripes and patterns
is a buttonhole attachment for a straight stitch machine. remove the regular foot and the screw holding it in place. a larger screw is required to hold the attachment in place, the fork is slipped onto the screw. the feed dogs must be covered with a smooth plate. raise the attachment, place the fabric between the attachment and the smooth plate. lower the attachment. size of the buttonhole can be controlled by the wing nuts on the back of the attachment. when it is in motion, do not hold onto the fabric. the attachment moves the fabric back and forth, creating a zigzag stitch.
The mystery foot is a ruffler. My first Singer (circa 1955) had this foot and I used it a lot.
It's a ruffler. My first machine, a Singer circa 1955 had this foot along with about eight others. I used them all.
Lots of guesses! References, anyone? Couldn't find it in my collection of old sewing machine manuals. Try putting some fabric through it and see what happens! I would!
I forgot to add that you should try this on your Featherweight machine if you have one, or another older straight stitch machine. There probably should be a plate that goes under it that has a wide opening for the zigzag stitch, but which also covers the feed dogs.
In any case, if you are trying it on another machine, you should drop your feed dogs, as I'm pretty sure this foot will push the fabric from side to side as it works and you shouldn't hold onto the fabric while its working. Its not a pleater or buttonholer as I have both of those for my Featherweight. I really think it does zigzagging over braid, fairly thick braid at that.
Please put up a video of it when you have it working, I'd love to see it in action.
Emmy
I'll fall in line with the "ruffler" voters.
The foot is a ruffler. I still have mine in the original box. While it is called a ruffler, it really is a pleater. The foot is able to pleat a single layer or simultaneously pleat and attach the single layer to a second layer. In other words, it is able to pleat(ruffle) a skirt to a bodice all at once. Stitch length determines the fullness.
It definitely looks like a ruffler from an older machine. I would guess the 50's and I would also guess it could be from a treadle machine. Those treadles have lots of sewing feet.
Bobbins
It reminds me of the original buttonhole attachment that was with my Grandmothers "Pedal" Singer Sewing Machine. They then came out with an attachment with drop in
dies, for the lack of a better word, for the "Pedal" machine.
Question Please,
My Singer Serger did not come with an elastic presser foot. The manual and website say good for lingerie/swimsuits. Can one be used effectively for elastic in running/lounge pants, etc.
Thanks
It is a zigzag foot....not a pleater or ruffler. I have both feet and this one lacks a lot of the goodies that the pleater/ruffler has. Its just to make it possible to zigzag or satin stitch with a straight stitch machine. I don't think it needs a wide hole in the plate below it because the fabric moves back and forth, not the needle. If you have a wide hole under it, using the solid plate with a hole like the one designed for the buttonhole attachment would help keep it from tangling in the feeddogs. Have fun playing with it, it takes a bit of getting used to.
While I personally have never used a foot like this, I believe that one uses it for ruffling wherein you are attaching a ruffle layer to a straight or flat layer. The reason for having a wide needle slot is to perhaps position the needle off center for attaching a ruffle to a flat layer of fabric.
If you will note, there is a screw at the rear of the foot for adjusting the depth of the pleat or ruffle.
Another thought about this foot is that it could be used for sewing two flat layers together while incorporating a flat piece of elastic which you zigzag over. This would be especially nice when attaching a flounce type ruffle to the cuff area of a sleeve as both sleeve and flounce then could be ruffled at the same time via the addition of the elastic.
Years and years ago, I remember my mother sewing a window treatment for a small window at my grandmother's house. It actually was a ruffle that had elastic down the middle of it that went all the way around the three sides of the window. It looked darling. Four rings were sewn the proper distance around the length of the long ruffle and then attached at the corners of the window via eye hooks. It really was a slick idea in that it decorated the window but did not block any light from coming in. A foot like this one surely would have been just the ticket to accomplish that task. As I recall, mother satin stitched the edge of the fabric prior to the ruffling/elastic process.
Thanks for inviting my thoughts.
probably makes a non zig zag machine do a zig zag by moving the fabric side to side
it's a ruffler/pleater. Have one from the 60's and still use it
Looks very much like the ruffler foot my mother used on her 1930s Singer treadle machine. Lots of ruffles went through it for her two girls.
It defiantly is a rufflier! I just saw one at the fabric store yesterday . I was thinking about getting one but I don't ruffle anything yet!
It is a gathering or ruffler foot. The fork attached to the needle bar.
The foot looks like the "Zig-Zag foot" to mt old 1939) Singer Featherweight Machine that I used for many years.
The mystery foot is called a "tucker foot." It works like the ruffler and is especially for the Singer 221.
I'm pretty sure that this foot was one I used many years ago. It had a duel purpose. You would place the strip you wanted ruffled between the upper part of the foot and the material you wanted to attach it to on the bottom. It made little ruffles that were evenly spaced and attatched them at the same time. It was a great idea but as I recall it was very hard on my machine and needles.
It's a vintage zigzag attachment for a straight stitch machine.
It is a ruffler attachment. I have one quite similar and also an older one that came with a treadle machine.Mine says it is used for ruffling,puffing or shirring.It came with the style no. 11 or no.27 Singer machine. I have the instruction manual for both the no.11 and no.27.
I'm with msewhappy2. I've seen a foot like this ages ago for an old Singer(I think). It's used to make ruffles. I don't have as much info as msewhappy2, since the foot and the machine are long gone.
My Singer machine sewing manual says it's an Even Feed Foot. The text says:
"A practical, simple way to accent the lines of a dress or coat is to place one or more rows of stitching along collars, lapels, facing edges, hems, pockets, seams, etc. For a tailor look, use lines of regular straight stitching : sew them with buttonhole twist (or double strands of regular thread) for added emphasis. The Even Feed Foot will help you place stitching evenly and accurately." It also can be used for an elastic stretch stitch. I'll stay tuned to find out what it is from the experts!
It is a foot that allows a straight stitch machine to do a zig-zag stitch. The adjustment in the back is for making the zig-zag a satin stitch. My mother had one similar to this for her singer tredle machine.
It looks like a ruffler to me. I don't have one, but I've seen similar feet on other machines.
I haven't read all of the comments so someone else may have this same answer. I believe it is a bias foot that attaches the bias tape to the article it is being sewn to at one time. It folds the tape and stitches it to the garment in one step. I have used a foot that does this and the foot in the picture is quite similar. It is a tricky application---you really have to practice, at least I did, but it is handy once you know what to do.
I know it is not a ruffling or pleating foot. That type of foot has a piece in the front that has definite teeth on it, which is what ruffles or pleats the fabric.
I think it is a Bias Binder for edge with a bias tape and it was used on a Viking sewing machine.
It is a zig zag foot for a straight stitch machine like the Singer featherweight. It really works too.
For all those who guessed ruffler attachment, you are right on. I still have mine and it came with a Singer slant needle from the early 50s - this is one of the last machines made with all metal attachments. Still buzzing along, I might add.
I'm guessing a ruffler.
I'm going with the zig zag foot as my guess. The ruffler/pleater would have additional adjustments such as pleats per stitch and even a no pleat option for areas along the length that need to be flat.
Although it LOOKS very similar to the rufflers, and pleaters mentioned above, the bottom is different, not having the 'teeth' to pull the fabric through at varying rates. I have had several of them over the years, with my very old machines. It does however, have a suquare hole in the front, leading me to belive it is for attaching trims, ribbons, etc by feeding them through the hole.
Thank goodness for modern electronic machines!
It is not a rufflerfrom a treadle machine because the distance front to bak is too short. I remember there being a zigZag attachment, but I never touched one. That must be what this is. Just remember to let the machine do the work. Go try it please.
I would have to say that this is an adjustable zigzagger for an old singer straight stitch machine. Here's another link: http://www.homejobshome.com/store/1707890/product/A-0000043 .
It looks like an old pleater.
By now there are many answers, but the really nice thing is a memory of my Grandmother at the sewing machine, using that foot, during one of her visits. I must have been a close observer, probably more in the way than helpful!
My Grandmother used this foot to make ruffles on her Singer.
I agree with Darla. This is a zigzag foot for an old singer.
Swarner
Could be a shirring/zigzag foot for a stright needle machine.
This looks like a surging foot for sewing machines to use with knits.
I have used many presser feet. However, the only one that resembles the mystery foot, with regard to the way it attaches to the shank, is the even-feed foot (also known as the "walking foot").
Yes that is a zig zag Attachment but it can be used as a Button foot as well.
It lookes to be a zig-zag foot for the straight stitch machine. The bottle of the foot is make to move the material back and forth. The slot is elongated so that when the foot moves the material the needle will not come down on metal.
Its the foot that converts a straight stitch machine to a zig zag. It moves the fabric from side to side while the needle goes up and down.
Nuf
It looks a lot like a shirring foot; or possibly an early version of a pleater.
That foot is a ruffler foot. It works very well.
I thought it was a zigzag attachment but wanted to read what had been posted already!
Hooray for llg930!!
I followed her link and lo and behold, there it was, about half way down the page.
"llg930 writes: hi ok i found your mystery foot here is
the link and description:
http://www.raindropkites.co.uk/sewingmachines/bigatts.html"
Way to go!!
Rufflers have more working parts and although it might have been used as a buttonholer (and states that on the referenced web page) I believe the primary use is to overcast. Indeed, the one above it is shown on that page as creating a three stitch zigzag, typically what is used today to attach elastic and form a flexible seam (the extra "toe" on that one might have been a guide for the elastic!)
The attachment looks like the buttonhole attachment that was on my mother's Kenmore sewing machine back in the 1950's when I learned to sew. It worked fairly well once you got it set up correctly.
I have a similar foot - from memory it was for attaching ruffels for a Singer Machine. As that machine dates from 1932 (when my mother married) it predates zigzag. The wide opening was where the ribbon was fed in. As it is now nearly midnight (UK time) I will leave it until another day to check if I have instructions and take a phtot to send.
My first thought when I saw it, is that it's a ruffler, but it's much smaller and not as long as a ruffler, and doesn't have a part that moves forward/backward to push the fabric into gathers or pleats. It could be a shirrer, but I don't think so.
I think the grooves on the bottom of the foot have something to do with it's function, perhaps to grip the fabric to keep it from shifting.
As the fork goes up and down, the small bar moves from front to back, and back to front, causing the can-opener gear to move, right. What other movement happens? That is, what does the gear's movement do? I studied the 1st and 3rd photos again (fork up, then fork down, side view), and I can see that the foot part (that touches the fabric and that the needle goes through) moves right to left at the turning of the gear. (this is why the round circular thing on the bottom moves 'up and down' in the photo (left to right when the foot is upright). So as the foot grips the fabric, it moves the fabric back and forth creating a zig zag. That is, the needle doesn't move sideways as on modern zig-zag machines, but simply sews straight, while the fabric zigs and zags.
I don't think it's a buttonhole foot, as the screw in the back doesn't have enough length to adjust for long or short buttonholes. Instead, that screw probably adjust the width of the zig-zag.
The suggestion that it is for sewing on bias binding is interesting; I can't see how that would work, but then I've never used a bias-binding foot.
I'm sticking with the zig-zag attachment for a straight-stitch machine.
I have one of those. It is a buttholer for an old Singer. I got the Singer maybe 50 years ago and I still use the buttonholer for replica outfits since the finished product is rustic enough to handmade.
The foot was a ruffler found in the sears kenmore sewing machine attachments in the middle 1950's when my father purchased as a gft for mom. There is an adjustment lever with numbers that control the depth of the flounce.
As to what the foot is... It is a pleating or ruffling foot....My Mom bought a electric Singer in 1959 and this foot & many attachments and instruction book came with the machine. I made a queen size duvet cover and used this to make the pleated ruffle all the way round the cover. If you can get this to work on any machine it does a wonderful job as each pleat is the same size. I have an Omega sewing machine that I bought in 1978 and it will work on this machine with a bit of adjustment and the automatic buttonholer that came with the Singer will work on the Omega also.
Have to agree with those who say it is a zig zag attachment for a straight stitch machine. I remember my mother having one years ago. The ruffle, pleat attachment is much more elaborate and does not move side to side. It will be interesting to find out if we are correct.
Could this foot possibly be for some kind of smocking?
I am positive that this is an even feed foot or walking foot used only for straight stitches. Even thought it has a wide opening making it look like a zigzag foot. It is used to sew layers together and feeding the layers together so one layer doesn't get ahead of the other.
I believe this is a combination foot to add bias tape or ruffles. I used one in high school on a viking machine. It was great for attaching bias tape to garments. Would love to have one now!
This is definitely the ziz zag foot for the straight stitch singer or Phaff machine. The ruffler has a longer body and extra slides to place the fabric in. this one has the 2 slots to hold the fabric each in its own place to feed thru to the needle. this one swings side to side. The ruffler/pleater slid front to back and made the prettiest ruffles. I think I still may have it around in some of my nostalgic sewing stuff.
I have a Singer Slant-O-Matic 500 that I brought in 1963 or 1964. This was one of the feet that was included with my machine. It is a ruffler. Needless to say I have never used this foot. It offers a simple and effective way to make gathered and pleated ruffles according to the manual. Ruffles may be made separately or made and applied at the same time. Hope this helps.
This is a bias tape and ruffle combo foot. I used a similar one in high school on our viking machines. It was great for attaching bias tape to garments. Wish I had one now!
At first I also thought it was a ruffler or shirring foot but then I remembered the first sewing machine I got back in 1957 (sew Best) came with a zig-zag attachment. The screw on the back adjusted the width of the stitch. We have come a long way since then!!!!!! thankfully ;)
I must side with the zigzag foot for the early straight stitch machine. I took a picture of mine; is there a place to post it?
As for the ruffler, there is not front to back movement that would make the pleat/ruffle. This foot moves the fabric back and forth to create the zig-zag. The open part in front accomodates the width. The other piece is similar to the original edge-stitch foot snd attaches into that wide space for fabric placement.
It looks like a ruffle/pleating foot to me. It is not necessary to sew zigzag stitches with it. You simply sew straight stitch and it makes uniform pleats or ruffles. The one I have doesn't fit the machine that I use now because it is about 35 years old. You can set them to take a ruffle every stitch, every other stitch, or even three or four stitches.
the feet is a ruffler .It´s also a pleater and it can be use to do several sizes of pleats and also too you can atach it to any material at the same time.
I believe it is an elastic attachment foot.
While this attachment has been identified, I thought I'd add a comment about researching some old sewing machine attachments. I was given what turned out to be an eyelet attachment. It had a sharp pointed finger that punched a hole in the fabric and it then turned the fabric in a circle making 5 thread "spokes" around the hole. Mine did not have the needed base that raised the attachment above the needle hole plate so the pointed finger could penetrate the fabric without scarring the plate.
I found out what it was because a patent number was engraved into the attachment. The U.S. Patent Office has all patents available online. Pre-1975 patents are scans of the pages and searchable only by patent number, date issued and a few other pieces of data. The patent pages even described how to use the attachment.
There is a number on the forked finger of the subject mystery foot, but I could not read it from the photo.
This is an automatic overlocker attachment so that you can zig-zag with a straight stitch sewing machine. I had one for an old black singer years ago and it worked great.
I believe that the foot is a darning foot. My mother used one for darning clothes. It goes further back than the zig zag foot.
I believe it is a ruffler foot, looks like the one that fits my little singer sewing machine.
This IS a zip-zag attachment for straight stitch machines. My Mother had a straight stitch Kenmore and had this attachment in a box with instructions. I have several sewing machines, and I have used the ruffler attachments for over 30 years and this is NOT a ruffler and never was. This just goes side to side in a zig zag motion and the screw adjects the width The wide opening at the front allows for the width of the stitch. It doesn't shir, gather or attach bias. It is a zig-zag attachment.
This IS a zig-zag attachment for straight stitch machines. My Mother had a straight stitch Kenmore and had this attachment in a box with instructions. I have several sewing machines, and I have used the ruffler attachments for over 30 years and this is NOT a ruffler and never was. This just goes side to side in a zig zag motion and the screw adjusts the width The wide opening at the front allows for the width of the stitch. It doesn't shir, gather or attach bias. It is a zig-zag attachment.
I think this is a "Side Cutter Foot" for an older industrial zig-zag machine. It simulates a serged stitch and cuts the fabric as well.
Hi April, while the attachment does resemble a ruffler, I have to go with a zigzag attachment. In the Singer manual for a 15-91 the ruffler has an extra gizmo at the back of the C-shaped arm that contains slots to adjust the size of teh ruffle you wish to make, it was the adjusting lever. Your attachment does not have that nor does it have an "s" shaped foot. It could be a pleater of some sort and what makes me think that is the grooves on the bottom of the foot which are tracks to allow you to keep the pleats or tucks straight.
Hope this helps some. You might try going to the Singer web site and asking them or to one of the antique sewing machine sites, they may be able to answer your question better.
Terri Drake in Ossineke, MI playing on her 1913 White Treadle
OK, so here I go, dipping into Blog-o-landia!
If I'm not mistaken, this is called a Ruffler Foot, probably for an OLD Singer. It's intended to make little "creases" in the fabric and advance it to the next crease. So the vertical "fork" holds up the intended ruffle, and the little "clutch" grabs a small bunch of the fabric and advances it over the flat stock.
Not sure exactly how to load fabric into this complicated looking foot(so now you know the answer to 'have I used it' -NO). But almost certain it's meant to attach a narrow, folded band - perhaps cut on the bias? - to a flat (and larger) piece, as in for example, around a collar or around the edge of a curtain.
That's my best guess (and I've also wondered, so I'll be happy to find out if someone really knows...)
I think it is a ruffler. I remember my mother using one with a long bobbin Singer machine.
It looks to me like a pin tuck foot. It has the opening and large groove for the cord>
Ok, it looks like the ruffler that belongs to my antique singer 66 - 16 1935 sewing machine. You have to remove the presser foot to use it. I am having the machine serviced so I can use it again as my aunts and mother did.
If I am not mistaken, I believe I own the same foot. If so, it is a button hole attachment. With the various adjustments on the device, you can establish the length of the button hole that it makes, the width of the zigzag stitch and the width of the hole in the middle. My mother or I have used it on any number of the older Singer machines, including the Featherweight. I agree with Palady, give it a try and play with the adjustments. I would be willing to bet that what you have is a "buttonholer."
This looks exactly like the ruffler attachment I got with my Wizzard Sewing Machine purchased from a Western Auto Store back in 1960.
Looks like a foot to do a zigzag stitch that will allow you to attach elastic to fabric therefore gathering the fabric. Place your fabric under the foot. With the elastic inserted from bottom up through the first hole and then down through the second hole lining up the elastic and fabric ends together start stitching, the lower feed dogs will pull the lower fabric and the foot will stretch your elastic as it zigzags over it, therefore gathering the fabric under it. If you wish to make tighter gathers you can bypass the first hole and pull on the elastic as tightly as you wish to make fuller gathers. You can also use it to attach bias binding, bypass the first hole, line up your binding with whatever you are binding and sew as usual. If you wish a straight stitch you will need to disengage the zigzag feature by loosening the screw at the back of the foot.
I believe this foot is used to attach elastic to fabrics.
I think its some sort of binding foot
It definitely is not a ruffler or pleater they have a slick metal piece on the bottom that uses to grab and feed the material. I'm pretty sure, like it has been mentioned, it's a zigzag for a straight stitch machine. The screw on the back adjust the with of the zig or zag.
Adopted by the following
Singer
28 Hand Crank
Red Eye Treadle
15-91
201 Centennial
221
318
500A
Brother machine model unknown
Elna
Grasshopper
Pro 5
945
Janome 10000
Viking Designer Diamond
I agree with the earlier not that it looks like a very early zig zag foot, (maybe from the 1940's or 50's) with a channel to allow the attachment perhaps of lace or ribbon. It doesn't appear to be a Singer - attachments made by Singer were clearly stamped "SINGER" and/or had a part number on them.
It is definitely NOT a ruffler... which had even more adjustments! To see a good picture of an early (1949 printing) Singer ruffler, see Mary Brooks Picken's: "Singer Sewing Book", published by Singer, page No 113, 196. This is a great, though somewhat hard to find book on everything to do with household sewing.
The Zigzagger ws an extra accessory, I've seen very few of these "bare" zig zaggers. Later in the 1950's a very cool, and more palatable looking zig zagger came out with varied cams for different stitches was produced. The pages referenced above show the zig zag stitch used to insert lace and apply applique work.
This book is my "bible" for sewing (as it was my mother's"... and shows how to use all the "old" feet that came with your Singer. The "dressmaker" size machines all came with a Ruffler as a standard accessory, many, many are still out there, and they operate wonderfully with almost any modern low shank machine. Because machines soon appeared in the mid to late 50's with built in zig zag, these attachments were short lived, and soon discarded.
I collect, restore, and use many Singer models. This part may be from another machine maker, or one of the accessory makers. If it were made by Greist, it also would have been marked, but almost any other maker, would leave no mark!
- Karen Alexander
Austin, Tx
Singer 15, 15-31, 101, 201, 221, 14-91, and 401,
http://www.karenquiltslife.blogspot.com
i had one like this for an older model singer touchtronic.
it was a buttonhole foot and worked very well.
yep. it's a zig zag foot for a straight stitch machine. the fork goes around the horizontal bar where your needle screw is attatched. I have mine right here in front of me (i've used it lots of times with my older Kenmore that I didn't have a zig zag cam for) and I have an extra piece that you dont' have pictured that attatches to the bottom. It has a piece that slides into the hole just above the needle hole. play with it on your machine it's fun to watch the foot work. :-)
That looks to me like a very early zig zagger. The screw in the back adjusts the width of the stitch.
oops. just remembered that my extra piece actually attatches to the top, and looks like it could be used for attatching trim or elastic.
I'm convinced, by its appearance, that this is an "even feed foot/walking foot". This foot walks over fabric to help keep the fabric layers feeding at the same rate. When using this foot, your fabric can be sewn without shifting or puckering because the fabric is gripped and fed by both the upper and lower feed teeth. This foot is often used when quilting one layer of batting between two layers of fabric.
I own and have used this attachment. It is to make a zig zag stitch with a straight stitch sewing machine. You do not need a larger plate hole as this attachment actually moved the fabric itself in a zig zag fashion. It really works pretty darned good. JOYce Thompson
The foot looks similar to the Pin tucking or Ruffle foot that I have for my Old Kenmore Sewing machine that is about 30 years old. It could even be a a zig zag foot for a alder machine.
I have one at my flea market stall. I hope I didnt throw it into a box of junk I sold at an auction. I have some other pieces that I have no idea about what they are. I will try to get a picture of it. It goes to a big machine that I know. I got it in a box of Embrodery threads.
My daughter suggested it looked like a blind hem foot, so I looked it up in my Machine Sewing book by Singer, published 1950, and it looks like an older one, or a different brand of the blind stitch attachment pictured on page 149. The only difference is the pictured foot has a guide on the toe.
It lokes like it maybe to rick-rack?
That is indeed a generic ZigZag Attachment for low shank machines. It moves the fabric back and forth (rather than the needle zigzagging back and forth) for straight needle straight-stitch only machines.
It works similarly to the one I demonstrate here:
http://www.april1930s.com/html/singer_adjustable_zigzag_attac.html
I have to agree with all that said it's a zigzag attachment. Found another foot that appears to have the same features.
http://www.google.com/imgres?imgurl=http://www.april1930s.com/assets/images/ZigZag_Attachment-Green_Box03.JPG&imgrefurl=http://www.april1930s.com/html/new_to_the_shoppe.html&h=408&w=546&sz=172&tbnid=dfjeq6dpRfZIzM:&tbnh=99&tbnw=133&prev=/images%3Fq%3Dpictures%2Bof%2Bantique%2Bzigzag%2Battachment&hl=en&usg=__g1opGQnMsY1irau6uaNJ_hGztSg=&ei=CdqlStWWDoT6MY_9iPAP&sa=X&oi=image_result&resnum=1&ct=image
Tootsiebelle
Having checked my posting, which seems to have scrawled itself all the way across the page (sorry about that), I thought I was seeing double, as I noticed the first part of the site address has April1930s in it, and April1930s post right below! Please forgive the redundancy!
Wow such a lot of sleuths out there - people just love to solve a mystery don't they?
I have a Riccar 9900 which is over 30 years old. One of the new generation machines at the time which integrated zig-zag stitch without the necessity of manually changing cams! It came with a superb variety of extra changeable feet one of which look remarkably like the photographs above. Here is what the manual says about the Riccar version of a similar foot:
"Walking Foot Eliminates Slipping"
"Some kinds of cloth, when sewn under an ordinary presser foot, may slip and cause untidy wrinkles or faulty alignment of the two pieces of cloth.
Use a Walking Foot for leather, vinyl, plaids, chiffon, velvet and troublesome or slippery fabrics."
I am wondering if my foot can also do the functions things that the other similar feet can do? What do other people think?
Has there been a definitive identification yet?
I believe this may be for pleqting ruffles qs you sew on to the straight piece of material, my mother had one on her old Singer sewing machine many years ago.
My treadle sewing machine manual describes it as a ruffler, and it automatically makes tiny pleats in either ribbon or fabric, if in ribbon it can be used to pleat and apply in one go. The plates allow the ribbon to be pleated whilst the fabric layer is moved past using the feeddogs. Usually there is a cam that can be adjusted to make larger or smaller pleats .. but the pleats are fairly neat and small even at the larger setting. I regularly use mine to sew with on my bernina .. I bought it a singer to bernina attachment foot and it works well. My treadle dates from the 1880's ... and is a singer .. although I suspect there were many many of these made and sold and not all were for singers.
This is a edge finisher and side cutter. I call it the "poor woman's serger." It trims and finishes the edge. That "leg" that sticks up goes over the screw that holds the needle on to keep the edge straight.
This looks very much like one of the early 50's complicated add-on sewing attachments that came with my Aunt Ruby's brand new Necchi "top of the line" sewing machine--one of the new exports from a post-WWII Germany. Ruby bought every attachment they offered. My Gram had taught me to sew when I was about 7 on her old Treadle Singer Sewing Machine. Later, Ruby decided to teach me 'modern' sewing--electrically with a foot pedal! The Necchi--also a cabinet style with drawers and doors, had a hinged sewing table extension that folded over the top after the machine swung down into the cabinet. Anyway, these drawers were stuffed with boxed add-ons with pictures of the parts on the outside and detailed instructions of how to use them inside the box. I never got over to Gram and Ruby's (by then I was about 10, and we'd gotten a Portable Singer at home) to spend much time learning all the Necchi parts--I was more into gardening (3 sides of their yard were flower gardens with a vegetable garden in the far back).
This part looks very much like an ancient BUTTON FOOT. The forked arm that has 1 bent 'tong' fit around the needle screw and went up and down with it. The bottom part in the center that turns was driven by the fork, moving the material/button side to side to line it up with the needle coming down into the foot that was holding the button in place, while the needle/thread alternated stitching into the 2 button's holes. The doublefork in the center, attached to the outerside hooked like many parts around the main needle holder/driver below the tension, held on by a large-headed screw similar to the one shown on your foot. That screw probably held the part up in back as the metal was pretty heavy back then. That'd anchor the part horizontally from the side and vertically from the back, allowing the inside forked arm to be driven by the needle-screw's up/down motion, in turn, moving the portion on the center bottom side-to-side, allowing the needle to alternate holes in the button clamped under the foot. There are several levels/ layers of metal on the bottom of that part. It is likely that they somehow shifted back and forth--also driven directly or indirectly by the extended fork (like cog wheels in clocks).
I think Pattyv's idea may be on track. My first thought is that it is some type of attachment to allow one to do a zigzag stitch perhaps for seam finishing.
I have this attachment for my circa 1950 Kenmore sewing machine (still works!). It is a ruffler attachment. The fabric feeds in the bottom left side; the arm portion hooks over the shank screw, and automatically gathers the fabric as the needle moves up and down. Works very well!
My first guess is ruffler or pleater. My mom had a very old machine that came with a lot of attachments, one was a ruffler. The machine was controlled by a knee control, my dad converted it to be used as a foot control, great old machine. I used the ruffler and Rosemarie is right, works very well. Wish I had all those old attachemnts and they would actually fit on my modern machine. They were great.
My first thought was a ruffler but she says it moves side to side so I'd vote for a zig-zag attachment. I had one that looked more like the old Griest buttonhole attachment. Good luck!
This aqttachment is a ruffler or a pleater. THe fabric feeds throughthe attachment. Depending upon the length of the stitch- the gathering can be very close together (hence ruffler) or spaced futher apart- hence pleater. The attachment works nicely. I too have used it with my Kenmore machines.
Megaquilter
This attachment is a ruffler or a pleater. Te fabric feeds through the attachment. Depending upon the length of the stitch- the gathering can be very close together (hence ruffler) or spaced futher apart- hence pleater. The attachment works nicely. I too have used it with my Kenmore machines.
Megaquilter
My grandmother had one of those - she used it for zigzag sewing. I remember from my childhood being fascinated with the things her special attachments (she called then "gadget feet") would do to the fabric as it fed under the needle.
I think this is an ruffler foot. that's the way my ruffler looks for my machine
I just opened my "Chadwick" Pantent Zigzagger. It is still in the box with instructions and the packing notice from the
Walter Drake & Sons of Colorado Springs CO. From the address that I had it sent, I must have ordered it for my Mom's Kenmore Model 86 between 1967 and 1970.
Instructions to adjust to wide or narrow stitch: turn screw on back to the left for wide stitach and to the right for narrow. (Marcked W & N)
My vote is for the walking foot.
That looks like my ruffler. It's a great attachment if you ever do ruffles.
The last time I saw one of these sewing machine foot. It was either for the very old singer machine or the White treadle machine and it was for gathering material. Joan J
My first thought when looking at the foot, it seemed to be a walking or duel feed foot. But, after looking at it more closely, it appears to be a pleating or ruffling foot.
This is definitely a zigzagger - appears to be the Chadwick model I use on my 1940s Singer Featherweight, but there are several of this type. Singer's oldest manual zigzagger is similar in appearance. As another poster mentioned, there is a small edge-stitcher plate that snaps into the front to allow joining the edges of 2 pieces of fabric with a fine zigzag stitch. The stitch width is set by turning the knurled nut at the back of the zigzagger attachment, reducing or increasing the sideways play of the fabric. Stitch length is set from the sewing machine itself & there is also a small lever that switches the attachment between straight & zigzag stitch. I believe I do still have the (very minimal) instructions that came with it if anyone is interested.
Since I have only 1 machine - my Featherweight - over the years I've added a wealth of attachments including walking, pleater, shirrer/ruffler, & button feet; several zigzaggers (manual & automatic), plus a hemstitcher, buttonholer (although you can make a freehand buttonhole with any zigzag foot) & a "side cutter " (aka Greist Overcaster). Yes, they can be a bit fiddly to set up, but they do work.
This looks like a smocking foot.
Is this not just an attachment for a straight stitch machine to create a zig zag stitch?
I believe this is a ruffle attachment. I had one at one time but never used it.
Hi this is a zig zagger foot which came as part of the gadgets with my Jones CB Treadle machine, which has instructions for using it for patching, cording, overcasting,overlocking,seam neatening, buttonholing and blind hemming. It has an extra plate which should only be attached if you require to join two pieces of material together or for lace insertion.
Looks like a shirring foot, the extra large hole would accomodate a decorative stitch.
I have a sewing foot like this that was made by Singer Sewing Machine Co. It was purchased to use for quilting but I used it to keep the top and bottom of a seam even. It was called a "walking foot".
Looks like a ruffler to my 50 year old Singer. Still ruffles too!
Looks like a ruffler to my 50 year old Singer. Still ruffles too!
This looks simular to a Singer Adjustable Zigzag attachment, part number 121706, for straight stitch machines. I have one, also the instruction book.
It states:
Remove the presser foot from the machine.
Bring the zigzag attachment into position from the rear with the fork arm astride the needle clamp, and fasten the shank of the attachment to the presser bar with the regular thumb screw.
On Singer 101 class machines, insert the thumb screw through the upper hole in the shank. On all other Singer machines, insert the thumb screw through the lower hole.
The sewing machine should be run slowly for zigzag stitching, and the material should be held loosely so that it can be moved sidewise freely by the zigsag foot.
Tensions - For best results, both upper and lower tensions should be fairly light to prevent the material from puckering.
Those were the basics, the booklet has much more.
ConnieS
My Mother, who is 83 says this foot is for hemming.
Definitely looks like the pleater foot that came with my mom's old Singer.
This foot looks a lot like an attachment to my mother's circa 1934 Singer sewing machine. We called it the Ruffler, and it pushes fabric together in little pleats and then stitches it down. However, this foot only has a little hole for the needle - that's because this machine only sewed straight - doesn't even have a reverse.
I have one of these, it makes ruffles. It makes really tight ruffles or loose ruffles.
I agree it is a ruffler. I had one for my Singer Featherweight.
To me it looks like a gatherer for a sewing machine.
This foot must be for zig and zag before the straight machines had such a thing as a zigzag. It would move the fabric back and forth.
looks like an early zig zag foot to me
The pictured machine foot looks exactly like a foot to my mother's Singer which would now be 60 years old. It served as both a zig-zag and ruffler. I know that she made button holes with it. I learned to sew on that machine and I used the foot to put a ruffle on curtains.
I believe this is a ruffler/pleater (many of these feet do both functions). If you put the first fabric in the slot, and a second fabric on top, both will be ruffled. If you put one fabric under the foot, only the top fabric (through the slot) is ruffled.
At first glance, this foot looks very much like one that I have on my mother-in-laws old Singer treadle machine that was used to gather or pleat. But since you say it moves left to right, than right to left, I think it could sew on buttons.
I think it's a gathering foot, my mum's Brother sewing machine has a similar attachment.
It could also be a very early version of a walking foot used in quilting. If the foot walks along and keeps the fabric layer even, then I would think that is what it is.
Look forward to finding out what it is.
This looks like the button hole attachment that I used on my portable Singer years ago when I was about 12 years old. It took some adjusting but the button holes were perfect.
Looks like my cutting foot. The wide opening is for the zig-zag stitch. The upper fork slips onto the nut and the up-and-down motion of the needle drives the cutter. The end result is an over-edge zigzag from a regular machine.
I still have my ruffler/pleater attachment for my Mom's Singer lightweight, straight stitcher. This one doesn't look like it. Mine has the adjustable, gatherer sliding gauge part to adjust the width of the gathers. Your photograph does show the foot portion as being level in front (on fabric/seams), but there's room under the back portion between the table top and the attachment. I would guess it's some kind of walking foot to equalize distribution of heavy fabrics and that might also do dual duty as a zig-zagger, edge finisher. Because there's a space behind the foot part, it may also have been used for heavier quilts, jeans or heavy woolen fabrics like coating. The screw would adjust the distance of the zig and zags. By all means, Attache the darn thing and sew with it and see what it actually does and answer your own question!!!
I just realized that the word Patent appears on the bottom plate. If there's a number, it's a simple matter to go on-line and check the patent number with the USPTO (United States Patent and Trademark Office), where they have the COMPLETE description and instructions, etc. etc. If it's A European patent, you can probably do the same thing, but the word Patent is in English, so check England first.
/j/
When will you post the answer?
/j/
It is a ruffler - I have one. Also used to use one on my Mom's old treadle machine. Rather dates me doesn't it! :)
My first thought is that it is a gathering foot, but also it could be a shirring foot. If I have my names and terms correct.
My first thought is that it is a gathering foot, but also it could be a shirring foot. If I have my names and terms correct.
I think it is a ruffler foot or zig-zag foot for a straight stitch machine. I have a ruffler foot similar to this one, but it doesn't have a wide hole for the needle to pass through....therefore, I think it might be more a zig-zag type if it moves the fabric side to side as it stitches.
It looks like a ruffler that I use once in a while. Although the front of my ruffler looks different. Mine has little slip in slots for the different layers of material.
"The foot is a blind stitch attachment that gives an effect much like hand hemming and serves well where saving time is more important than an invisible hem." Information found in a book my sister from Canada gave me, "Clothing Construction" by Evelyn Mansfield/Michigan State College, copyright 1953.
I seem to recall seeing this attachment back in the 1960's when sitting at my grandmother's Morse sewing machine. Never used it.
Most of the time a lot of us don't use this foot. We will pleat by hand. So I think it is a foot for pleating.
Hi,
This machine foot is used to put elastic on things like half slips or those soft nylon skirtsor even panties.
It zig-zags the elastic on to give it ample stretch as the elastic is fed through the slot. I have been wanting one for years and cannot find one. As the item is being elasticized toy can tighten the little screw on back to get max or min ruffle.
Shelly
even though I've never seen this particular foot before, my vote is with an early version of a walking foot for quilting and heavy sewing. It looks similar to the one I have for my sewing machine.
Well here is what I think it might be used for , just my thought.I'm talking many years ago , when I worked in a single needle machine in a factory, there was a foot we used, to feed thin elastic throught the foot part between the two metal parts and run the material under the foot it self, which made a zig-zag movement and attached the elastic to the sleeve or whatever the part of the garment needed elastic.It's been a lot of years since I worked in a garment factory, but I'm thinkin that is what the foot can be used for.The screw part was for ajusting the tension of the elastic running through the two metal parts and would give the drag it would needed to pull the material in under the foot. It's hard to explain without showing who the elastic gets feed through.The elastic would go between the two metal pieces,out the front and then ,in under the foot,through the retangle opening, and as you sew the elastic gets feed through the opening and attached to the garment and as for the other arm attached on the right side is like a pressure arm you can press to ajust pressure on the garment.That is my opinion.
I am fairly certain this is a ruffler. I have a Singer book from the early 1920's with a picture of a similar foot. The following parts are labeled: Foot (A)- attaches to the presser bar; Fork Arm (B) - placed astride the needle clamp; Adjusting Screw (C) - regulates fullness of the gather; Projection (D) - projects through the slots in the adjusting lever; Adjusting Lever (E) - sets the ruffler for gathering or making a pleat either every 6 stitches or every 12 stitches - also disengages the ruffler; Adjusting Finger (F) - regulates the width or size of the pleats; Separator Guide (G) - on the underside, contains slots into which the edge of the fabric is placed to keep the heading of the ruffle even. Also for separating the fabrice to be ruffled from the fabric to which the ruffle is being attached. Ruffling Blade (H) - upper blade with teeth at the end to push the fabric in pleats up to the needle; Separator Blade (J) - lower blade without teeth, which prevents the teeth of the upper blade from coming into contact with the feed of the machine or the fabric to which the ruffle or pleating is being applied.
I had one of these for my very first machine.a Frister and Rossmann, and I used it for Zig-Zagging.
It was bought as a universal attachment for machines way back in 1960.
I believe it is a Walking foot, used to evenly feed the top and bottom fabric at the same time.
Pam
It looks like an old fashioned ruffler foot -- I have several old Singers from the 50's and before, and those feet had that fork. Check with a Singer dealer or Google them. Thank goodness for new machines!
I have a strikingly similar attachment in my sewing stash(what DON'T I have in that stash) and I'm pretty sure it's a zig-zag attachment for the old, simple, straight stich machines. With it, one could do so much more with those basic machines. And I'm sure it was used for ruffling too. The inventive sewer can do just about anything with the most basic tools.
I believe it is a ruffler foot. It resembles the one from my moms machine that I learned to sew on in the 50's it was a singer 401a which I still have and sadly to say do not use since I replaced them with 3 new berninas over the years but I will not get rid of it. It is reliable and I dont have to send it out to be fixed. Since it is not computerized. According to the manual and picture it is that foot
that foot is a pleater/ruffling foot and it saves a lot of time when gathering.
it looks to me like something to couch trim or elastic
An automatic ruffeler. I have one and used it to make all my curtains for our first home in 1975. It fit my first sewing machine a Sears Kenmore.
Good morning April. I have an attachment very similar to the photo. It goes with my Singer Touch Tronic 2010 Memory Machine, that I have had for approximately 22 years.
It is an Even Feed Foot used for sewing hard-to-feed pile, knits, shiny fabrics, vinyl, plaids, leather,and bonded fabrics.
Thanks for sharing I had forgotten about this attachment. I will have to use it soon.
Hi, April. You've received a lot of feedback already. It does resemble the "Walking Foot." I remember the ruffler foot also. The ruffler foot looks similar to the walking foot, but with one additional feature: it has a little claw that swings according to whatever adjustment you make on the body of the foot. The claw swings to grab a measured portion of fabric into a pleat while the sewing advances. It repeats according to the frequency you set on the foot's adjustment or stitch length setting. Your mystery foot looks like it has adjustments for ruffling on it. Experiment. If it is a walking foot, it will make matching plaids, stripes and patterns more accurate in the stitching. If it is a ruffler, you will find your fabric neatly and uniformly pleated as you stitch. If it is a side cutter, then I guess it will trim as you sew. If it is an elastic sewing foot, then feeding elastic through the slot and sewing it to the fabric will be successful and easier. Whatever kind of function it performs, the short fork installs on the presser foot bar shank screw. The long fork sits on the needle bar clamp screw. Both screws must be tightened securely. You may set your stitch width for zigzag or straight stitching. Have fun! Let us know what you find out! :-)!
I believe this is a ruffler. I had one with an old machine and I used it when I made little girl's dresses many years ago.
Most ruffler/pleater feet have a thin piece of metal that moves back and forth to push a small amount of fabric under the needle and this foot does not have that. Also a ruffler/pleater foot does not have a side-to-side or zigzag motion like you said this foot has. I think it is either a simple zigzag or blind hemmer attachment that would go on an old straight stitch machine. Singer had a zigzag attachment that had different patterns, similar to what the cams that came with my old Kenmore machine had for simple zigzag embroidery patterns. It would make sense that the machine companies would have come out with an attachment that could do zigzag and/or blind hemming with their straight stitch machines. Boy, have our machines come a long way since then.
I say play with it and then let us know what you learn! I looked at "Google images" for "ruffler sewing machine foot," and didn't see anything that looked EXACTLY like this. However, I did see a couple of similar feet with a little arm-thingy that moves. One website said the moveable arm hooks onto the machine's doohicky that goes up and down--as the foot moves up and down with the machine, it counts stitches between pleats.
I use a singer 301A slant needle, circa 1948? It is not a ruffler or a pleating foot. It zig zags and sews ric rac or elastic onto fabric.
Hi,
I used to work for a sewing machine importer in Vancouver Canada about 30 or so years ago and we stocked many parts. It reminds me of a ruffler, didn't use it but somehow the fabric bunched up at the back.
Lynn
I have the directions for the Singer Electric Sewing Machine copyright 1941 and in it it has a picture of an attachment much like this one. It is called a ruffler and is used to make ruffling, gathering and plaiting. I still have the attachment and you can also use it to sew piping on at the same time or sew the ruffle to the garment at the same time as well as add a facing.
Nana21
I also have this attachment it came from my grandmother and it is a gathering foot. Her machine is forever old but it works great in mine.
It looks similar to an attachment on the Honeymoon Treadle Machine my grandmother used, I believe it's a pleater.
Perhaps it's a smocking foot. It doesn't look like my old Singer zigzag foot.
This looks a lot like a foot used to make gathering. You would use this instead of stitching 2 or 3 rows of long machine basting stitches.
look like a shearer foot for making French tucks
hi, I have one for my singer, it's a ruffler attachment
I believe it looks like a gathering foot that I have for my machine. Mine is definitely a newer machine but it sure looks a lot like it.
Can you tell how the fabric is located with respect to the foot? When I was younger, I had a sewing maching that was straight stitch only. It had a foot that looked similar the ruffler/pleater feet out there. But the foot fed the fabric and moved the fabric left and right to create a zig-zag stitch. It was the only way my sewing machine could do a zig-zag stitch.
I'm thinking that is what your foot might be.
I have a Singer 319 book that came with a sewing machine purchased in 1953 and the part looks very much like this part. It is a ruffler and pleater.
I know exactly what it is, I have one with my Singer Featherweight machine that I got in 1942. I is a ruffle attachment. For the life of me tho I can not remember if you had to attatch a smooth plate to machine before you put the attachment on. I made many many things with ruffels when I was in high school and I don`t know what I would have done without it. Guess I will have it get it out and check on it, I haven`t used that machine in years, I have one of the newer models now, and at my age no longer wear many ruffels.
Well, well, well, this sewing foot finally surfaces. I thought I was one of few that had this heavy sewing machine foot, but look at this I am not. This is a ruffling/gathering foot. I remember my mother would make us girls our Sunday go to meeting dresses and boy did we have some pleats, skinny pleat, wide pleat dresses and skirts. It sure is good to see this foot talked about. Would you please give us a how to use demo on this foot, and where can I get this foot repaired.
Could this be a Singer Sewing Machine ruffler. It looks like one that my grandmother used to use with her old treadle Singer. Good luck !!
what you have look like a ruffler foot but it isn't. It is just a sophisticated gathering foot which you can adjust its fullness by turning the knob at the back. the available gathering foot in the market are just simple design foot that have standard amount fullness.ambe
I have this foot! I bought it back in the 8O's to gather on my Adler sewing machine (old!), cost me $10 by mail order. I haven't used it since, plus the machine quit working. I've bought 2 other machines since then and I don't think it fits, but haven't the need to use the ruffler/gatherer/pleater attatchment either. I think I still have the instructions, too!
This novelty foot is to make a zig zag stitch with a straight stitch sewing machine. This attachment actually moves the fabric itself in a zig zag motion.
The ruffler or gatherer has an arm coming down from the bar that attaches to the needle that will "push" the adjusted amount of fabric through the foot to ruffle or pleat it. I only see plates to move the fabric back and forth, not backward.
This novelty attachment is to make a zig zag stitch with a straight stitch sewing machine. This attachment actually moves the fabric in a zig zag motion.
The ruffler/gather foot had a curved arm coming down from the arm that hooks into the needle screw. This arm would push the top fabric under the presser foot as you sewed causing a gather or pleat. I do not see any thing here that could push the fabric under the foot. However, I do see the two plates that would move the fabric, causing a zigzag.
It looks to me like a zig zag attachment for sewing machine. It moves the fabric but not the needle.
i have this foot it is called a tucker it is from a kenmore sewing machine that use to belong to my husbands grandmother and when she died i got the machine .it still work .i have never used it.i just have it it is very old .i still have the book for the machine looks like the one you have .it very neet looking.in the book it shows how it tucks.it almost looks like
it does thos tiny tucks on blouses or on babys dresses
grandam
I think this is a foot for attaching elastic on clothing such as a waistband or swimsuit. You would insert the elastic thru the rectangular hole in the foot. The foot can be adjusted for how much to stretch the elastic while being sewn to the fabric!
This is a zig zag adapter foot, for the old straight stitch only machines. The foot moves the fabric to form the zig zag stitch.
I think the foot looks like a "walking foot, a very old type though.
Yes it is a ruffler foot. makes great ruffles. I have one and love it..
I hope you'll all visit my new blog, "Mystery Foot Revealed" which explains what I learned about this foot--thanks to the assistance of many of you!
Thanks so much for all of your comments.
April Mohr
This is a Chadwick Zigzagger attachment...
They are sold on ebay from time to time. Take a look:
Have you check with the manufacturer of the sewing machine?
I didnt read them all, but it looks exactly like my Ruby RS-type automatic zigzagger, and I would like to know how to use it. I have attached it & can sew, but is it any good at finishing knit edges? it just does a plain zig zag; that is, a lightning-bolt shaped stitch.
I have a Chadwick Zigzagger Part# 4582 and have the orginal box and instructions and its for sale. The part shows that it will do four different zigzag.
i stumbled onto this site looking for a zig zag attachment and found your mystery foot. later i saw the same attachment here :edsmum.wordpress.com/category/attachment-reviews.
it is a generic zip zag w/out the joining plate as pixed at the site
hope that helps
I know this is years later, but I want to add that this is a zigzag foot for making zigzag stitches on a straight stitch machine like a Featherweight. It is not a ruffler or pleating foot.
It is a Ruffler and Pleater, I have the book Directions on the care and use of Rotary Sewing Machines from the 1930's and it is in that book, wish I could post the picture and instructions for use but can't figure out how to post pictures. There are many wierd and wonderful attachment instructions in it. Let me know if you know how I can post pictures or would like a copy of the book.